
Imagine you work for NASA and are building a rocket for space travel. You, as the main developer of the rocket launch program, are responsible for the precision of the rocket launch angle. Of course, the necessary calculations are numerous and complex. After calculating the launch angle, for example, you have to complete many other interrelated calculations. Let’s say that on the day of the rocket launch, the rocket tragically crashes because there was a shift in the launch angle. You then discover that the code for the launch angle changed because of another calculation code.
From the scenario above, we can understand that the logic of the code we create (in this case, the launch angle calculation) can change—without our knowledge—when another code is added. This can have a major impact, and can even be fatal. But of course, the rocket crash could have been prevented if you had added tests to the code.
Likewise, in software development, you need to do software testing to avoid programs that do not match your requirements. In this post, we’ll discuss software testing and its benefits, unit testing in iOS development using XCTest, and how to write a UI test. You will also learn how to show code coverage in your XCode project.
Software Testing
Software testing is a way to check whether the software product that you make meets your product’s requirements and is not defective.
Unit testing is a series of software tests carried out on certain units. The unit referred to here is the smallest unit component that can stand alone in your code. Writing unit test code has many advantages, including:
- Saves you time and money on bug fixes in the long run when used early in the product development cycle
- Allows developers to quickly make changes by helping them understand the code base
- Serves as project documentation
- Significantly helps with the reuse of code in new projects
Another type of software testing is test-driven development (TDD), a development approach that combines test-first development and refactoring. In other words, test cases for each component are initially written and tested, and if the test fails, new code is written to pass the test, resulting in clean, bug-free code. Because TDD requires an entirely different approach than most people are familiar with (we usually write unit tests after software development), there is a steep learning curve and it can be hard to implement. Still, it’s possible.
As we understand so far, tests in code will help ensure that business logic is successful and suits your requirements. However, remember that doing a lot of tests doesn’t necessarily ensure good results. Instead, it’s better to increase the code coverage of the tests that you create.
Unit Testing in iOS
Now that we’ve reviewed what a unit test is, let’s discuss how to write one. To get started, you first need to know what to test. The most crucial thing to test is the part of the code that you plan to change due to the addition of new features.
In general, a test should cover the following topics:
- Core functionality: model classes, methods, and interactions of methods with the controller
- The most common UI workflows
- Corner cases
- Fixes for bugs
Understanding the XCTest Framework
XCTest is a framework for creating and executing unit tests, performance tests, and UI tests. It integrates seamlessly with the XCode testing workflow.
To write a test, you’ll need to define test cases using XCTestCase. A test case is a series of associated test methods, including optional setup and teardown functions, before and after the tests. Setup allows you to define the initial state of a test case before it starts. Teardown allows you to clean up whenever the test case has finished.
A test function is a short, self-contained function for testing a specific section of your code. Tests assert that specific criteria are met during execution. If they aren't, test failures (with optional messages) are recorded.
We use the XCTAssert function to assert that a value of expression satisfies our test requirements. There are several variations of the XCTAssert function, including XCTAssertTrue or XCTAssertFalse (for boolean assertion) and XCTAssertEqual and XCTAssertNotEqual (to check whether two values are equal). You can read more about test assertion functions here.
Tests can also examine performance regressions by analyzing the efficiency of code blocks and can interact with an application's UI to verify user interaction flows. You can use XCUIElementQuery to perform a query to locate UI elements (XCUIElement) on the screen. Gesture actions such as tapping, long pressing, swiping, pinching, and rotating are available in XCUIElement.
Understanding the Sample Project
In this post, we’ll show you how to write a unit test using this sample project. The project is a simple game, where you have to correctly enter the number that completes the displayed mathematical equation.
To familiarize yourself with the game, run the application and give it a try. As you’ll see, when you press the + button, the number displayed on the screen (your answer) will increase by one. When you press the - button, the number will decrease by one. When the equation is correct, the color on the screen will turn green; otherwise it will be yellow. Press the reset button to generate a new equation.
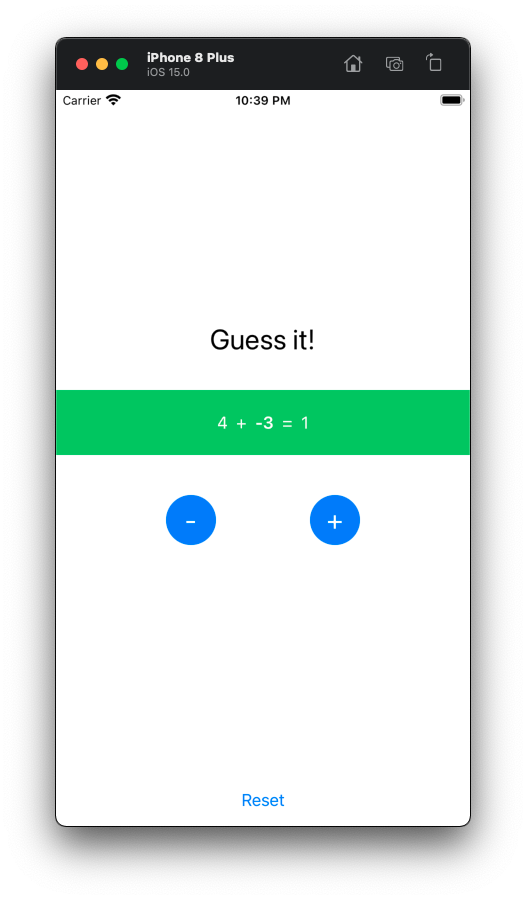
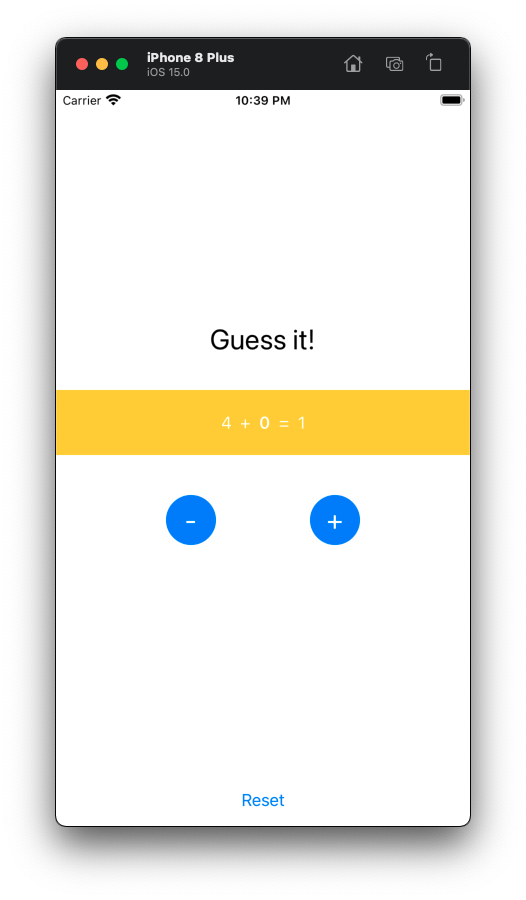
Figure 1: Application user interface
For this game, we will create a unit test for ContentViewViewModel. Our view model will have four states that will be consumed by our view. bgColor holds the value for the background color of the equation (yellow or green). The first three states are the ones that are needed to hold the equation value.
Here is the formula for the equation:
givenValue + guessValue = expectValue

Figure 2: State and equation mapping
The function defined in the view model will be used by the view interactor (+ button, - button, and reset button). The buttonLimit function will return true when the guess value has reached an upper or lower limit. This function will be chained to the buttonBackground function, which will turn the button color gray and disable the button action when the limit is reached. Otherwise, it will change the button color to blue and enable the button action.
The buttonPressed function will increase or decrease the guessValue. The resetButtonPressed function will reset the state value with a new random number. The checkResult function will change the bgColor state to green when the equation is correct; otherwise it will turn the background color yellow.
class ContentViewViewModel: ObservableObject {
    @Published var givenValue: Int = Int.random(in: 1...10)
    @Published var guessValue: Int = 0
    @Published var expectValue: Int = Int.random(in: 1...10)

    @Published var bgColor: Color?
}

extension ContentViewViewModel {
    func checkResult() {
        if (expectValue == guessValue + givenValue) {
            bgColor = Color.green
        } else {
            bgColor = Color.yellow
        }
    }

    func minusButtonLimit() -> Bool {
        return guessValue < -10
    }

    func minusButtonBackground() -> Color {
        return minusButtonLimit() ? Color.gray : Color.blue
    }

    func minusButtonPressed() {
        guessValue = guessValue - 1
        checkResult()
    }

    func plusButtonLimit() -> Bool {
        return guessValue > 10
    }

    func plusButtonBackground() -> Color {
        return plusButtonLimit() ? Color.gray : Color.blue
    }

    func plusButtonPressed() {
        guessValue = guessValue + 1
        checkResult()
    }

    func resetButtonPressed() {
        guessValue = 0
        givenValue = Int.random(in: 0...10)
        expectValue = Int.random(in: 0...10)
        checkResult()
    }
}
Creating Unit Test Cases and Functions
Now you’re ready to create your unit test. XCode has a test navigator that is very helpful in managing the test code that you create. To access the test navigator, use the Cmd+6 shortcut. After that, click the + sign in the lower left corner to create a new unit test target. Accept the default name and click Next.
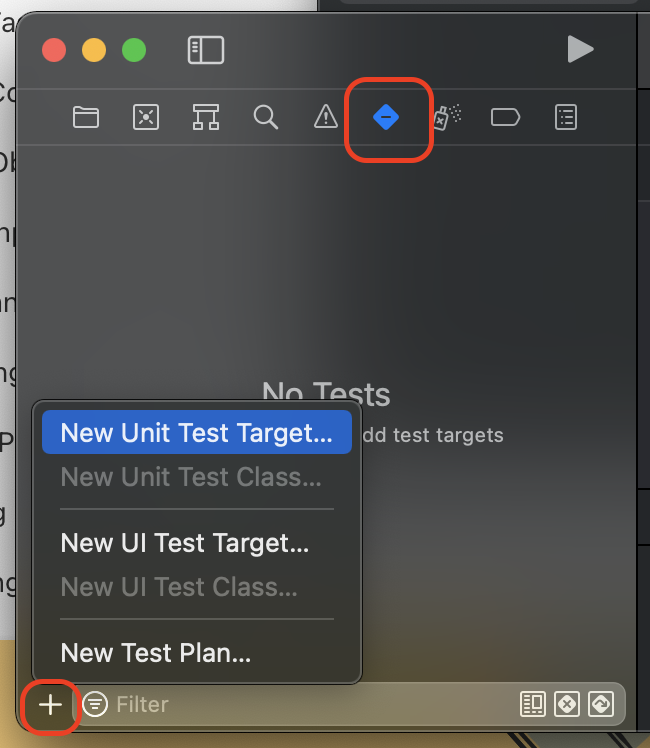
Figure 3: Create new unit test target
Now check that the test bundle shows up in the test navigator once you've added the target. When you open DemoTests, you’ll see an example of the unit test that has been generated. You can see DemoTests as a subclass of XCTestCase. Our DemoTests has the functions setUpWithError() and tearDownWithError().
You can run this unit test in three ways:
- In the menu bar, select
Product->Testor use theCmd-Ushortcut. This method will run all unit tests registered in the project. - Press the arrow buttons on the test navigator (blue color). This will run all the tests registered in the corresponding file.
- Press the diamond symbol in the editor (yellow color). This will run all the tests in the selected class.
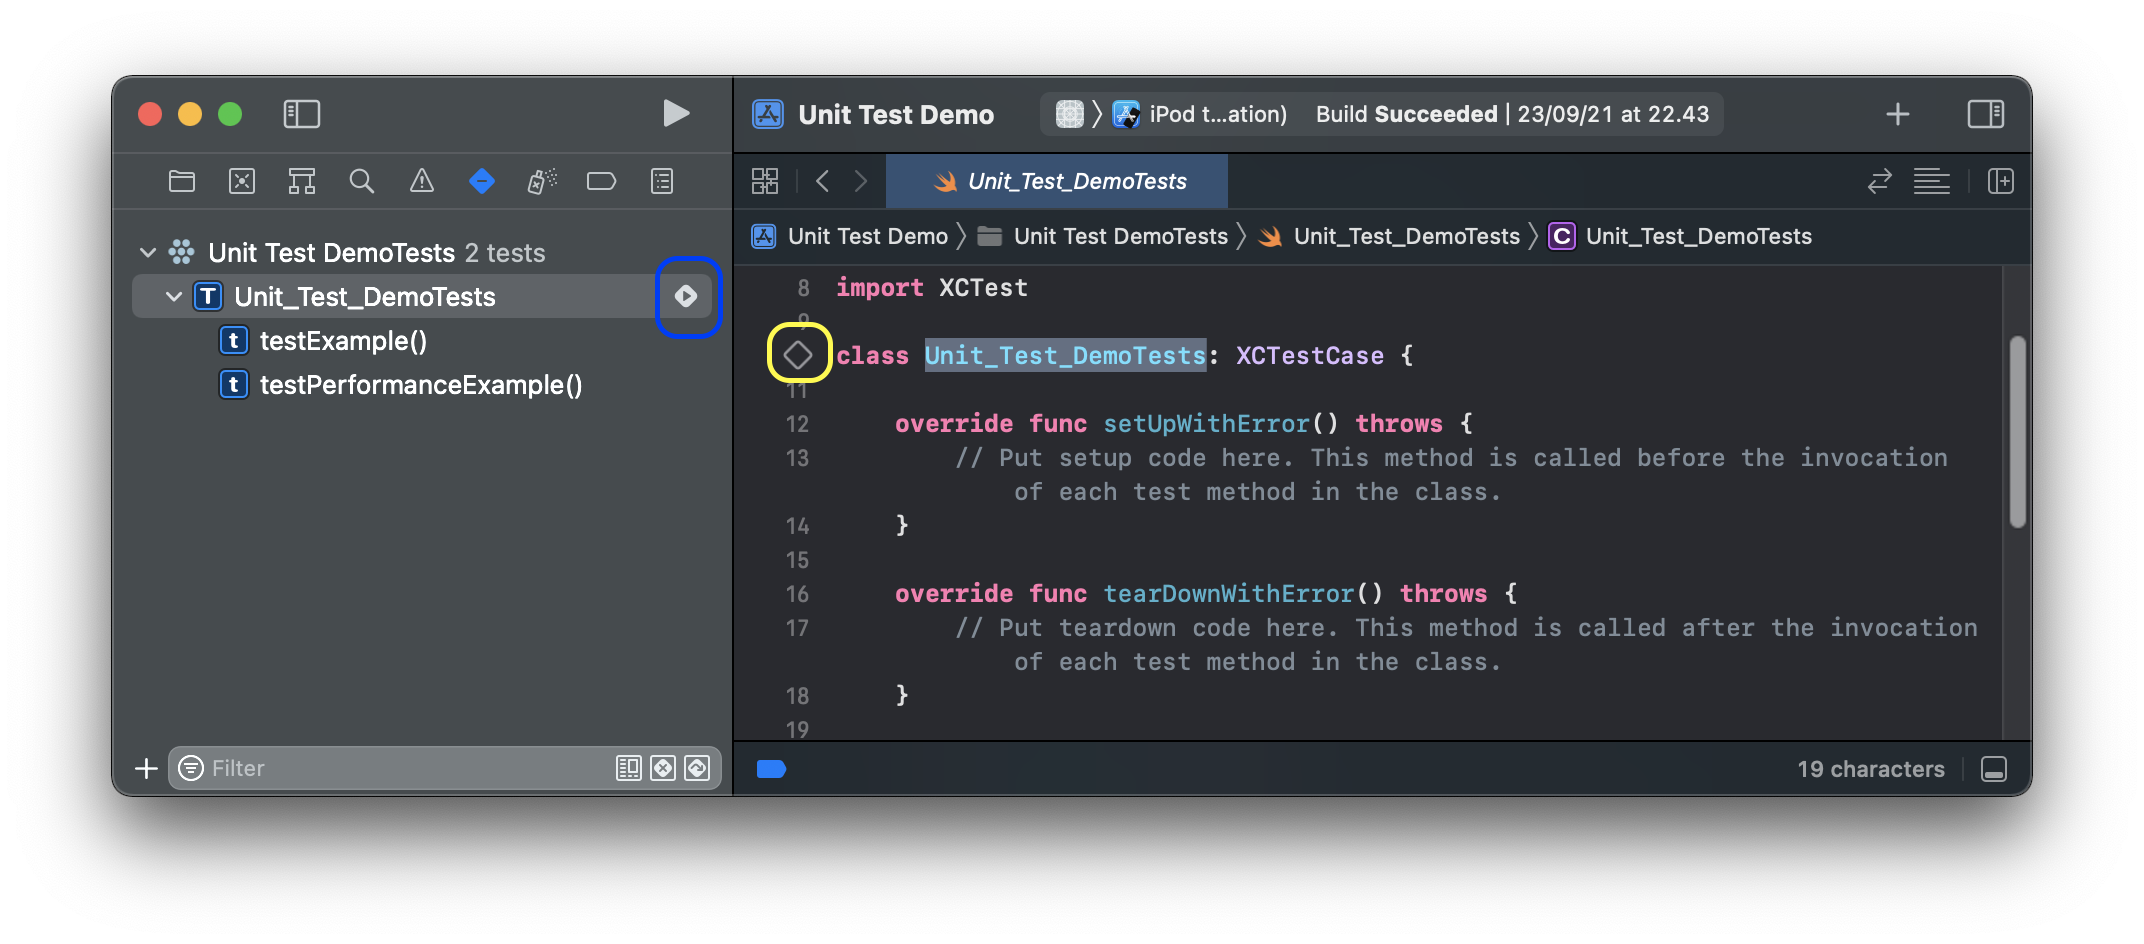
Figure 4: Generated test bundle
The class that we’re going to write the test for is ContentViewViewModel. You’ll need to import SwiftUI because we’ll use it as our UI framework. Also, to gain access to internal types and functions and to add testable annotation when importing Demo projects, add the following code:
import XCTest
// Add the following import statement:
import SwiftUI
@testable import Demo
Inside the DemoTests body, add your SUT (system under test) object. SUT refers to the object that is currently being tested. You can write your own naming, but we will use the following for consistency:
var sut: ContentViewViewModel!
The contents of setUpWithError() will then be replaced with the SUT object's initialization.
override func setUpWithError() throws {
    try super.setUpWithError()
    sut = ContentViewViewModel()
}
You also need to replace the contents of tearDownWithError() to release the SUT object. To guarantee that every test runs in a clean state, it’s recommended to construct a SUT object in setUpWsithError() and release it in tearDownWithError().
override func tearDownWithError() throws {
    sut = nil
    try super.tearDownWithError()
}
Now let's write a test for the minusButtonLimit function. A test function name is always preceded by the word test and is generally followed by a summary about what it tests. In this case, it’s best to split the test into three segments: given, when, and then:
- Given: In most cases, the value required must be provided in the “when” section.
- When: This is where you will run the program being tested.
- Then: This is where you will assert the outcome of the “when” section.
The minusButtonLimit function returns true if the guess value is less than -10; otherwise it will return false. This is a helper function to enable or disable the - button state. So, to assert that minusButtonLimit will return true, set the guessValue to -15. To assert that it will return false, set it to 5. We will use XCTAssertFalse to make the false assertion of the return value from minusButtonLimit and XCTAssertTrue to make the true assertion.
This is the function that you are going to test:
// Function to test
func minusButtonLimit() -> Bool {
    return guessValue < -10
}
This is the unit test based on minusButtonLimit function:
// Unit test function
func testMinusButtonLimitReturnFalse() throws {
    // Given
    sut.guessValue = -15

    // When
    let result = sut.minusButtonLimit()

    // Then
    XCTAssertFalse(result)
}

func testMinusButtonLimitReturnTrue() throws {
    // Given
    sut.guessValue = 5

    // When
    let result = sut.minusButtonLimit()

    // Then
    XCTAssertTrue(result)
}
Voilà, you just made your first unit test! Now you can try to run it. You should see a temporary pop-up, as follows:
Figure 5: Pop-up showing that the unit test succeeded
Now, let's refactor our unit test function to use random testing. Random testing is a technique in which programs are tested by generating random independent inputs to avoid biased testing. To cover more cases of guess value, we will enter a random number that satisfies the function and check to see if our function will still return the correct value if it’s within the random range. Within the -10 to 0 range, the function should return false. Within the -20 to -9 range, the function should return true.
You can also add a test case for the minusButtonBackground function, which will change the button color to gray if the minusButtonLimit function returns true value, Otherwise, it will change the button color to blue. The test function for minusButtonBackground will be put on the same test case function as minusButtonLimit. We will use XCTAssertEqual to assert that the function will return Color.blue or Color.gray.
The refactored unit test will become:
func testMinusButtonLimitReturnFalseAndBlueBackground() throws {
    // Given
    sut.guessValue = Int.random(in: -10 ..< 0)

    // When
    let result = sut.minusButtonLimit()
    let background = sut.minusButtonBackground()

    // Then
    XCTAssertFalse(result)
    XCTAssertEqual(background, Color.blue)
}

func testMinusButtonLimitReturnTrueAndGrayBackground() throws {
    // Given
    sut.guessValue = Int.random(in: -20 ..< -10)

    // When
    let result = sut.minusButtonLimit()
    let background = sut.minusButtonBackground()

    // Then
    XCTAssertTrue(result)
    XCTAssertEqual(background, Color.gray)
}
Showing Code Coverage
Code coverage is a tool that shows you which part of your application code is not tested (at least, not yet). Unit testing is well known for improving the quality and reliability of any software deployment. However, it is impossible to assess how well a unit evaluates your code and how many tests are sufficient. Code coverage measures may help with these issues.
The coverage metric also helps with avoiding test entropy. When code goes through numerous release cycles, there is a risk of unit test atrophy. As new code is introduced, it may fail to fulfill the same testing requirements that you specified when the project was originally delivered. Monitoring code coverage can help you keep your testing up to date.
To enable code coverage in XCode, click on Edit Scheme. Then click on Test action and open the Options tab. Now check the Code Coverage section. After enabling code coverage, re-run the test to see your project’s code coverage.
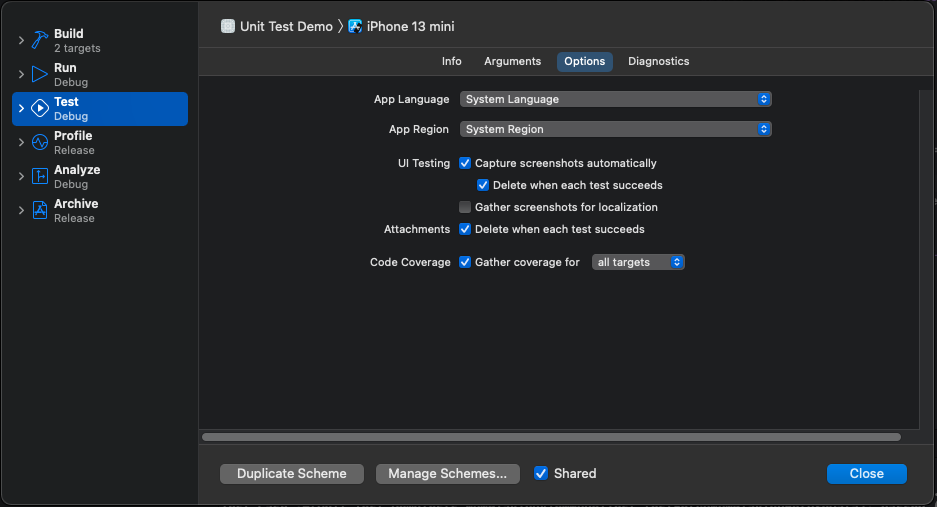
Figure 6: Enabling code coverage in project
UI Testing
UI testing allows you to confirm that the user interface of your application is behaving according to your requirements. It works by finding application UI objects, synthesizing events, and sending those events to interact with objects. The process for creating a UI test is the same as for creating a unit test target, but you create a UI test target instead.
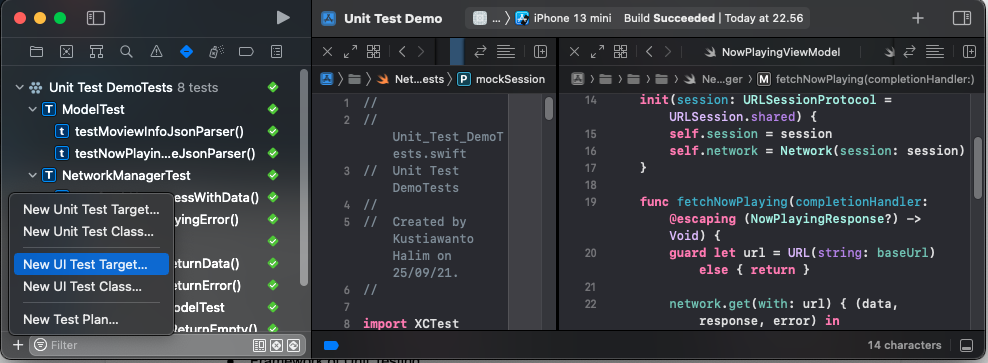
Figure 7: Create new UI test target
To start writing your UI test, open DemoUITests.swift. You are adding an app property at the top of the class body. The app will act as the SUT. The next step is the same as when you created a unit test: Implement a setup and teardown function.
After that, your code will look like this:
class DemoUITests: XCTestCase {

    var app: XCUIApplication!

    override func setUpWithError() throws {
        try super.setUpWithError()
        continueAfterFailure = false
        app = XCUIApplication()
        app.launch()
    }

    override func tearDownWithError() throws {
        app = nil
        try super.tearDownWithError()
    }
}
Your application will change the equation text whenever the user clicks on the + or - buttons. To make sure the label displaying the equation changes when the user clicks on the button, verify it using a UI test.
The XCUIApplication object has the XCUIElement property that can be used to access UI elements on the screen. We will use staticTexts to find Text elements and buttons to find Button elements. To find the equation Text label (the displayed text), we will use app.staticTexts.element(boundBy: 1).label.
staticTexts.element(boundBy: 1) will find the second Text element displayed on the screen (because the first element is “Guess It!”). To find the + button, use app.buttons["+"].
Look at the following image to understand the element on the screen:
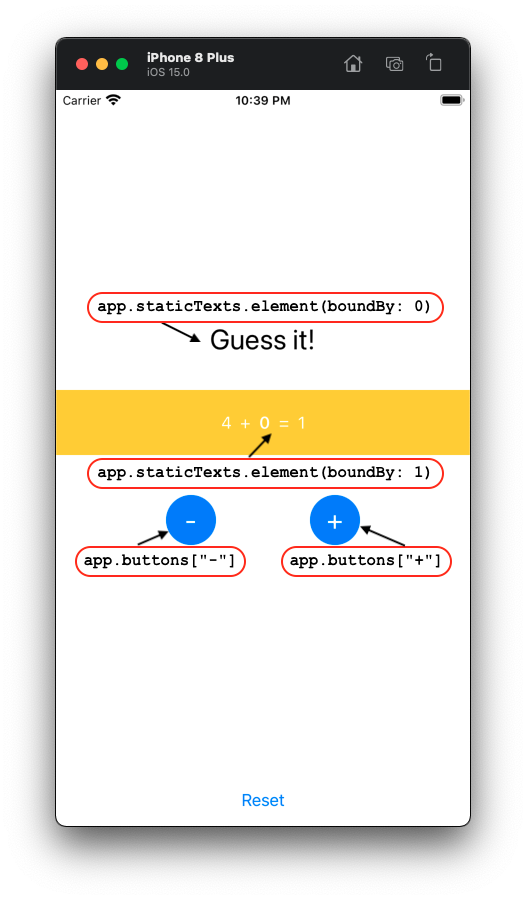
Figure 8: UI element on the application
Your UI test will use the given, when, and then pattern. In the given section, set the equation Text label before you press the button. The action (when) performed is tapping the + or - button, indicated by calling the .tap() function on the button element. Assert that the label displayed before and after the user clicks the button is not equal (by using the XCTAssertNotEqual function). Now try to run the UI test and you’ll see the action performed.
func testPlusButtonChangeLabel() throws {
    // Given
    let previousText = app.staticTexts.element(boundBy: 1).label

    // When
    app.buttons["+"].tap()

    // Then
    XCTAssertNotEqual(previousText, app.staticTexts.element(boundBy: 1).label)
}

func testMinusButtonChangeLabel() throws {
    // Given
    let previousText = app.staticTexts.element(boundBy: 1).label

    // When
    app.buttons["-"].tap()

    // Then
    XCTAssertNotEqual(previousText, app.staticTexts.element(boundBy: 1).label)
}
Conclusion
Writing tests for your application is time consuming, but worth it. Of course, we recommend ensuring code quality as early as possible before your application release, as fixing bugs is more costly over time. Still, testing doesn’t always guarantee bug-free software.
That’s where we can help. Shipbook helps you improve the code quality of the software you are developing, giving you the power to remotely gather, search, and analyze your user mobile-app logs and crashes in the cloud, on a per-user and session basis. This will allow you to easily analyze relevant data—and fix bugs faster.