11 posts tagged with "swift"

View All Tags

· 6 min read
Nikita Lazarev-Zubov

Debugging SwiftUI Views Redraws

When SwiftUI was introduced by Apple as a substitution to the old-fashioned UIKit in 2019, it immediately became a hit. Developers love that SwiftUI requires far less code to implement a user interface than the hundreds of lines of code necessitated in UIKit. However, as often happens, this new technology presented programmers with a steep learning curve. An initial lack of unambiguous documentation added fuel to the fire, leading developers to exchange their sometimes-frustrating experiences in communities like Stack Overflow.

Challenges Posed by SwiftUI

The reason for the initial confusion of SwiftUI adopters is that SwiftUI doesn’t follow common imperative principles of UIKit. In UIKit, we need to manually implement all view events and handlers of those events, and describe how views are rendered. But in SwiftUI, views are built on declarative principles: Using a concise DSL, we describe what views look like. The how part is left to the system.

SwiftUI views are value types; they don’t store any state and don’t need the developer to implement transitions between states. Instead, they have an identity. Since views are implemented with structs, changing their identity means that the old value is destroyed and the new value is created as a substitution. At this point, the SwiftUI engine redraws the view.

Taking both performance and user interface smoothness into consideration, Apple implemented SwiftUI in such a way that it doesn’t redraw everything at once. The engine isolates only those views with changed identities, and redraws them according to the rules we describe (e.g., animation.) Now, keeping in mind that views are composable, and that every element inside a view is a view itself, view redrawing and animation might not work exactly as we would expect.

Troubleshooting SwiftUI is often a challenge. To understand what happens under the hood, we need debugging. But how does debugging work in a value-oriented environment, where no state is ever preserved? Let’s see how SwiftUI views can be debugged using an example.

Problematic View Example

Let’s start with a simple view with just a couple of text labels, one of which is animated:

struct ContentView: View {


var body: some View {
VStack(spacing: 10.0) {
Text("Your score is")
.scaleEffect(isTitleScaling ? 1.2 : 1.0)
.rotationEffect(
Angle(degrees: isTitleRotating
? .random(in: -10.0...0.0)
: .random(in: 0.0...10.0))
)
Text("\(score)")
}
.onAppear {
withAnimation(
.easeInOut(duration: 0.5).delay(0.1).repeatForever()
) { isTitleScaling.toggle() }
withAnimation(
.easeInOut(duration: 1.0).delay(0.2).repeatForever()
) { isTitleRotating.toggle() }
}
}
private let score: Int
@State private var isTitleRotating = true
@State private var isTitleScaling = true

init(score: Int) {
self.score = score
}

}

This is what it looks like:

A simple view with animation

Figure 1: A simple view with animation

For now, it looks as expected. However, if we make it dynamic by updating score from an outside source, things immediately go south:

Broken animation in a dynamic view

Figure 2: Broken animation in a dynamic view

The animation becomes choppy and breaks when the score number is changed. Here’s the changed version of the view for comparison:

struct ContentView: View {
var body: some View {
VStack(spacing: 10.0) {
Text("Your score is")
.scaleEffect(isTitleScaling ? 1.2 : 1.0)
.rotationEffect(
Angle(degrees: isTitleRotating
? .random(in: -10.0...0.0)
: .random(in: 0.0...10.0))
)
Text("\(viewModel.score)")
}
.onAppear {
withAnimation(
.easeInOut(duration: 0.5).delay(0.1).repeatForever()
) { isTitleScaling.toggle() }
withAnimation(
.easeInOut(duration: 1.0).delay(0.2).repeatForever()
) { isTitleRotating.toggle() }
}
}
@State private var isTitleRotating = true
@State private var isTitleScaling = true
@StateObject private var viewModel = ContentViewModel()
}

The only changed thing is the source of the score text, which is now a @Published property of a view model:

final class ContentViewModel: ObservableObject {
@Published private(set) var score = 0
}

The initial source of the score value changes can be anything: a real time game update, a received response from a remote API, etc.

Let’s try to find the cause of the bug and fix it.

Debugging a View

One of the first things that come to mind when someone mentions debugging is breakpoints. We can go that route and simply put a breakpoint inside the body property. The next time that the ContentView’s identity is changed (i.e., any of its properties receives a new value, and the view is re-created), a redraw is invoked and the breakpoint is triggered. But what good is that?

Apple let slip information about a private static method _printChanges() that prints the reason for the last redraw. To use it, while on the breakpoint, type po Self._printChanges() (mind the Self part, since it’s a static method) in the LLDB console, and it will print out something like “ContentView: _score changed.” Voilà, now we know the reason that the view was redrawn!

Apparently, the timer—being a part of the entire view—triggers a redraw of the entire view, not just the text with the score count. To fix that, we can extract the animated text into a separate view, leaving the score count and its timer on their own:

struct ContentView: View {

var body: some View {
VStack(spacing: 10.0) {
ScoreTitle()
Text("\(viewModel.score)")
}
}
@StateObject private var viewModel = ContentViewModel()

private struct ScoreTitle: View {

var body: some View {
Text("Your score is")
.scaleEffect(isTitleScaling ? 1.2 : 1.0)
.rotationEffect(
Angle(degrees: isTitleRotating
? .random(in: -10.0...0.0)
: .random(in: 0.0...10.0))
)
.onAppear {
withAnimation(
.easeInOut(duration: 0.5).delay(0.1).repeatForever()
) { isTitleScaling.toggle() }
withAnimation(
.easeInOut(duration: 1.0).delay(0.2).repeatForever()
) { isTitleRotating.toggle() }
}
}
@State private var isTitleRotating = true
@State private var isTitleScaling = true

}

}

The fix works just fine:

Fixed animation together with a dynamic view

Figure 3: Fixed animation together with a dynamic view

Logging Redraw Triggers

Unfortunately, if we need to log changes of properties of a dynamic view, the debugger can’t help us. However, SwiftUI provides us with a view modifier onChange(of:perform:) that can be added to a view to track changes of any SwiftUI view property. Here’s an example that uses the Shipbook syntax:

.onChange(of: score) {
Log.d("New score is \($0)")
}

Conclusion

SwiftUI introduced a brand new mindset to building UI on Apple platforms, and learning it is not always easy. While implementing complex views, even an experienced developer might stumble and encounter confusing problems. To avoid unexpected behavior in as many cases as possible, always try to make your views small. This will enable you to reuse them more easily, and will help avoid bugs and failures.

When dealing with dynamic views, it’s even more vital to avoid introducing unwanted view redraws. Properties that trigger updates should affect only the views they change. When implementing animations, it’s always safer to make an animated view a separate SwiftUI View.

While troubleshooting unexpected behavior, the _printChanges method might prove useful. However, for logging purposes, SwiftUI’s view modifier onChanged is the best choice. It’s the perfect place to track changes of observable properties and log them remotely using Shipbook.

· 7 min read
Nikita Lazarev-Zubov

State Restoration in SwiftUI

Many mobile applications base their work on quick user actions: Open the app, do something quickly, close it, and forget about it for a while. Others apps, though, have a more ambitious goal: to become a handy companion to the user. The user stores valuable information in that app, and comes back to it on a regular basis.

When dealing with the applications in the second category, you would usually expect a better-than-average user experience. Specifically, you want the app’s state to be preserved across its launches. But unfortunately, that’s not a default behavior in iOS. Apple’s mobile operating system pursues principles of effective utilization of device resources, and when an application is closed by the user, the system might terminate it any moment in order to free up memory for another application that is currently in use. When it happens, all data that wasn’t explicitly saved on disk is gone.

Let’s look at how we as developers can walk an extra mile in order to provide our users with a better experience by retaining app data.

Traditional Methods

The UI of an app can be determined by flags or stored values that indicate one state or another. In the case of basic types—for instance, user preferences—you can use UserDefaults. This is a lightweight, key-value database provided by iOS to every application on a given device. It’s simple to use:

    UserDefaults.standard.set("Yellow", forKey: "Background")

For a larger quantity of data, you can save the data directly in a file in one of the standard folders at the app’s disposal: the documents directory, the temporary directory, or similar. The syntax is more complicated in this case, because you need to manually decode values into data, and write the latter to a file on disk. For example:

    let folderURL = FileManager
.default
.urls(for: .documentDirectory, in: .userDomainMask)[0]
let fileURL = folderURL.appendingPathComponent("Data")

let string = "I want to store this string"
try string.write(to: fileURL,
atomically: true,
encoding: .utf8)

State Preservation in UIKit

For UIKit’s view controllers, Apple gave us an app state preservation and restoration API, which includes several steps:

  1. The functionality must be enabled in the AppDelegate:

    func application(
    _ application: UIApplication,
    shouldSaveSecureApplicationState coder: NSCoder
    ) -> Bool {
    return true
    }
    func application(
    _ application: UIApplication,
    shouldRestoreSecureApplicationState coder: NSCoder
    ) -> Bool {
    return true
    }
  2. Every restorable view controller must be assigned a restoration ID in Storyboard or in code.

  3. Encoding and decoding of necessary data must be implemented in restorable view controllers:

    override func encodeRestorableState(with coder: NSCoder) {
    super.encodeRestorableState(with: coder)
    // Save data.
    }
    override func decodeRestorableState(with coder: NSCoder) {
    super.decodeRestorableState(with: coder)
    // Restore data.
    }

This is, of course, a simplified overview. In real-world applications, using this API requires significantly more code, which is in line with the overall imperative style of UIKit programming.

The SwiftUI Method

Let’s see whether the modern SwiftUI interface offers something friendlier.

AppStorage

Everything said about UserDefaults and file storage above is, of course, true for SwiftUI apps, too. To simplify the usage of the former, SwiftUI has a dedicated property wrapper: @AppStorage. This wrapper can be added to any property, and it will automatically reflect a value from UserDefaults. In the example below, background always returns the value stored in UserDefaults by the “Background” key, or the default value—“Yellow,” if there’s no key with such name:

    @AppStorage("Background")
var background = "Yellow"

As you may have guessed, assigning a new value to the property also stores it as a new value for the “Background” key. As the icing on the cake, changing the backing stored value invalidates the view, so @AppStorage properties—similar to in the case of @State—are observable.

SceneStorage

As mentioned earlier, UI state preservation is a good practice in achieving a better user experience, however, it’s not critical to the app’s functionality. SwiftUI’s solution, the @SceneStorage property wrapper, is effective but lightweight, and thus is not supposed to be 100% reliable. We’ll come back to the limitations later, but first, let’s look at how it can be used.

@SceneStorage works similarly to @AppStorage with one important difference: The values it stores are only available to the current scene, and thus, the former is more suitable for storing data related directly to the UI of the application. Therefore, this is exactly what we need to implement state preservation in SwiftUI.

Its syntax and usage are straightforward: Just add the wrapper to any view property that needs preservation:

    @SceneStorage("Background")
var background = "Yellow"

In the example above, after view initialization, the value of the background property will be equal to its last value before the application was closed last time. This means that the system preserves the last value across app launches.

Limitations of SceneStorage

Storage keys ("Background," in the example above,) however, require attention. To avoid unexpected bugs, they must be unique across the app scene. Additionally, if you reuse your views, keys should be also unique to each view instance, otherwise the instances will share the same stored value.

This solution’s power is not limitless. It only supports a short list of types, namely Bool, Int, Double, String, URL, and Data. If you need to save any custom type, you should use some other storage technique.

You can, of course, encode anything to Data and still use @SceneStorage, but Apple explicitly warns us against doing that, and against storing anything large in general. The reason is that storing and restoring happens inside a view, and large values may result in a poor performance of the view.

From that limitation, another caveat follows: If you need to preserve something more complicated than a number or string—for example, a navigation path to open a specific screen—you must implement your own logic on how to encode and decode such values. This bears an unfortunate similarity to the “old” ways.

And finally, as the property wrapper’s name suggests, stored values are only accessible within a single scene. There are a couple of implications to this:

  1. If your application supports multiple scenes, each of them has its own dedicated storage which is not shared with other scenes. To share or pass data between scenes, something else would need to be implemented, for example, NSUserActivity.
  2. If the corresponding scene is destroyed (when, for example, the user removed it from the switcher snapshot on iPad, where the app may have multiple scenes,) the data is gone too. Thus, no sensitive or unrecoverable data should rely on the @SceneStorage property wrapper.

Evidently, this @SceneStorage method has a number of restrictions, but it still may come in handy in simple situations.

Conclusion

Old methods of preserving data to restore the state of an iOS application, although not particularly complicated, all rely on you to implement their particular logic and handle corner cases. Modern, SwiftUI-based APIs aim to achieve similar results, and they indeed appear simpler and more concise. However, they have similar limitations to the old methods, and require extra work in more complicated cases. I personally think that the current methods of state preservation in SwiftUI are just a start, and something even better awaits us in a future release of the iOS SDK.

Logging

In some cases you might want to log changes of preserved values to later analyze the state of the UI or to gather additional information necessary to nail a nasty bug. Unfortunately, neither the old method of UI state preservation nor the new one offer a means of doing that automatically. You need to track the change manually, e.g., within the onChange(of:perform:) SwiftUI view modifier, and pass it further to your log system. For example, Shipbook offers a simple in use yet powerful platform to gather your app logs remotely.

· 9 min read
Nikita Lazarev-Zubov

iOS Log

Logging is the process of collecting data about events occurring in a system. It’s an indispensable tool for identifying, investigating, and debugging incidents. Every software development platform has to offer a means of logging, and iOS is no exception.

Being a UNIX-like system, iOS supported the syslog standard from as long as iOS has been around (since 2007). In addition, from 2005 Apple System Log (ASL) has been supported by all Apple operating systems. However, ASL isn’t perfect: It has multiple APIs performing similar functions to one another; it stores logs in plain text, and it requires going deep into the file system to read them. It also doesn’t perform very well, because string processing happens mostly in real time. While ASL is still available, Apple deprecated it a few years ago in favor of an improved system.

Apple’s Unified Logging

In 2016, Apple presented its replacement for ASL, the OSLog framework, also known as unified logging. And “unified” is right: It has a simple and clean API for creating entries, and an efficient way of reading logs across all Apple platforms. It logs both kernel and user events, and lets you read them all in a single place.

Beyond its impressive efficiency and visual presentation, unified logging offers performance benefits. It stores data in a binary format, thus saving a lot of space. The notorious observer effect is mitigated by deferring all string processing work until log entries are actually displayed.

Let’s dive in and put unified logging to work.

Unified Logging in Depth

Writing and Reading Logs

The easiest way to create an entry using OSLog is to initialize a Logger instance and call its log method:

    import OSLog

let logger = Logger()
logger.log("Hello Shipbook!")

After running this small Swift program, the message "Hello Shipbook!" will appear in the Xcode debug output:

Xcode debug output

Figure 1: Xcode debug output

Since unified logging stores its data in binary format, reading that data requires special tools. This is why Apple introduced the brand new Console application alongside the framework. This is how the log message appears in Console:

The Console application for reading unified logging messages

Figure 2: The Console application for reading unified logging messages

As you can see, unified logging takes care of all relevant metadata for you: Human-readable timestamps, the corresponding process name, etc.

Another often underestimated way of reading logs is by means of the OSLog framework itself. The process is straightforward: You only need to have a specific instance of the OSLogStore class and a particular point in time that you’re interested in. For example, the code snippet below will print all log entries since the app launch:

    do {
let store = try OSLogStore(scope: .currentProcessIdentifier)
let position = store.position(timeIntervalSinceLatestBoot: 0)

let entries = try store.getEntries(at: position)
// Do something with retrieved log entries.
} catch {
// Handle possible disk reading errors.
}

This might be useful in testing, or for sending logs to your servers.

Log Levels

For grouping and filtering purposes, logs are usually separated into levels. The levels signify the severity of each entry. Unified logging supports five levels, with 1 being the least problematic and 5 being the most severe. Here’s the full list of supported levels and Apple’s recommendations for using them:

  1. The debug level is typically used for information that is useful while debugging. Log entries of this level are not stored to disk, and are displayed in Console only if enabled.
  2. The info level is used for non-essential information that might come in handy for debugging problems. By default, the log messages at this level are not persisted.
  3. The default level (also called notice level) is for logging information essential for troubleshooting potential errors. Starting from this level, messages are always persisted on disk.
  4. The error level is for logging process-level errors in your code.
  5. The fault level is intended for messages about unrecoverable errors, faults, and major bugs in your code.

Beyond their use in classifying error severity, log levels have an important impact on log processing: The higher the level, the more information the system gathers, and the higher the overhead. Debug messages produce negligible overhead, compared to the most critical (and supposedly rare) errors and faults.

Here’s how different levels can be used in code:

    logger.log(level: .debug, "I am a debug message")
logger.log(level: .info, "I am info")
logger.log(level: .default, "I am a notice")
logger.log(level: .error, "I am an error")
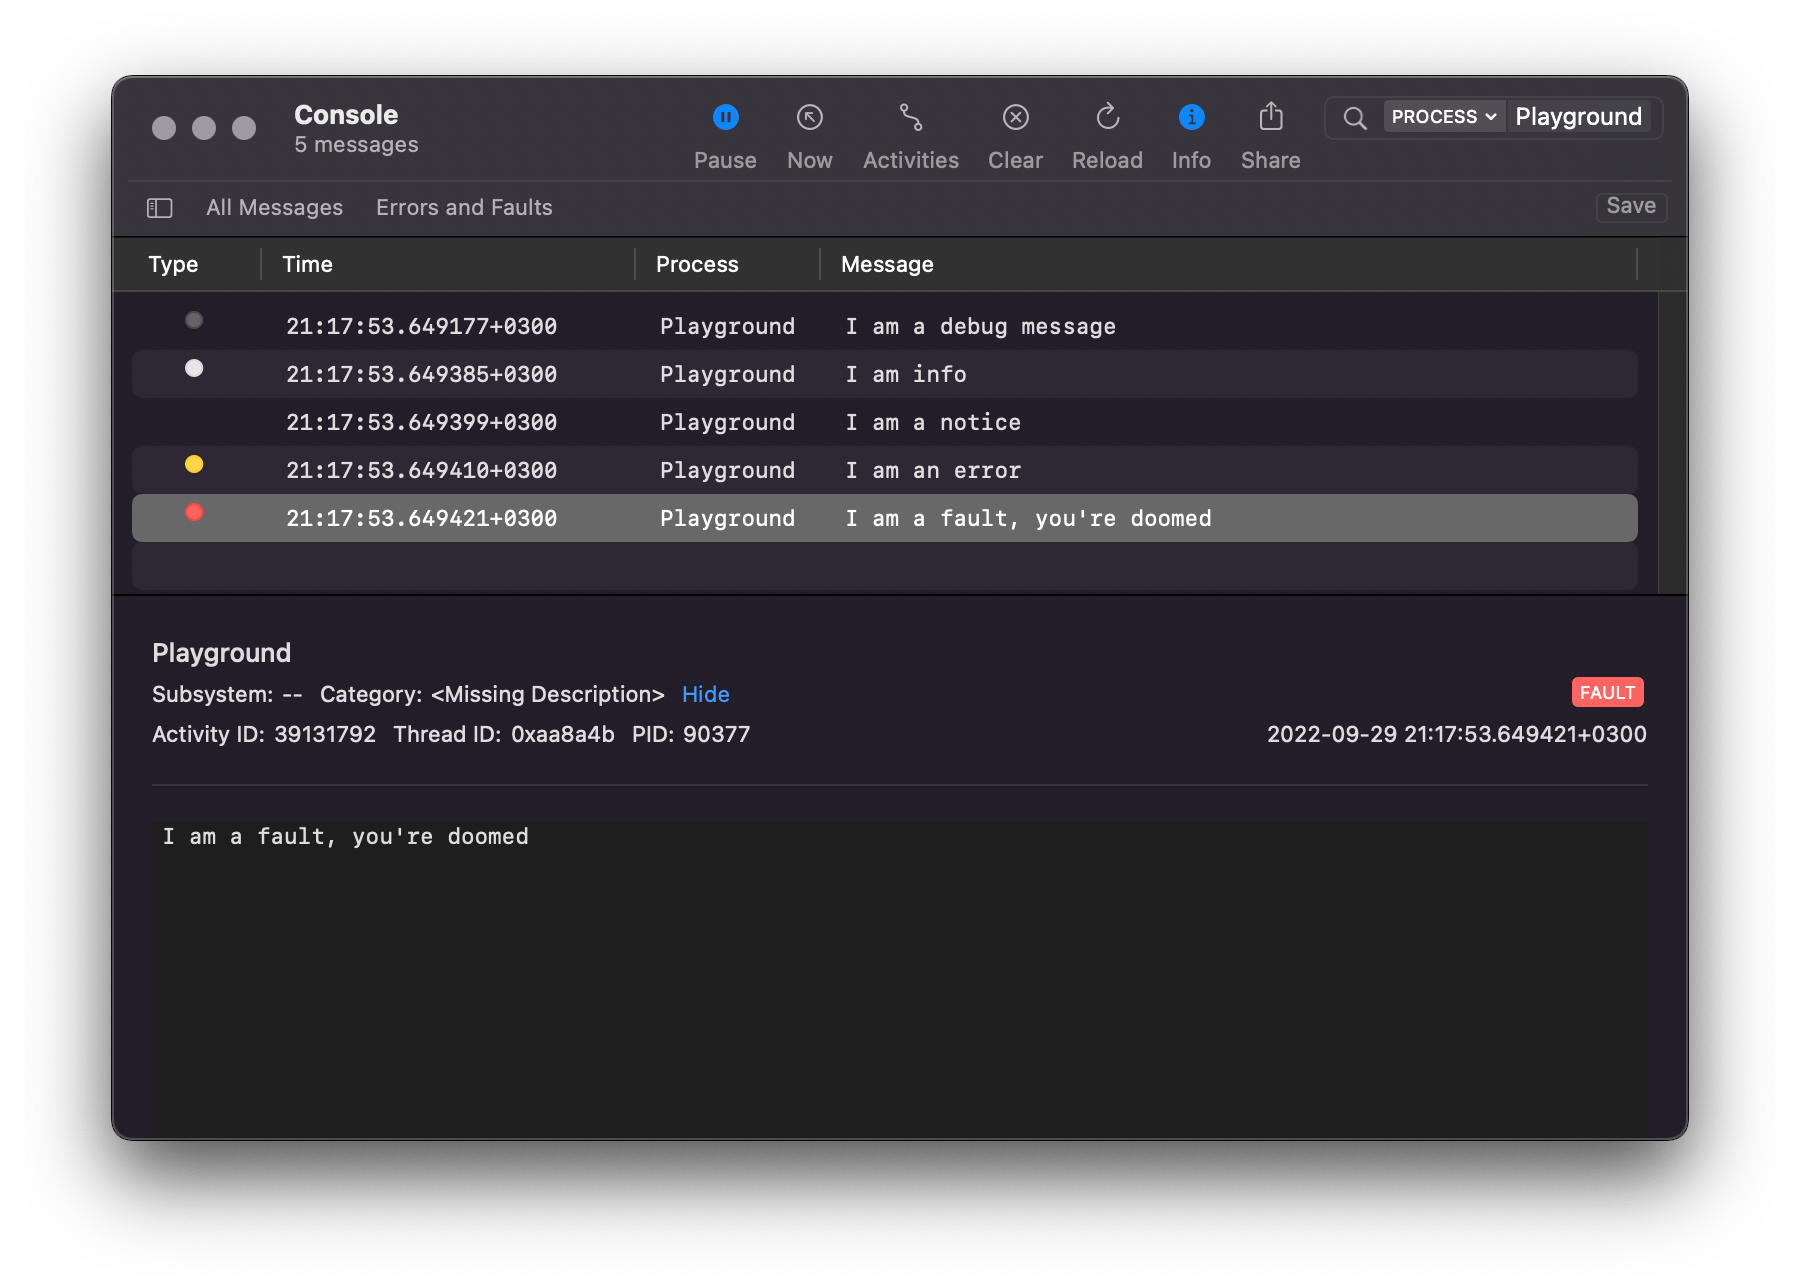
logger.log(level: .fault, "I am a fault, you're doomed")

And this is how those entries look in Console:

Logs of different levels in Console

Figure 3: Logs of different levels in Console

The debug and info messages are only visible here because the corresponding option is enabled. Otherwise, messages would be shown exclusively in the IDE’s debug output.

Subsystems and Categories

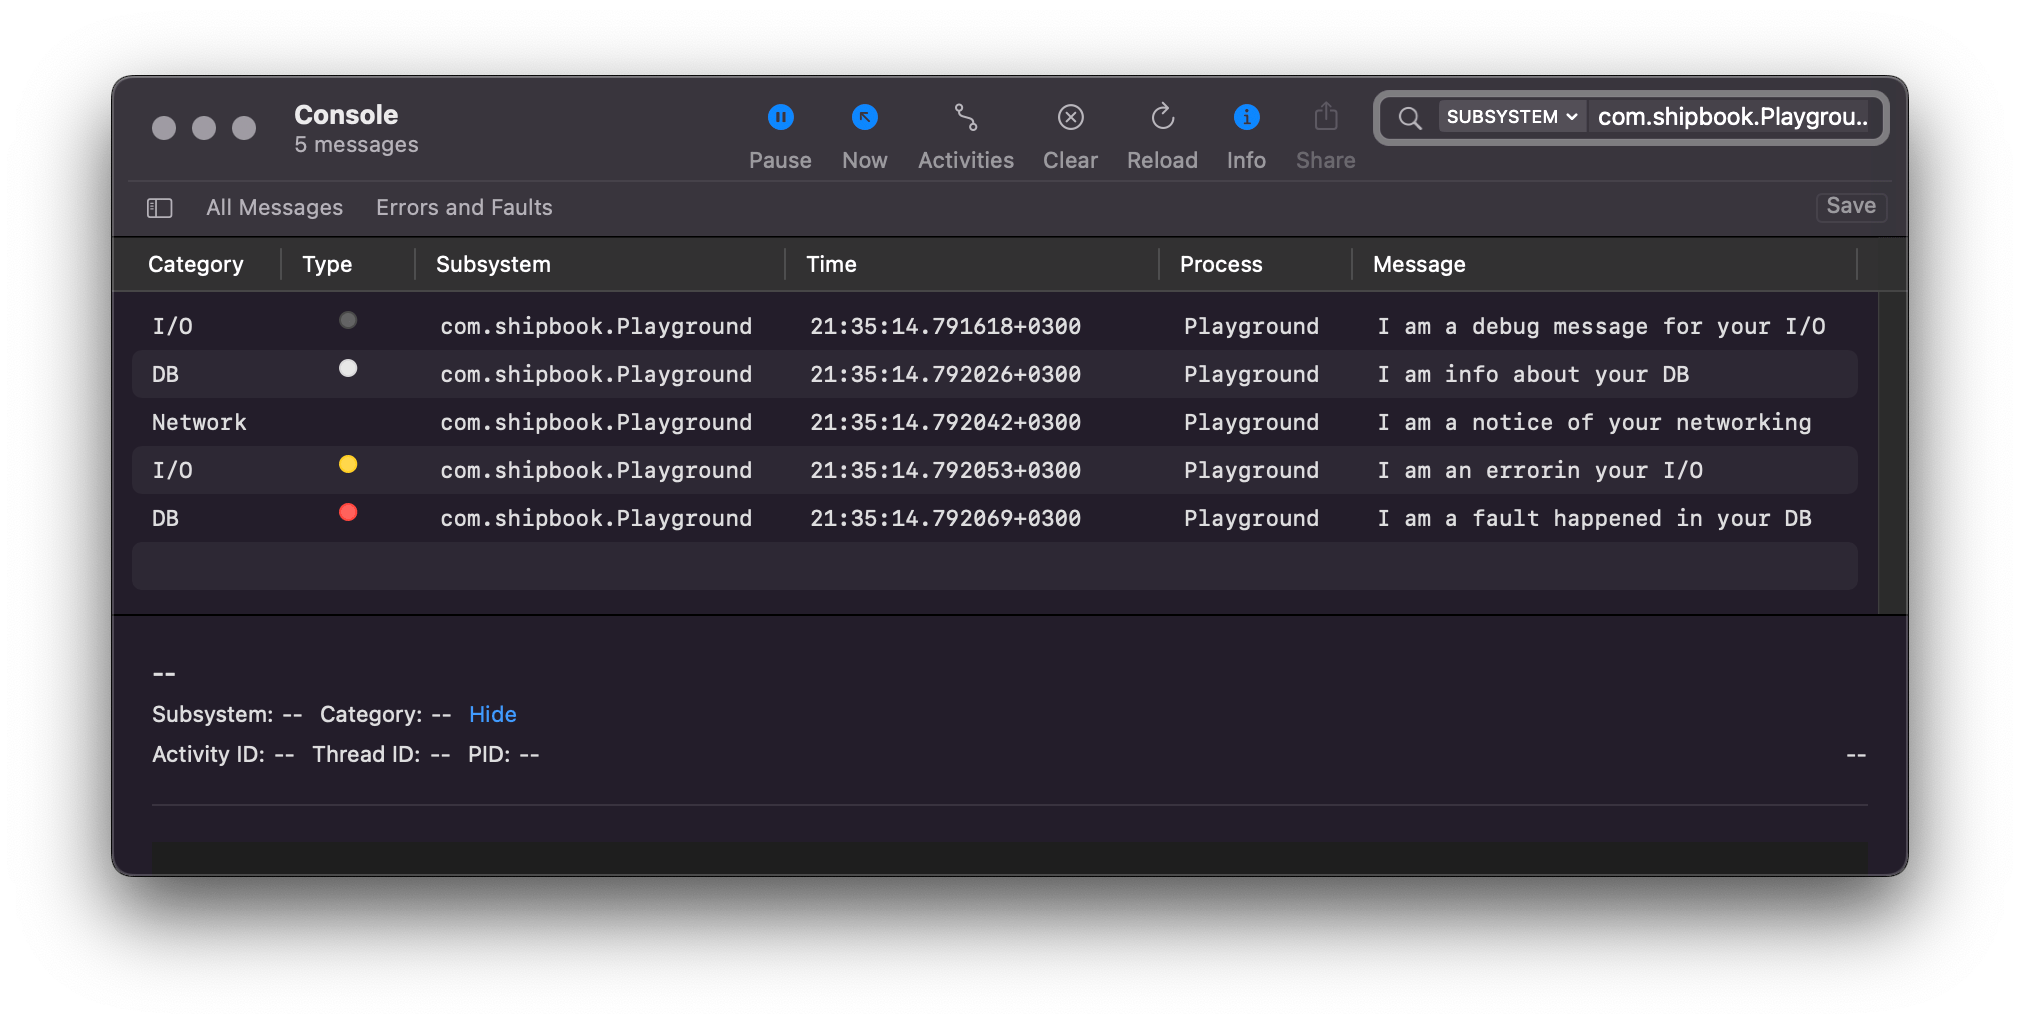
Logs generated by all applications are stored and processed together, along with kernel logs. This means that it’s crucial to have a way to organize log messages. Conveniently, Logger can be initialized using strings denoting the corresponding subsystem and the category of the message.

The most common way (and the method recommended by Apple) to denote the subsystem is to use the identifier of your app or its extension in reverse domain notation. The other parameter is used to categorize emitted log messages, for instance, “Network” or “I/O”. Here’s an example of a logger for categorized messages in Console:

    let logger = Logger(subsystem: "com.shipbook.Playground",
category: "I/O")

Log categorization in Console

Figure 4: Log categorization in Console

Formatting Entries

Static strings are not the only type of data we want to use in logs. We often want to log some dynamic data together with the string, which can be achieved with string interpolation:

    logger.log(
level: .debug,
"User \(userID) has reached the limit of \(availableSpace)"
)

Strictly speaking, the string literal passed as a parameter to the log method is not a String, it’s an OSLogMessage object. As I mentioned before, the logging system postpones processing the string literal until the corresponding log entry is accessed by a reading tool. The unified logging system saves all data in binary format for further use (or until it’s removed, once the storage limit is exceeded).

All common data types that can be used in an interpolated String can also be used inside an OSLogMessage: other strings, integers, arrays, etc.

Redacting Private Data

By default, almost all dynamic data—i.e., variables used inside a log message—is considered private and is hidden from the output (unless you’re running the code in Simulator or with the debugger attached). In Figure 5, below, the string value is substituted by “<private>”, but the integer is printed publicly.

Redacted private entry

Figure 5: Redacted private entry

Only scalar primitives are printed unredacted. If you need to log a dynamic value—like string or dictionary—without redacting, you can mark the interpolated variable as public:

    logger.log(
level: .debug,
"User \(userID, privacy: .public) has reached the limit of \(availableSpace)"
)

Apart from public, there are also private and sensitive levels of privacy, which currently work identically to the default level. Apple recommends specifying them anyway, presumably to ensure that your code is future-proof.

In many cases, you will want to keep data private while identifying it in logs massif. This option could come in handy for filtering out all messages concerning the same user ID, for example, in which case the variable can be hidden under a mask:

    logger.log(
level: .debug,
"User \(userID, privacy: .private(mask: .hash)) has reached the limit of \(availableSpace)"
)

The value in the output will be meaningless, but identifiable:

Private data hidden under a mask

Figure 6: Private data hidden under a mask

Performance Measuring

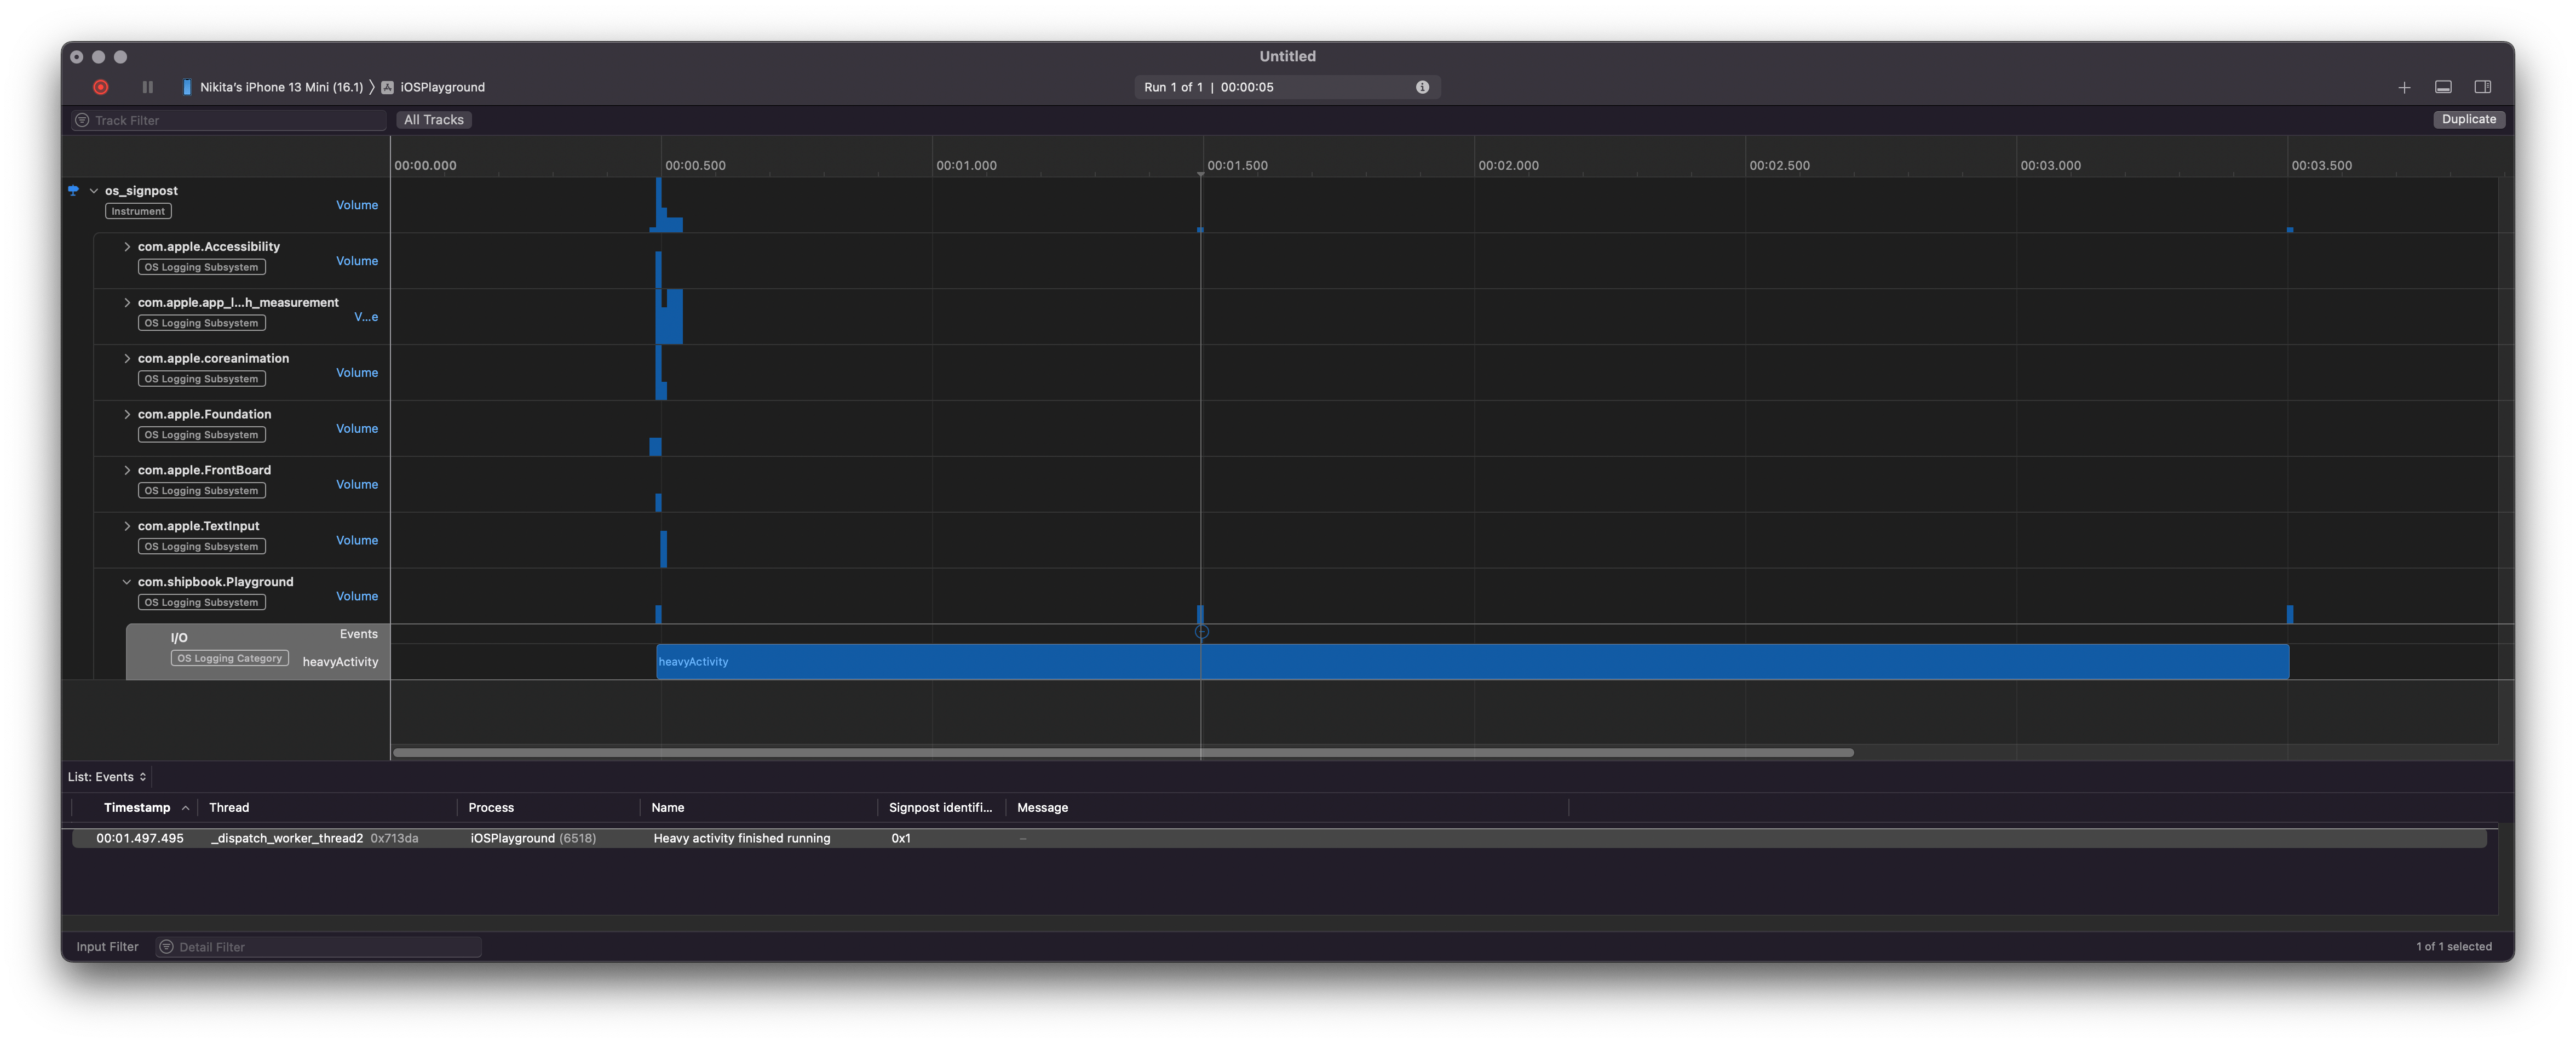
A special use case of unified logging is performance measurement, a function that was introduced two years after the system was first released. The principle is simple: You create an instance of OSSignposter and call its methods at the beginning and end of the piece of code that you want to measure. Optionally, in the middle of the measured code you can add events, which will be visible on the timeline when analyzing measured data. Here’s how it looks in assembly:

    let signposter = OSSignposter(logger: logger)
let signpostID = signposter.makeSignpostID()

// Start measuring.
let state = signposter.beginInterval("heavyActivity",
id: signpostID)

// The piece of code of interest.
runHeavyActivity()
signposter.emitEvent("Heavy activity finished running",
id: signpostID)
finalizeHeavyActivity()

// Stop measuring.
signposter.endInterval("heavyActivity", state)

You can analyze this data using the os_signpost tool in Instruments:

Performance measurement using OSSignposter

Figure 7: Performance measurement using OSSignposter

Conclusion

Apple’s unified logging is both powerful and simple to use. As its name suggests, the system can be used with all Apple platforms: iOS, iPadOS, macOS, and watchOS, using either Swift or Objective-C. Unified logging is also efficient thanks to its deferred log processing and compressed binary format storage. It mitigates the observer effect and reduces disk usage.

Gathering logs using OSLog is a great option when you’re debugging or have access to the physical device. However, when it comes to accumulating logs remotely, you need a different solution. Shipbook can take care of your needs by allowing you to gather logs remotely. Shipbook offers a simple API similar to OSLog’s, and a user-friendly interface that helps you to observe and analyze collected data.

Importantly, Shipbook integrates with Apple’s Unified Logging System, enhancing your workflow by letting you utilize the familiar tools provided by Apple when your device is connected. This integration ensures a seamless transition between remote logging and local diagnostics, making Shipbook a versatile tool for developers who require both remote data collection and the capabilities of Apple’s native logging system.

· 11 min read
Nikita Lazarev-Zubov

SwiftUI Navigation

Another WWDC has come and gone, leaving in its wake a glut of new features and enhancements. Now that the initial excitement has passed, software developers across the world are thinking about how they can update their apps to benefit from these exciting new offerings. Improvements and evolution come at a cost, with API modernization accompanied by deprecations. SwiftUI is no exception in both regards, its updates offering both benefits and challenges to developers.

One of the most notable updates for SwiftUI is its navigation system. Navigation in SwiftUI has been a pain point for its users, especially with regard to bigger code bases, and Apple’s attention to navigation in this update will put a smile on the faces of many developers. But with this overhaul come new warnings and deprecations. Let’s take a look at SwiftUI’s navigation updates in practice and explore how to implement its features.

Putting SwiftUI Navigation to the Test

Apple’s examples for new updates are usually on the topic of food, but I’m more of a reader than a chef. We’ll build an application called Book Worm using SwiftUI’s new navigation features starring a collection of my favorite programming books.

We can understand what’s new in the field of SwiftUI navigation by building a simple app. The starting point of the app is a simple scrollable list. Tapping on a list item reveals the corresponding book details. From there, a third layer of the UI offers more in-depth information on that specific book.

Without further ado, let’s dive into coding.

Step One: Book List

As a warm-up, let’s create BookListCellView that will represent a single element of the book list. We don’t need anything complicated here, just a couple of text labels:

Stack(alignment: .leading) {
Text(viewModel.authorsString)
Text(viewModel.titleString)
.font(.headline)
}
.padding([.leading, .trailing])

I prefer to have separate view models for my views. Some people argue that it’s not a good idea, but I try to keep as much business and presentation logic out of the view layer as possible, because it helps unit testing and abstracting out layers.

In Book Worm all view models are pretty straightforward, but let’s also look at an underlying Book model that is at the heart of the data service of the app. You can now see what information the app shows to the end user:

struct Book: Decodable {
let authors: [Author]
let brief: String
let id: String
let title: String
let year: String
}
struct Author: Decodable {
let id: String
let name: String
let brief: String?
}

And here’s the body of the list view, BookListView, itself:

List(0..<viewModel.booksCount, id: \.self) {
BookListCellView(
viewModel: viewModel.cellViewModel(forIndex: $0)
)
}

The MainView of the app only has the list for now:

var body: some View {
BookListView(viewModel: viewModel.bookListViewModel)
}

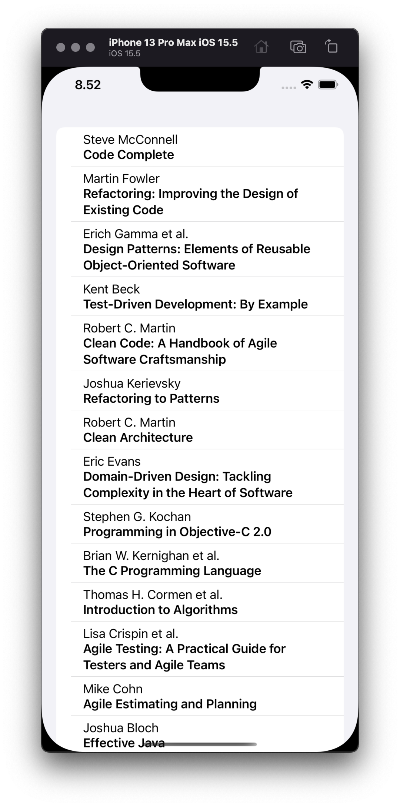
This is how it looks on iOS:

The book list on iOS

Figure 1: The book list on iOS

Not bad. Now let’s implement something more interesting.

Step Two: Book Details

The next step is to add a view for book details. Here’s the body of BookDetailsView:

VStack {
Image(viewModel.imageName)
.resizable()
.scaledToFit()
.frame(width: 200.0)
.padding([.top], 8.0)
.padding([.bottom], 40.0)
Text(viewModel.title)
.font(.title2)
.multilineTextAlignment(.center)
Text(viewModel.authors)
.multilineTextAlignment(.center)
.padding([.bottom], 8.0)
Text(viewModel.year)
.padding([.bottom], 8.0)
}
.padding()
.frame(maxWidth: 400.0)

There’s nothing too complicated here, but we’ve reached the point where we have to start implementing elements of navigation. In the list view, we need a NavigationLink instead of a plain cell view:

List(0..<viewModel.booksCount, id: \.self) { index in
NavigationLink {
BookDetailsView(
viewModel: viewModel.detailsViewModel(forIndex: index)
)
} label: {
BookListCellView(
viewModel: viewModel.cellViewModel(forIndex: index)
)
}
}

NavigationLink allows us to present another view on top of the navigation stack, but we need a stack to get started with that. Prior to iOS 16, there was only one way to put everything into a stack, which was by wrapping the root view by a NavigationView:

NavigationView {
BookListView(viewModel: viewModel.bookListViewModel)
}

This resulted in a traditional “push” behavior on iPhone in portrait orientation, and a two-column view on iPad, macOS, and iPhone in landscape orientation.

This method is now deprecated, but the only thing we need to change is to use NavigationStack instead of NavigationView. The former works well, but in more complicated cases, the new NavigationPath type offers important benefits. It can be stored outside the view layer, allowing us to implement proper routers or coordinators. It’s a huge step toward cleaner SwiftUI apps.

To understand this concept, let’s focus on the book details presentation from the list of books. First, we’ll need an ObservableObject that will store the NavigationPath of the app. The latter represents a data structure that stores the list of all currently presented views. The path can be manipulated as a regular array; you can add or remove view identifiers, and the navigation stack will be modified accordingly. Removing all elements from the path will pop all presented views and reveal the root view.

final class Router: ObservableObject {
@Published var path = NavigationPath()
}

Let’s add a book details destination ID to the router:

final class Router: ObservableObject {
enum Destination: Hashable {
case details(book: Book)
}
func openDetails(of book: Book) {
path.append(Destination.details(book: book))
}
// The rest of the code.
}

Since we’ve been using view models, it’s logical to put references to the router there, but this is where things can start to get messy. In order to initialize the navigation stack in the view, we need to expose the path to it. This introduces the problem of multiple sources of truth: Both the router (or whatever holds the path) and the navigation stack can modify the path. Here’s an extract from BookListView, where the stack is configured:

NavigationStack(path: $viewModel.path) {
List(0..<viewModel.booksCount, id: \.self) {
// ...
}
}

In order to make that possible, we need to “republish” the path in the view model:

final class BookListDefaultViewModel: BookListViewModel {

@Published var path = NavigationPath()
private var cancellables: Set<AnyCancellable> = []

init(/* ... */) {
// ...
router
.$path
.assign(to: \.path, on: self)
.store(in: &cancellables)
}

// The rest of the code.

}

Then the view model can handle taps for the view:

func handleTap(on index: Int) {
router.openDetails(of: bookService.books[index])
}

This method can be trivially called from the view:

List(0..<viewModel.booksCount, id: \.self) { index in
Button {
viewModel.handleTap(on: index)
} label: {
// Style the button.
}
}

In BookListView, we need to provide a way for NavigationStack to know exactly which view it should present when an element is added to the current path. Although the view creation can be delegated, the view still knows about the destination type IDs, which makes things yet messier. Here’s the full body of the view:

NavigationStack(path: $viewModel.path) {
List(0..<viewModel.booksCount, id: \.self) { index in
Button {
viewModel.handleTap(on: index)
} label: {
viewModel.cell(for: index)
}
.buttonStyle(.plain)
}
.navigationTitle("Books")
.navigationDestination(for: Router.Destination.self) {
viewModel.view(for: $0)
}
}

Step Three: Details Placeholder

If you’re like me, you probably don’t like the empty space in the second column. This is an easy fix: We can add a placeholder to the navigation view, and it will be displayed by default. Once you use a navigation link from the left column, it will show the link’s destination view in the second column, replacing the placeholder view.

In iOS 15 it could be achieved by adding a second view into the NavigationView:

NavigationView {
BookListView(viewModel: viewModel.bookListViewModel)
EmptyDetailsView()
}

This is where one of the ugly sides of the NavigationView API reared its head: Nothing stopped us from adding a third view, which would result in the three-column navigation, or a fourth one, a fifth… On macOS, all of them would be nicely rendered as separate columns, but on mobile platforms things went south quickly and we ended up with a lot of undefined behavior. In the best case scenario, excessive columns would simply be invisible, but in the worst case, we had UI glitches and non-working navigation.

In iOS 16 a new NavigationSplitView was introduced to handle multi-column navigation:

NavigationSplitView {
BookListView(viewModel: viewModel.bookListViewModel)
.frame(minWidth: 200.0)
} detail: {
EmptyDetailsView()
.frame(minWidth: 300.0)
}

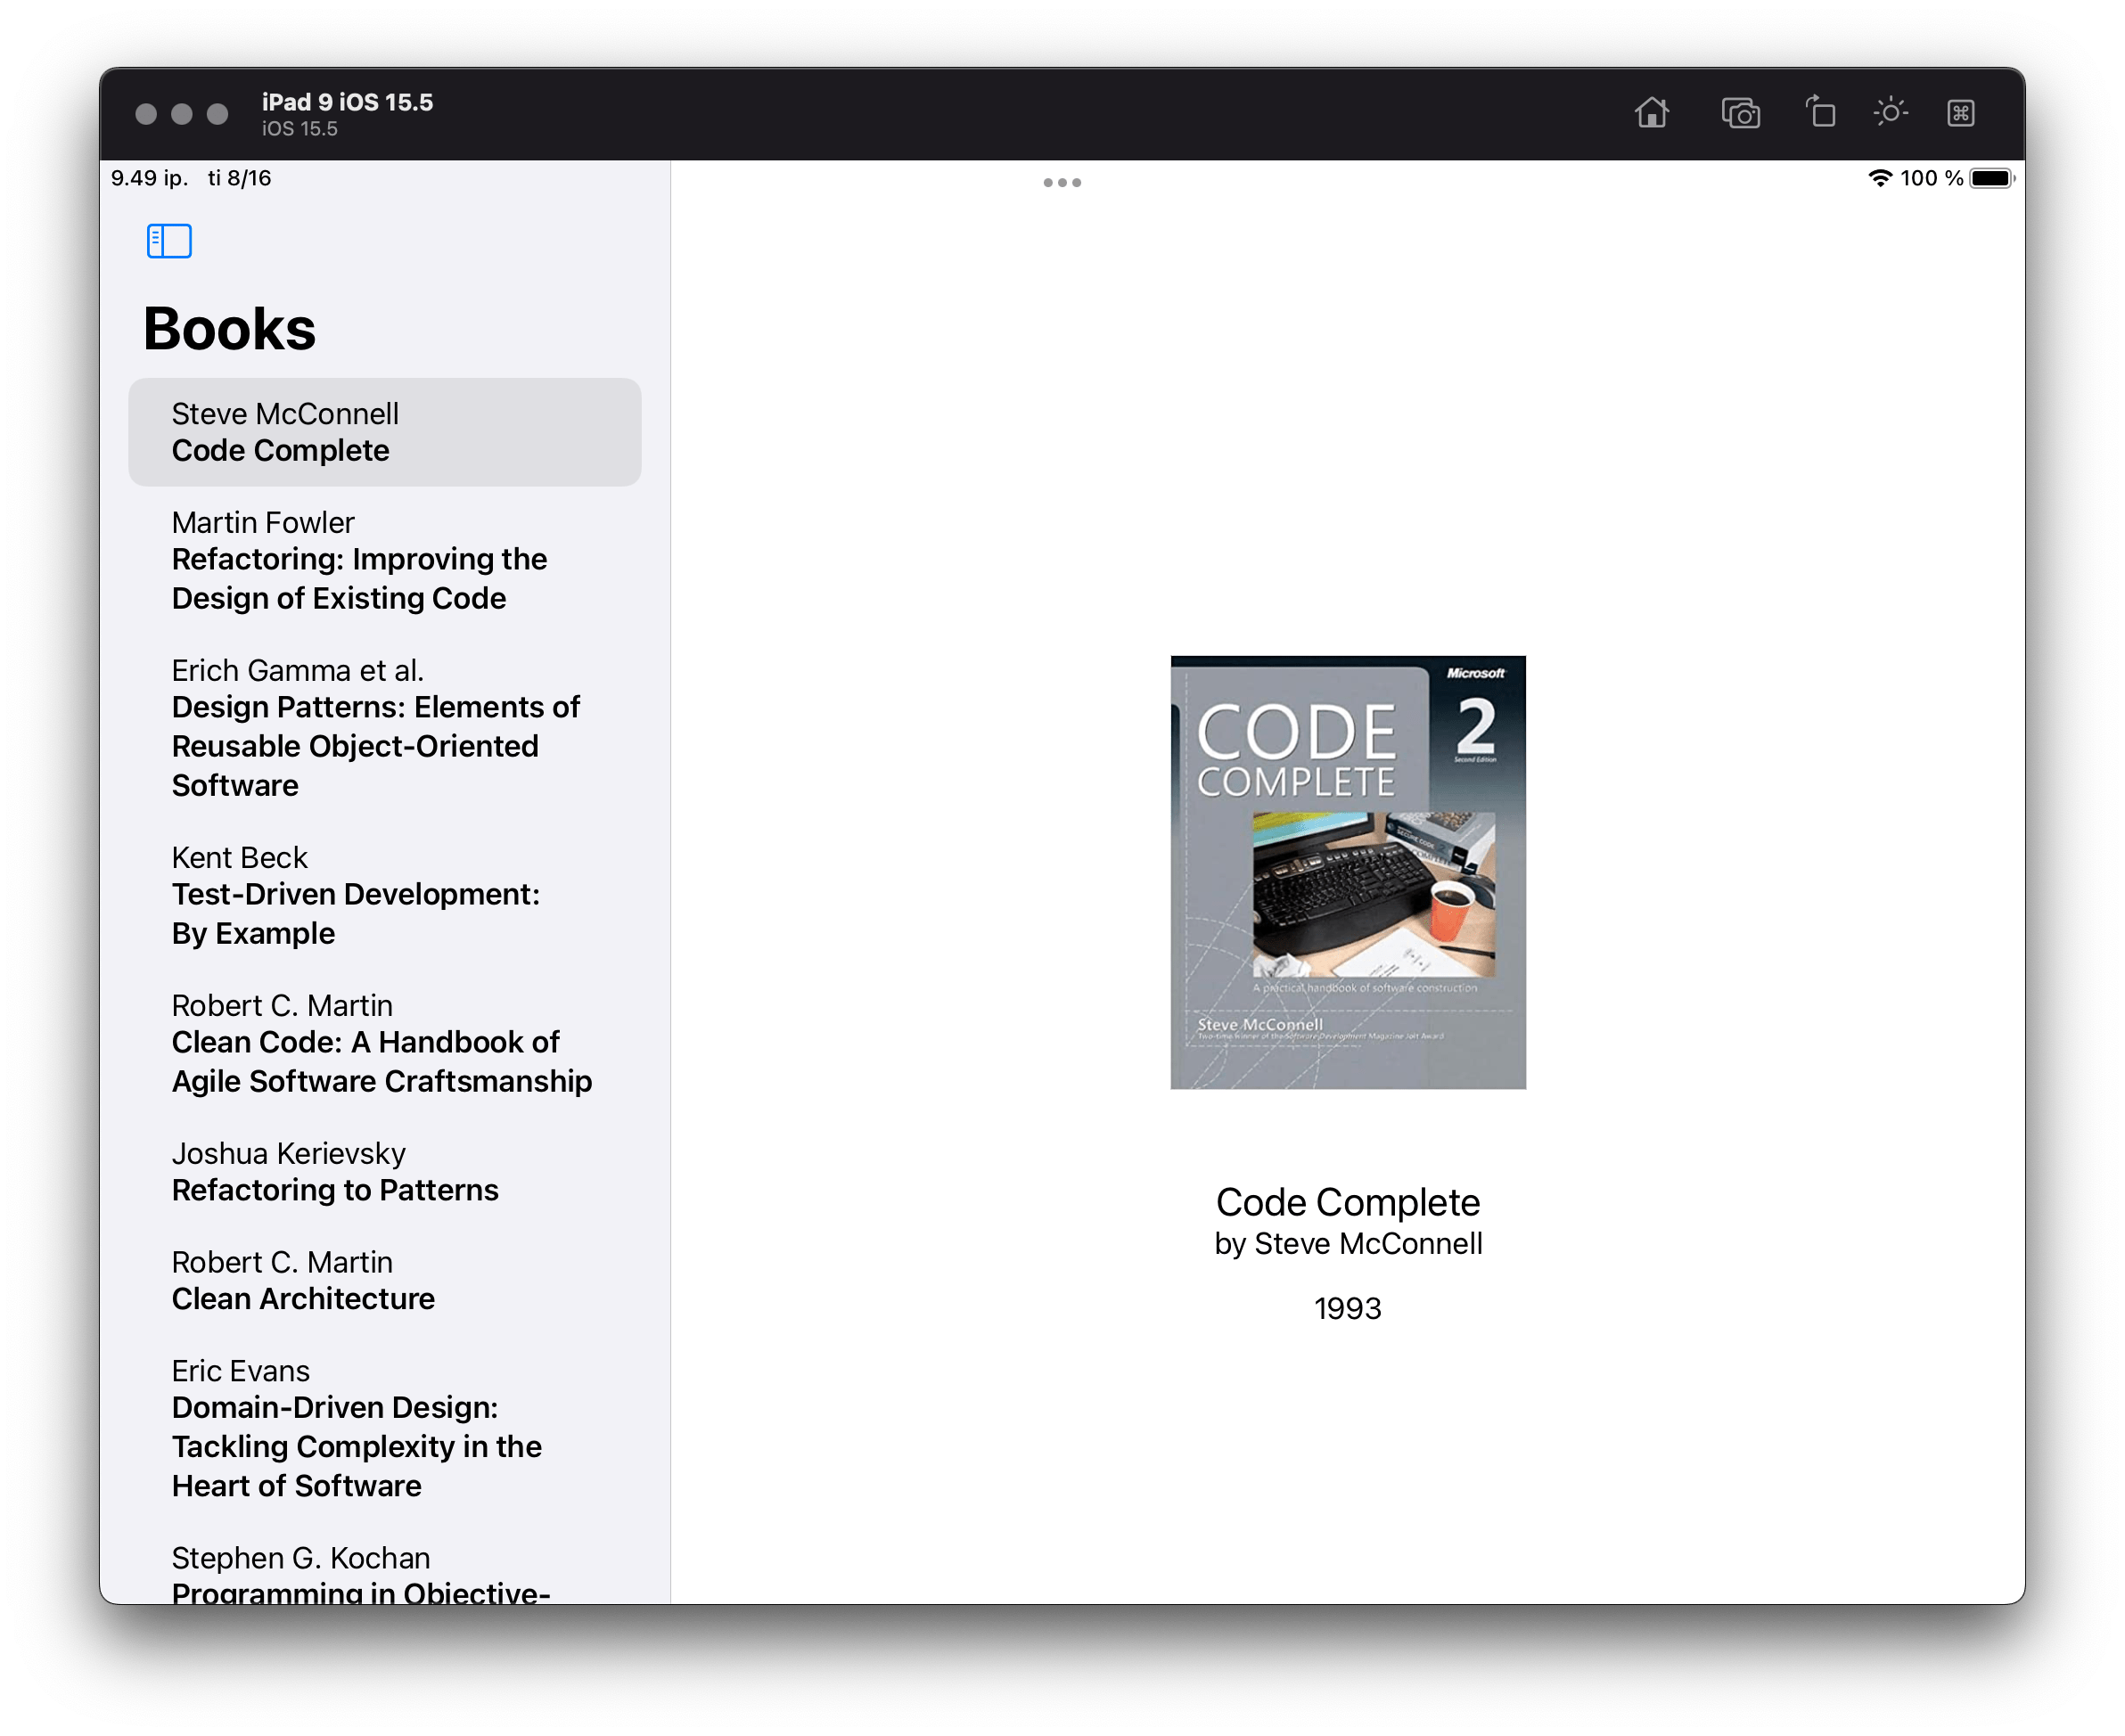
Here’s what we should have by now:

The book list with details on iPadOS

Figure 2: The book list with details on iPadOS

Step Four: Book Description

Let’s add another view to the app where we can show detailed information about the book. We’ll call it BookDescriptionView:

ScrollView {
Text(viewModel.description)
}
.padding()

We want to open the new view from BookDetailsView, using another navigation link. In iOS 15 the link could be activated with a boolean flag:

var body: some View {
VStack {
// The rest of the contents stay unchanged.
NavigationLink(destination: BookDescriptionView(
viewModel: viewModel.bookDescriptionViewModel
),
isActive: $detailsShown) {
Text("Read more")
}
.padding([.bottom], 8.0)
}
.padding()
.frame(maxWidth: 400.0)
}

This NavigationLink API was another reason the model of navigation in SwiftUI was criticized—it needed a boolean flag to indicate whether the link should present its destination view:

@State private var detailsShown = false

On one hand, the flag makes sense, because SwiftUI views describe the state—the idea that is called the “declarative approach,” as opposed to the imperative one. On the other hand, boolean flags are usually considered as code smell and can become messy if they are too numerous.

In iOS 16 flag-based navigation links are also deprecated in favor of the navigation path. Fortunately, in our simple case, we can get by on an automatic navigation link:

NavigationLink {
BookDescriptionView(
viewModel: viewModel.bookDescriptionViewModel
)
} label: {
Text("Read more")
}

All this works nicely for iOS and iPadOS, but if you run the app on macOS, the “Read more” button will be inactive. One way to overcome this is to wrap BookDetailsView with another NavigationView. On macOS this results in a three-column navigation view, but on iOS devices, you’ll see a lot of UI glitches.

Another option is to use a sheet-styled presentation, but this comes with its own problems. Firstly, it doesn’t fit the app’s visual concept. Secondly, it doesn’t work out of the box for macOS, so we would need to implement additional means for closing the sheet. Thirdly, determining size for the sheet would be tricky and would probably require us to use UIKit APIs like UIScreen. And fourthly, sheet presentations on SwiftUI require another boolean flag: isPresented.

In other words, this isn’t something you could write once and run anywhere.

Instead, let’s return to Book Worm and add a third column to our navigation model using new iOS 16 NavigationSplitView:

NavigationSplitView {
BookListView(viewModel: viewModel.bookListViewModel)
.frame(minWidth: 200.0)
} content: {
EmptyDetailsView()
.frame(minWidth: 300.0)
} detail: {
EmptyView()
}

Explicitly named parameters content and detail remove the uncertainty of the indefinite set of views inside NavigationView’s content. If you want a two-column navigation, you just need to remove the content parameter.

Optionally, we could specify a columnVisibility argument for the NavigationSplitView initializer. It takes a Binding to a NavigationSplitViewVisibility variable. This new argument solves another problem with multi-column presentation in SwiftUI prior to iOS 16, namely the need to use UIKit and UISplitViewController to define the visibility of columns. This is how it looks if we want to keep all three columns constantly visible:

NavigationSplitView(columnVisibility: .constant(.all)) {
// ...
}

This is how the three-column navigation view looks on macOS:

The book list with details and description in a separate view on macOS

Figure 3: The book list with details and description in a separate view on macOS

Here you can download the final version of the app to play with.

Conclusion

With the iOS 16 release, SwiftUI continues to evolve. Along with various new classes, methods, and techniques, we are also starting to see deprecations. This suggests that SwiftUI is no longer a novelty, but rather a serious way to build your applications.

Since SwiftUI was first released, developers have been struggling with creating clean and maintainable navigation in their big code bases. Apple has responded to this problem, and the new SwiftUI navigation types are a major step toward an easier build and maintain experience for developers. The system still has room for improvement, but knowing Apple, we won’t have to wait long for an even sleeker navigation experience for users and developers alike.

· 9 min read
Nikita Lazarev-Zubov

Exception Handling

The first version of Java was released in 1995 based on the great idea of WORA (“write once, run anywhere”) and a syntax similar to C++ but simpler and human-friendly. One notable language invention was checked exceptions—a model that later was often criticized.

Let’s see if checked exceptions are really that harmful and look at what’s being used instead in contemporary programming languages, such as Kotlin and Swift.

Good Ol’ Java Way

Java has two types of exceptions, checked and unchecked. The latter are runtime failures, errors that the program is not supposed to recover from. One of the most notable examples is the notorious NullPointerException.

The fact that the exception is unchecked doesn’t mean you can’t handle it:

Object object = null;
try {
System.out.println(object.hashCode());
} catch (NullPointerException npe) {
System.out.println("Caught!");
}

The difference between a checked and unchecked exception is that if the former is raised, it must be included in the method’s declaration:

void throwCustomException() throws CustomException {
throw new CustomException();
}

static class CustomException extends Exception { }

The compiler will make sure that it’s handled— sooner or later. The developer must wrap the throwCustomException() with a try-catch block:

try {
throwCustomException();
} catch (CustomException e) {
System.out.println(e.getMessage());
}

Or pass it further:

void rethrowCustomException() throws CustomException {
throwCustomException();
}

What’s Wrong with the Model

Checked exceptions are criticized for forcing people to explicitly deal with every declared exception, even if it’s known to be impossible. This results in a large amount of boilerplate try-catch blocks, the only purpose of which is to silence the compiler.

Programmers tend to work around checked exceptions by either declaring the method with the most general exception:

void throwCustomException() throws Exception {
if (Calendar.getInstance().get(Calendar.DAY_OF_MONTH) % 2 == 0) {
throw new EvenDayException();
} else {
throw new OddDayException();
}
}

Or handling it using a single catch-clause (also known as Pokémon exception handling):

void throwCustomException()
throws EvenDayException, OddDayException {
// ...
}

try {
throwCustomException();
} catch (Exception e) {
System.out.println(e.getMessage());
}

Both ways lead to a potentially dangerous situation, when all possible exceptions are sifted together, including everything that is not supposed to be dismissed. Error-handling blocks of code also become meaningless, fictitious, if not empty.

Even if all exceptions are meticulously dealt with, public methods swarm with various throws declarations. This means all abstraction levels are aware of all exceptions that are thrown around it, compromising the principle of information hiding.

In some parts of the system, where multiple throwing APIs meet, a problem with scalability might emerge. You call one API that raises one exception, then call another that raises two more, and so on, until the method must deal with more exceptions than it reasonably can. Consider a method that must deal with these two:

void throwsDaysExceptions() throws EvenDayException, OddDayException  {
// …
}
void throwsYearsExceptions() throws LeapYearException {
// …
}

It's doomed to have more exception-handling code than business logic:

void handleDate() {
try {
throwsDaysExceptions();
} catch (EvenDayException e) {
// ...
} catch (OddDayException e) {
// ...
}
try {
throwsYearsExceptions();
} catch (LeapYearException e) {
// ...
}
}

And finally, the checked exception approach is claimed to have a problem with versioning. Namely, adding a new exception to the throws section of a method declaration breaks client code. Consider the throwing method from the example above. If you add another exception to its throws declaration, the client code will stop compiling:

void throwException()
throws EvenDayException, OddDayException, LeapYearException {
// ...
}

try {
// Unhandled exception: LeapYearException
} catch (EvenDayException e) {
// ...
} catch (OddDayException e) {
// ...
}

The Kotlin Way

Sixteen years after Java was first released, in 2011, Kotlin was born from the efforts of JetBrains, a Czech company founded by three Russian software engineers. The new programming language aimed to become a modern alternative to Java, mitigating all its known flaws.

I don’t know any programming language that followed Java in implementing checked exceptions, Kotlin included, despite the fact it targeted JVMs. In Kotlin, you can throw and catch exceptions similarly to Java, but you’re not required to indicate an exception in a method’s declaration. (In fact, you can’t):

class CustomException: Exception()

fun throwCustomException() {
throw CustomException()
}

fun rethrowCustomException() {
try {
throwCustomException()
} catch (e: CustomException) {
println(e.message)
}
}

Even catching is up to the programmer:

fun rethrowCustomException() {
throwCustomException() // No compilation errors.
}

For interoperability with Java (and some other programming languages), Kotlin introduced the @Throws annotation. Although it’s optional and purely informative, it’s required for calling a throwing Kotlin method in Java:

@Throws(CustomException::class)
fun throwCustomException() {
throw CustomException()
}

From One Extreme to Another

It may seem that programmers can finally breathe easy, but, personally, I think by solving the original problem, this new approach—Kotlin’s exceptions model—creates another. Unscrupulous developers are free to entirely ignore all possible exceptions. Nothing stops them from quickly wrapping a handful of exceptions with a try-catch expression and shipping the result to their end users, with a prayer. Or not covered exceptions are going to be discovered by end users.

Even if you’re a disciplined engineer, you’re not safe: Neither the compiler nor API will alert you to exceptions lurking inside. There’s no reliable way to make sure that all possible errors are being properly handled.

You can only guard yourself from your own code, patiently annotating your methods with @Throws. Though, even in this case, the compiler will tell you nothing and it’s easy to forget one exception or another.

The Swift Way

Swift first appeared publicly a little later, in 2014. And again, we saw something new. The error-handling model itself lies somewhere between Java’s and Kotlin’s, but how it works together with the language’s optionals is incredible. But first things first.

Of course, Swift has runtime, “unchecked”, errors—an array index out of range, a force-unwrapped optional value turned out to be nil, etc. But unlike Java or Kotlin, you can’t catch them in Swift. This makes sense since runtime exceptions can only happen because of a programming mistake, or intentionally (for instance, by calling fatalError()).

The rest of exceptions are errors that are explicitly thrown in code. All methods that throw anything must be marked with the throws keyword, and all code that calls such methods must either handle errors or propagate them further. Looks familiar, doesn’t it? But there’s a catch.

Fly in the Ointment

Let’s look at an example from above:

func throwError() throws {
if (Calendar.current.component(.day, from: Date()) % 2 == 0) {
throw EvenDayError()
} else {
throw OddDayError()
}
}

As you can see, you don’t declare specific errors that a method can throw; you’re only required to mark it as throwing something. The consequence of this is that you, again, don’t really know what to catch.

Unfortunately, the code below won’t compile:

do {
/*
Errors thrown from here are not handled because the enclosing
catch is not exhaustive
*/
try throwError()
} catch is EvenDayError {
print(String(describing: EvenDayError.self))
} catch is OddDayError {
print(String(describing: EvenDayError.self))
}

You always have to add Pokémon handling:

do {
try throwError()
} catch is EvenDayError {
print(String(describing: EvenDayError.self))
} catch is OddDayError {
print(String(describing: EvenDayError.self))
} catch {
print(error)
}

In fact, the Swift compiler doesn’t care about specific error types that you try to catch. You can even add a handler for something entirely irrelevant:

do {
try throwError()
} catch is EvenDayError {
print(String(describing: EvenDayError.self))
} catch is IrrelevantError {
print(String(describing: EvenDayError.self))
} catch {
print(error)
}

Or you can have only one default catch block that covers everything:

    do {
try throwError()
} catch {
print(error)
}

Another bad thing about the approach is that, without a workaround, you can’t catch one error and propagate another. The only way to implement such behavior is to catch the error you’re interested in and throw it again:

func rethrow() throws {
do {
try throwError()
} catch is EvenDayError {
throw EvenDayError() // Here's the trick.
} catch is IrrelevantError {
print(String(describing: EvenDayError.self))
} catch {
print(error)
}
}

Ointment

In my opinion, Swift’s strongest merit is its optionals system that cooperates with all aspects of the language. If you don’t care about thrown errors, instead of fictitious catch-blocks, you can always write try? Execution of the method will stop the moment the error is thrown, without propagating it further:

try? throwError()

If you’re feeling bold, you can use try! instead of try?, which won’t suppress the error if it’s thrown, but will let you omit the do-catch block:

try! throwError()

This method also allows converting a throwing call to a value. try? will give you an optional one, whereas try! has an effect similar to force-unwrapping:

func intOrError() throws -> Int {
// …
}

let optionalInt = try? intOrError() // Optional(Int)
let dangerousCall = try! intOrError() // Int or die!

Conclusion

Personally, I find Kotlin’s way, ahem, a failure. I can understand why Kotlin developers decided not to follow Java in its way of checked exceptions, but ignoring exceptions entirely, without a hint of static checks, is too much.

On the other hand, is the Java way really that harmful? No mechanism can defend software from undisciplined programmers. Even the best idea can be distorted and misused. But applying Java’s principles as designed can lead to good results.

Connecting two levels of abstraction, you can catch errors from one level and re-throw new types of errors to propagate them to the next level. You can catch several types of errors, “combine” them into one another, and throw them for further handling. This can help mitigate problems with encapsulation and scalability. For instance:

void throwCustomException() throws CustomException {
try {
throwDayException();
} catch (EvenDayException | OddDayException e) {
throw new CustomException();
}
}

What Java lacked from the very beginning is Swift’s optionality system and a syntax to bind exception handling and optional values. I believe, coupled with entirely static checks of thrown exceptions, this would build a very strong model that can satisfy the grouchiest programmers. Although, in any aforementioned programming language, this would require breaking changes, I personally believe it would be a game-changing improvement of code safety.

And if you want to improve your app stability right now, Shipbook is already here for you! It proactively inspects your app, catches exceptions and allows you to analyze them even before your users stumble upon the problem.

· 10 min read
Nikita Lazarev-Zubov

Swift 5.7

Swift 5.6 was released just this past March, but the language evolution is unstoppable. There are plenty of things we already know will be included in the next release, so let’s look at the most interesting developments.

Syntax Improvements

Syntax improvements aren’t necessarily very important, but they will quickly start affecting code style, so we’ll start with these.

if let Shorthand

All Swift developers are familiar with optional binding by means of if and guard statements:

let uuid: String? = "e517e38a-261d-4ca5-85f4-9136ace20683"
if let uuid = uuid {
// The UUID string is not optional here.
}

In Swift 5.7, optional binding will become even more concise:

let uuid: String? = "e517e38a-261d-4ca5-85f4-9136ace20683"
if let uuid {
// The UUID string is not optional here.
}

The same trick is also possible with the guard statement:

guard let uuid else {
// The UUID string is nil.
return
}
// The UUID string is not optional from now on.

This isn’t the most important or anticipated language addition, but it looks spectacular, and I’ll definitely make use of it.

Default Values for Generic Parameters

The compiler will finally accept method declarations like this:

func doSomethingWith<Values: Collection>(
_ values: Values = [1, 2, 3]
) { }

Yes, starting from Swift 5.7, we will be able to use default values with generic parameters.

The default value won’t limit the use of the generic parameter, and we’ll still be able to pass, for example, a set of strings if we’re not happy with the default argument.

Multi-Statement Closure Type Inference

The current version of Swift is good enough in inferring types of closures… as long as the closure has only one statement. This code is perfectly fine for Swift 5.6 and earlier versions:

func validateUUID<R>(using handler: (R) -> Bool) {
// ...
}

let uuids = [String]()
validateUUID { uuids.contains($0) }

However, if the closure has more than one statement, the compiler will complain with the error “Unable to infer type of a closure parameter in the current context”:

func requestUUID<R>(_ handler: (R) -> Result<R, Error>) { }
func notifyDuplicatedUUID<R>(_ uuidRepresentation: R) { }
func processUUID<R>(_ uuidString: R) -> Result<R, Error> { }
let uuids = [String]()
requestUUID { // The error is on this line.
if uuids.contains($0) {
notifyDuplicatedUUID($0)
}
return processUUID($0)
}

The compiler wants our help with type inference even if it could’ve managed without it:

requestUUID { (uuidString: String) in
if uuids.contains(uuidString) {
notifyDuplicatedUUID(uuidString)
}
return processUUID(uuidString)
}

Swift 5.7 will have improvements in closure type inference and will no longer ask for such help, meaning the previous code snippet will compile just fine.

New Types

Swift 5.7 will introduce a couple of new and interesting type families to the standard library. Let’s take a look at them.

Regex

Regex promises to become a new, simple, and powerful way of dealing with regular expressions. As a simple but impressive example, let’s say we need to parse text data into objects of this type:

struct Person {
let firstName: String
let secondName: String
}

Here’s a string to parse, with some unexpected whitespace characters:

let input = "  Leo   Tolstoy"

This is a Regex object, initialized from a literal that will help us deal with the string parsing (pay attention to named capturing groups):

let regex = #/\s*(?<firstName>\w+)\s*(?<secondName>\w+)\s*/#

The following code shows how we can retrieve information from the string using that Regex object:

let match = try! regex.wholeMatch(in: input)
// These are named capturing groups defined above.
let firstName = match!.firstName
let secondName = match!.secondName
let person = Person(firstName: String(firstName),
secondName: String(secondName))

Can you guess what Person the object resulted in? My jaw dropped when I saw that it’s actually Person(firstName: "Leo", secondName: "Tolstoy")! Now processing huge sheets of CSV-formatted text with pure Swift will become a piece of cake.

Clock, Instant, and Duration

These types might not look that inspiring, but they’re still important. Swift has been in need of its own clock-related abstractions to replace wrappers around C code from the Dispatch framework. And at last, it will have them.

The Clock protocol will define the concept of passing time. Two main implementations are ContiniousClock, which runs no matter what, and SuspendingClock, which doesn’t advance if the process is suspended. So, Clock determines how exactly time runs:

try await Task.sleep(until: .now + .seconds(1),
clock: .continuous)

The aforementioned .now + .seconds(1), despite its resemblance to the DispatchTime syntax, is the instance of the new type Instant. Its purpose, as you may have guessed, is to represent a moment in time.

Another use case for the Clock type is measuring the time it takes for code blocks to execute. The resolution of such a measurement is claimed to be suitable even for benchmarks:

let timeElapsed = ContinuousClock().measure { benchmarkMe() }

The type of the resulting timeElapsed is not TimeInterval, it’s an instance of another new type called Duration. The type is Comparable, has all necessary arithmetic operations defined, and, in general, is ready to humbly serve.

Concurrency

Of course, the next Swift release cannot do without additions to the new concurrency model that was introduced a couple of updates back. This time, we’ll have all sorts of groovy little door prizes.

Concurrency on the Top Level

Currently, such calls are not permitted on the top level (for instance, in the root of the main.swift file):

await doAsyncWork()

With Swift 5.7, it will become perfectly legal.

Concurrent Function Execution Fixes

Another improvement in the concurrent world of Swift is that non-isolated asynchronous functions will now always run in the global concurrent pool instead of in an isolated context, from where they’re called. Consider this code snippet:

func doHeavyComputations() async {
// ...
}

actor Computer {
func compute() async {
await doHeavyComputations()
}
}

Prior to Swift 5.7, doHeavyComputations might start running on the Computer actor, blocking it unnecessarily. Starting with Swift 5.7, it will always execute concurrent functions in their own context. Although the improvement is mostly invisible, it’s rather important for code performance.

Unavailability from a Concurrent Environment

We’ll be able to mark functions as not available in an asynchronous context. For example, the code below won’t compile, resulting in the error “Global function 'doSomethingSensitive' is unavailable from asynchronous contexts; Use the asynchronous counterpart instead”:

@available(*, noasync, message: "Use the asynchronous counterpart instead")
func doSomethingSensitive() {
// ...
}
func soAsynchronousThings() async {
doSomethingSensitive() // The error is here.
}

Since we often write code that is just not meant to be used in multi-threaded environments, this new annotation will help avoid concurrency-related problems like race conditions in such code areas.

distributed actor

Swift 5.7 will introduce a new type of actors—distributed actors, as opposed to regular, local ones. At first, the keyword distributed will just enable more checks on the call site: Non-distributed members will only be available from within the scope of the actor, and distributed members will become implicitly async and throwing.

Unfortunately, at the moment of this writing, the current development snapshot of Swift 5.7 and the public beta version of Xcode 14 crashed on compiling distributed members of actors.

According to the proposal, non-distributed members of distributed actors can only be called from the actor’s isolated context. From the outside, only distributed members can be called. They will be also implicitly asynchronous and throwing in order to expose potential I/O and network operations that might be lurking inside. And finally, all those involved in distributed members’ types (i.e., types of arguments and returned values) must conform to Codable.

Here’s an example of a distributed actor:

distributed actor Person {
var name = "Leo Tolstoy"
distributed func changeName(_ name: String) {
self.name = name
}
}

Calls to the name property from outside the Person type won’t compile, whereas calls to changeName(_: String) will compile only when marked with try and await. These measures are aimed to increase the thread safety of distributed systems.

Opaque Types

Opaque types, introduced ages ago along with the SwiftUI, hide information about real underlying types and allow you to describe types in terms of the protocols they implement. Swift 5.7 will add a few important things to the syntax of opaque types.

First of all, they will be allowed as function arguments. This, in particular, will allow our SwiftUI compositions to be more concise:

func viewWrapping(_ wrapee: some View) -> some View {
// ...
}

Currently, you can only define the function above using a more clumsy, generics-based construction:

func viewWrapping<V: View>(_ wrapee: V) -> some View {
// ...
}

Opaque types will be also allowed as return values inside structural types:

func viewsWrapping(_ wrapee: some View) -> [some View] {
// ...
}

Existential Types

Existential types, just introduced in the last release, will expectedly evolve as well, moving Swift farther from generics-based code. As an example, consider the following snippet that uses good ol’ protocols with associated types (a.k.a. PATs):

protocol ServiceSupplier {
associatedtype SuppliedService
var service: SuppliedService { get }
}
protocol BackendService { }
struct ServiceCoordinator<Supplier: ServiceSupplier>
where Supplier.SuppliedService == BackendService {
let supplier: Supplier
}

After the next language release, we’ll be able to add one or more so-called primary associated types to protocols using a syntax similar to the generic clause:

protocol ServiceSupplier<SuppliedService> {
associatedtype SuppliedService
var service: SuppliedService { get }
}

And why would you want to do this? Because it enables us to use ServiceSupplier as an existential type, instead of a generic constraint:

struct ServiceCoordinator {
let supplier: any ServiceSupplier<BackendService>
}

Primary associated types are going to be added to many types in the standard library (most notably, to the Collection protocol), which will allow us to use them as existential types as well:

let numbers: any Collection<Int> = [1, 2, 3]

Low-Level Additions

And finally, all lovers of messing with raw pointers and other low-level stuff will have a bunch of additions to the standard library to play with. For example, currently the language doesn’t provide a way of loading data from arbitrary, unaligned sources like binary files. Swift 5.7 will bring this method to deal with the problem:

let data = dataSource.withUnsafeBytes {
$0.loadUnaligned(fromByteOffset: 128, as: YourType.self)
}

Swift 5.7 will also allow us to compare pointers using simple operators like &lt;= without type conversions.

The family of UnsafeRawPointer types will obtain methods to get pointers to the previous or next alignment boundaries using methods like this:

let next = current.alignedUp(for: UInt8.self)

It may not look as exciting as playing with new concurrency possibilities, but undoubtedly, this will have its own important areas of application.

Conclusion

All the above is most likely not everything that will be included in the next Swift release, but it’s definitely the bulk of it. Just as expected, the concurrency model keeps evolving, as well as existential types, which means they are here to stay.

I’m personally glad to see more improvements for using opaque types, and, of course, I can’t wait to start using the shorthand syntax of optional binding.

In the meantime, to improve the code quality of the software you’re developing, check out Shipbook. It gives you the power to remotely gather, search, and analyze your user logs and exceptions in the cloud, on a per-user & session basis.

· 11 min read
Kustiawanto Halim

Swiftui vs Storyboard

Introduction

In 2019, Apple introduced SwiftUI as a brand-new user interface foundation for iOS, tvOS, macOS, and watchOS. Since then, it has rapidly evolved into a new paradigm that is altering how developers view UI development for iOS apps. SwiftUI enables iOS developers to create a user interface with a single set of tools and APIs using declarative languages. Say goodbye to cumbersome UIKit code.

In contrast, storyboards, which were introduced w ith iOS 5, save you time when you’re developing iOS applications by allowing you to create and design user interfaces in one Interface Builder, while simultaneously defining business logic. You can use storyboards to prototype and design numerous ViewController views in one file, as well as to create transitions between them.

In this article, we will compare SwiftUI and storyboards. Hint: SwiftUI is more powerful.

Imperative UI vs. Declarative UI

To understand the differences between SwiftUI and storyboards, you first need some background on the imperative and declarative programming paradigms.

Imperative UI

Prior to SwiftUI, developers had to use different frameworks to create a platform-specific application: UIKit for iOS and tvOS apps, AppKit for macOS apps, and WatchKit for watchOS apps. These three event-driven UI frameworks used the imperative programming paradigm, which involves prototyping or modeling the UI application design. In imperative programming, you define the actions that modify the state of the machine, focusing on the “how,” rather than the “what.”

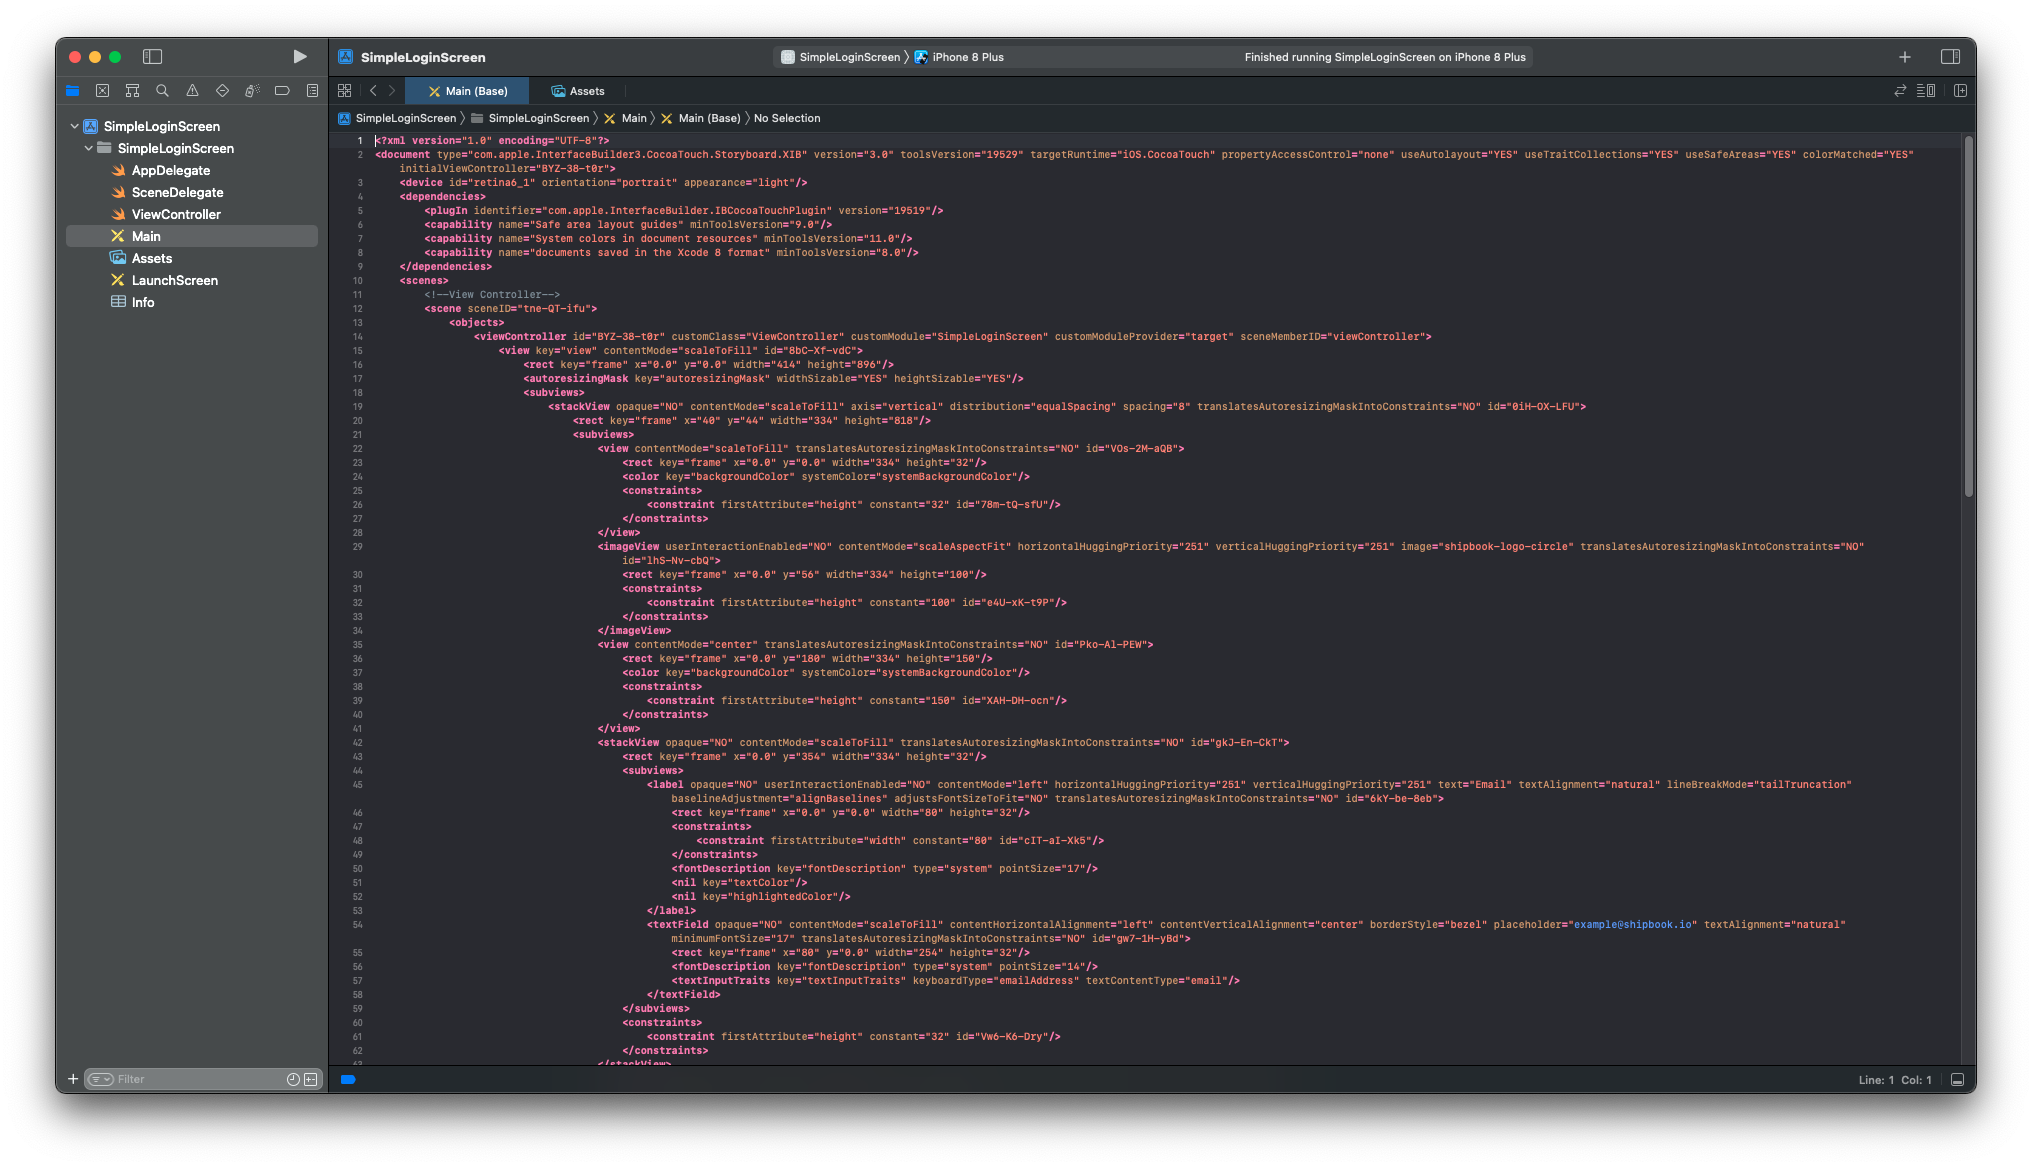
For example, if you want to create a login form screen using a storyboard, your storyboard source code will look like this:

alt_text

Figure 1: XML file of login form with a storyboard

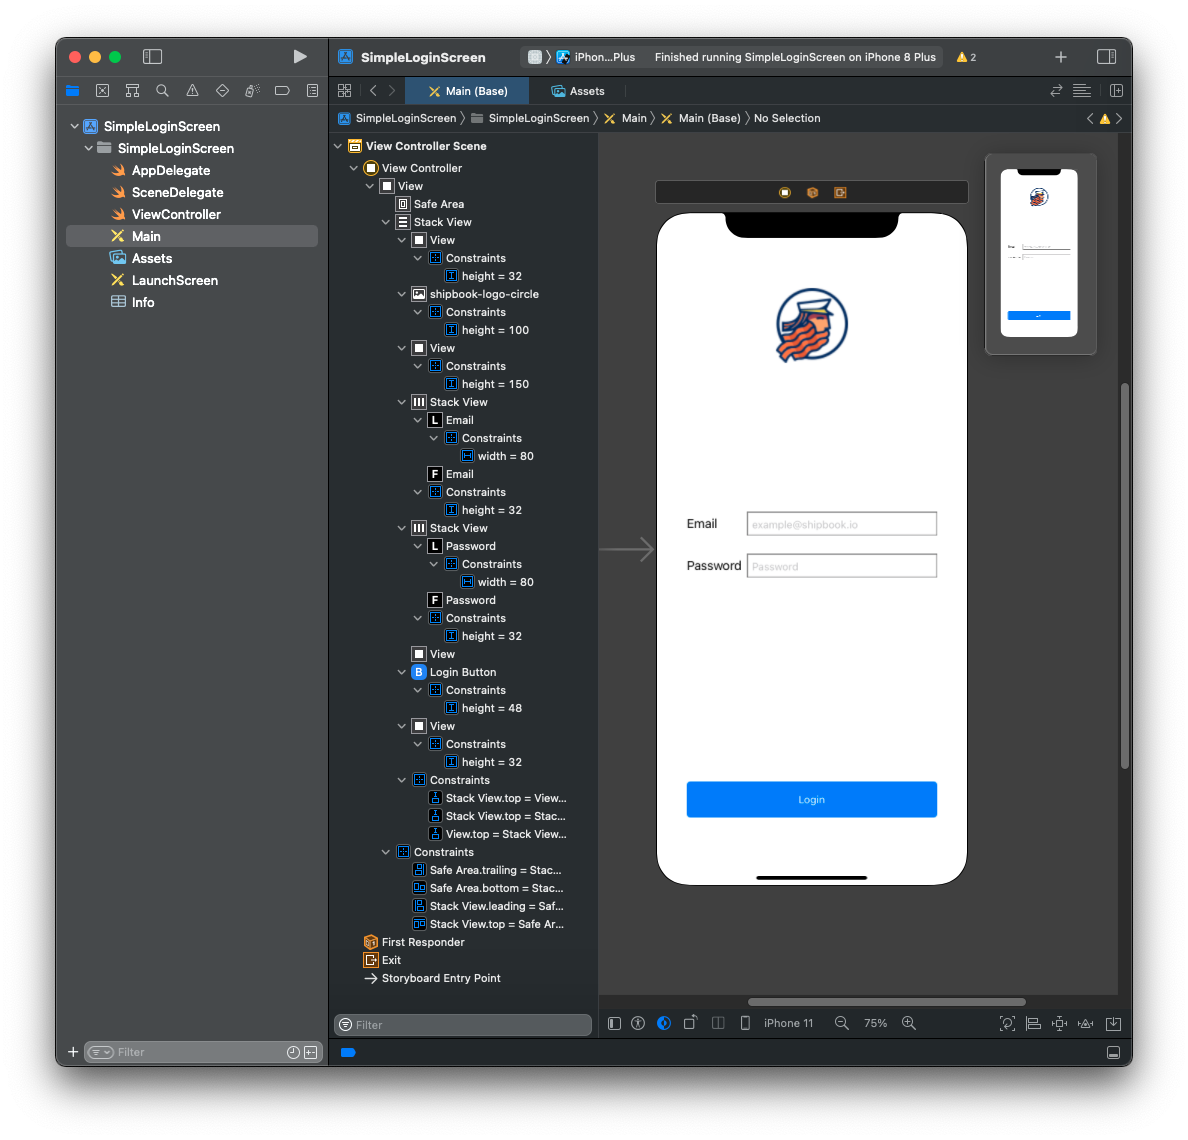
The XML file of the storyboard is quite messy, so you need Interface Builder to “translate” the XML file to be more readable for the developers. Here is a screenshot of the storyboard’s Interface Builder for the login form screen:

Interface Builder for the login form

Figure 2: Interface Builder for the login form

After finishing the UI of the application in the storyboard, you also need to define the business logic in the ViewController file. This is how it looks:

import UIKit

class ViewController: UIViewController {

@IBOutlet weak var email: UITextField!
@IBOutlet weak var password: UITextField!
@IBOutlet weak var loginButton: UIButton!

override func viewDidLoad() {
super.viewDidLoad()

loginButton.isEnabled = false

email.addTarget(self,
action: #selector(onTextFieldChanged),
for: .editingChanged)

password.addTarget(self,
action: #selector(onTextFieldChanged),
for: .editingChanged)
}

@objc func onTextFieldChanged(_ sender: UITextField) {
sender.text = sender.text?.trimmingCharacters(in: .whitespaces)

guard email.hasText, password.hasText else {
loginButton.isEnabled = false
return
}

loginButton.isEnabled = true
}

@IBAction func loginPressed(_ sender: Any) {
// do some login action here
}

}

Declarative UI

SwiftUI implements the declarative programming paradigm. Unlike imperative programming, declarative programming allows you to define your programs (what they should do and look like in different states), then let them manage shifting between those states. Declarative programming focuses on the “what,” rather than “how” a code is running.

Using SwiftUI, you only need to define what your application looks like inside the ContentView file:

import SwiftUI

struct ContentView: View {
@State var email: String = ""
@State var password: String = ""

var body: some View {

VStack {
Spacer().frame(height: 32)

Image("shipbook-logo-circle")

Spacer()

HStack {
Text("Email")
.frame(width: 80, alignment: .leading)

TextField("[email protected]", text: $email)
.keyboardType(.emailAddress)
.textFieldStyle(.roundedBorder)
}

HStack {
Text("Password")
.frame(width: 80, alignment: .leading)

SecureField("password", text: $password)
.textFieldStyle(.roundedBorder)
}

Spacer()

Button {
// do some login action here
} label: {
Text("Login")
.frame(maxWidth: .infinity)
}
.disabled(email.isEmpty || password.isEmpty)
.buttonStyle(.borderedProminent)
.frame(height: 48)
.padding(.bottom, 32)
}
.padding(.horizontal, 32)
}
}

struct ContentView_Previews: PreviewProvider {
static var previews: some View {
ContentView()
}
}
StoryboardSwiftUI

Figure 3: Comparing the UI of a storyboard (left) and SwiftUI (right)

Framework Support

Here is a summary of what each framework supports:

UIKit (Storyboard)SwiftUI
Platform SupportiOS and tvOS onlyiOS, tvOS, macOS, and watchOS (all platforms)
Minimal Version SupportiOS 5.0iOS 13.0 and Xcode 11
ParadigmImperativeDeclarative
View HierarchyAllowed to be examinedNot allowed to be examined
Live PreviewNot provided; only canvas in Interface BuilderProvided with hot reload

No More Interface Builder in SwiftUI

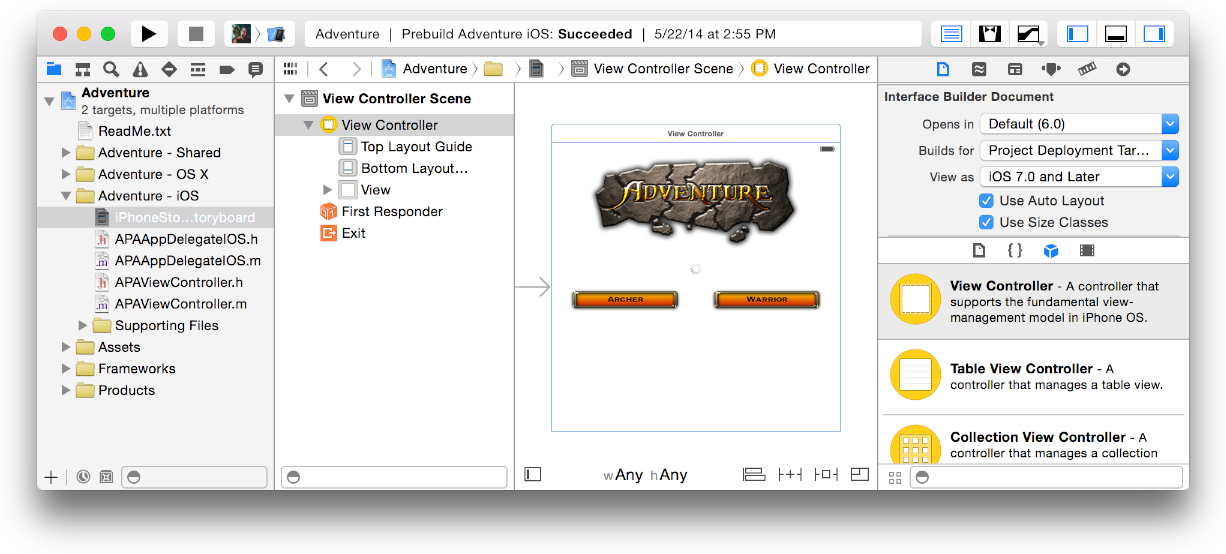
Prior to SwiftUI, when developers only used Storyboard, they would create a user interface in Interface Builder and produce .storyboard and .xib files in XML format. Interface Builder uses drag-and-drop gestures to add objects into the canvas. After you move objects and position them in the canvas, you also need to connect it to your code, which is written in another file using @IBOutlet and @IBAction. Finding the correct button to create the interface can be confusing because there are so many options.

alt_text

Figure 4: Interface Builder (Source: https://developer.apple.com/)

Design Tools and Live Preview

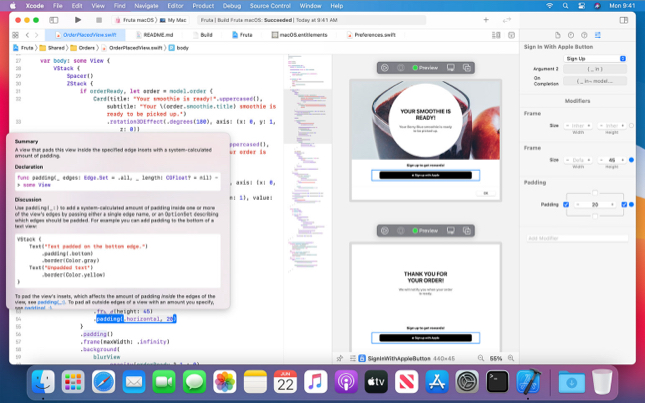
One of SwiftUI’s most helpful design tools is Live Preview. This is a progressive method of designing, building, and testing the outcome of the application interface in real time, without even running the app. With the Dynamic Replacement feature, every change made in the code will automatically recompile and update the preview screens. Xcode design tools also provide a drag-and-drop design control to arrange objects in the design canvas.

alt_text

Figure 5: SwiftUI design tools and previews (Source: https://developer.apple.com/)

SwiftUI replaces storyboards with code, making it simple to construct reusable views and minimize conflicts caused by the development team's concurrent use of one project.

The Cons of SwiftUI

Since there aren’t many, let's start with SwiftUI's disadvantages:

  • It is only compatible with iOS 13 and Xcode 11. By upgrading the minimum iOS version, some users will not be able to update the application.
  • SwiftUI’s technical community is still not mature, so you can’t obtain much help with complex situations.
  • Debugging user interfaces with SwiftUI is very hard. You cannot explore the view hierarchy in Xcode Previews because SwiftUI renders its view differently than UIKit.

The Pros of SwiftUI

Now let’s discuss SwiftUI's many positive features:

State Management and Binding

SwiftUI differs from Apple's prior UI frameworks, not just in how views and other UI components are built, but also how view-level state is handled throughout a program that utilizes it. SwiftUI provides a built-in state management function. This means that instead of delegates, data sources, or other state management patterns seen in imperative frameworks like UIKit and AppKit (i.e., a third-party framework such as RxSwift or ReSwift), SwiftUI ships with a number of property wrappers that allow you to describe exactly how your data is observed, rendered, and changed by your views.

Here are several state management functions for handling data flow in SwiftUI:

  • @Environment
    This is a property wrapper that can be used to read the value of the view's environment given by its parent. Read more.
  • @State
    You can use this property wrapper type to read and write a value without needing to worry about its management. Read more.
  • @Binding
    This property wrapper type can read and write a value owned by a source of truth defined in other places (using @Published property wrapper). Read more.
  • ObservableObject
    A type of object has a publisher. You can listen to the publisher changes using the objectWillChange function. Read more.

Mixable with UIKit

Apple added support for backward compatibility so that you can add SwiftUI to existing UIKit projects or vice versa. To be able to import SwiftUI view into UIKit, you can use UIHostingController, which will hold all of the subviews of ViewController in order to become a single SwiftUI view.

It is essential to understand that SwiftUI does not replace UIKit. Instead, SwiftUI is constructed on top of UIKIt, and gives you an extra layer of abstractions. To be able to import UIKit view inside SwiftUI, you can use UIViewRepresentable.

There are three functions you need to override in order to use this protocol:

  • makeUIView(:) to create and configure the initial state of object view
  • updateUIView(:context:) to update the state of object view when needed by SwiftUl
  • makeCoordinator() to create a Coordinator to communicate the changes of object view with other SwiftUI elements

Cross-Platform User Interface

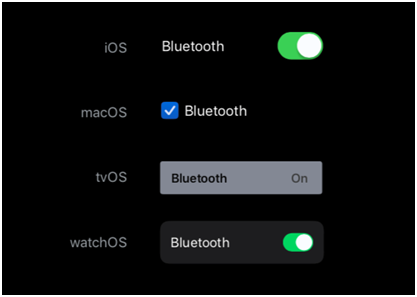
Creating a user interface will never be easier than when using SwiftUI, since it combines and automatically translates your view into a visual interface element that is suitable for each specific platform (macOS, iOS, watchOS, tvOS, etc.).

alt_text

Figure 6: View rendered for different platforms (Source: https://www.clariontech.com)

For example, as shown above, the Toggle view will look different on different platforms. SwiftUI may also change the colors, padding, and spacing, depending on the platform, container size, control status, and current screen. This ability to cross-platform build for the many operating systems inside the Apple ecosystem means there’s no need to master three distinct frameworks if you want to create an app that works on Apple Watch, Apple TV, MacBook Pro, and iPhone.

Easy-to-Add Animation

When adopting SwiftUI, you can independently animate changes to views or the state of a view, regardless of where the effects occur. SwiftUI takes care of the complexities of the animation logic (combinations, layers, and interruptible animations). You just need to call a single function, .animation(), to a view that you want to animate, add the animation logic inside of it, and, voilà, the animation is applied.

struct ContentView: View {
// …

@GestureState private var isDetectingPress = false

var body: some View {

VStack {
Spacer().frame(height: 32)

Image("shipbook-logo-circle")
.scaleEffect(isDetectingPress ? 2 : 1)
.animation(.easeInOut(duration: 4), value: isDetectingPress)
.gesture(
LongPressGesture(minimumDuration: 0.1)
.sequenced(before:DragGesture(minimumDistance: 0))
.updating($isDetectingPress) { value, state, _ in
switch value {
case .second(true, nil):
state = true
default:
break
}
})

Spacer()

// …
}
}

In the example above, you can add a long-press gesture on the Shipbook image to add scaling animation on it. You can then store the gesture state in isDetectingPress and use it as a value of the scaling effect and animation to be triggered.

When to Use Storyboards—and When Not To

So, if SwiftUI is the way of the future, why should you still use storyboards? There are a few explanations that come to mind:

  • You already have a codebase written in storyboards and XIB. This likely required a lot of effort.
  • You are a novice. Storyboards are a simple way to get started with iOS coding.
  • Storyboards need less coding and are more aesthetically appealing. However, if your user interface grows to be very complex, storyboards can rapidly become difficult to use.

Despite these use cases, there are several disadvantages to using storyboards in iOS projects:

  • Storyboards and the Interface Builder are difficult to grasp. The Interface Builder has so many tabs and buttons that it's like studying Photoshop.
  • The interaction between the code and the storyboard is complicated. A string match will be used numerous times to connect your code to the storyboard.
  • If you misspell or use the incorrect string, your application will crash at runtime! This is not a good experience for users or developers.
  • Modifications to storyboards are hard to trace. Because storyboards aren't written in human-readable code, resolving merge conflicts is extremely difficult. In particular, this happens if you have a huge team of developers all working on the same storyboard.

Conclusion

It’s important to consider the pros and cons of the UI development framework and features that are suitable for your application. If you are creating a new application and don't care about supporting the old version of iOS, SwiftUI is the obvious choice. It’s also possible to migrate your legacy code to SwiftUI because SwiftUI can be combined with UIKit and storyboards.


Shipbook gives you the power to remotely gather, search and analyze your user logs and exceptions in the cloud, on a per-user & session basis.

· 8 min read
Nikita Lazarev-Zubov

What’s New in Swift 5.6

Introduction

Since 2014, the year Swift was born and included in Xcode, the language has matured and become an integral part of software development on Apple platforms. The days when Swift language syntax would change with every major release are gone, but Swift still can surprise. Judge for yourself: Synthesized conformance to Equatable was introduced in Swift 4.1, built-in randomization functionality in Swift 4.2, the Result type in Swift 5, support for Windows in Swift 5.3, and so on.

Built-in concurrency—released just last September with Swift 5.5—became an exciting game changer. And now, the next language release, 5.6, is out. In this post, we’ll take a peek at what this latest version delivers.

Concurrency Evolution

After introducing so many thrilling concurrency-related features in Swift 5.5, it‘s not a surprise to see more of this in 5.6.

Incremental Migration to Concurrency

Swift 6 is expected to be packed with breaking concurrency changes, but until that happens, we now have a chance to migrate to the new concurrency model incrementally. If you want to migrate your libraries to built-in concurrency, you may want to first start annotating your closures with@Sendable. This annotation marks values as safe to be used in Swift's modern concurrency environment, or as Swift language developers put it, the values are “data race safe.” Passing a “non-sendable” value to concurrent code generates a warning (given the “-warn-concurrency” compiler option is enabled):

    func runConcurrently(_ task: @Sendable () -> Void) { }

class OldStyleClass {
var message = "Sent"
func callFromOldStyleCode() {
runConcurrently {
message = "Received" // "​​Capture of 'self' with non-sendable type 'OldStyleClass' in a `@Sendable` closure"
}
}
}

If you annotate runConcurrently(_:) with @preconcurrency, the warning will only be generated in a new concurrency environment; this is because the "@preconcurrency" annotation disables the warning for code that doesn't use modern Swift concurrency features:

    @preconcurrency func runConcurrently(_ task: @Sendable () -> Void) { }

class OldStyleClass {
var message = "Sent"
func callFromOldStyleCode() {
runConcurrently {
message = "Received" // No warnings.
}
}
}

class NewStyleClass {
var message = "Sent"
func callFromNewStyleCode() async {
runConcurrently {
message = "Received" // The same warning.
}
}
}

Above, the method implementation inside the NewStyleClass has the async keyword. This means it takes advantage of the modern Swift concurrency, whereas the method inside the OldStyleClass doesn’t and is thus affected by the warning.

You can also use @preconcurrency to annotate imports of old modules to suppress such warnings when passing a module’s types to concurrency environments.

Actors Isolation Warnings

Global actors instantiated as default values of instance-member properties are now outlawed and generate a warning:

    @MainActor struct Dependency { }

class Client {
@MainActor let member = Dependency() // Expression requiring global actor 'MainActor' cannot appear in default-value expression of property 'member'; this is an error in Swift 6
}

As you can see, the warning will become an error in Swift 6, so it’s better to prepare your code now. To get rid of the warning, just move the initialization to the init block:

    @MainActor struct Dependency { }

class Client {
let member: Dependency
@MainActor init() {
member = Dependency()
}
}

Syntax Additions

any Keyword

Swift 5.6 introduces a new keyword for using protocols as types in the form of any:

    protocol Employee { }
func fire(_ employee: any Employee) { }

You’re still allowed to omit it, but this is likely to change in the future. The new keyword creates a distinction between protocol conformance constraints and so-called existential types:

    func fire<Someone: Employee>(_ employee: Someone) { }
func fire(_ employee: any Employee) { }

The difference between the two versions doesn’t seem to be a big deal now–even seasoned Swift programmers might find it subtle. Conceptually, the first method takes an argument of any type that conforms to the Employee protocol, while the second one takes an argument of Employee as a type itself. For the time being, both versions will result in the same behavior, but the keyword is here to stay, so it’s a good idea to start getting used to it.

Type Placeholders

Type annotations for local variables and properties can contain underscore placeholders to take advantage of type inference:

    let int: _ = 1
struct IntContainer {
let int: _ = 1
}

In the above code snippet, it’s not particularly useful since those types are inferred even without placeholders. However, it might be useful for partial inference. For example, the variable in the code extract below would have the type of [String : Int]:

    let dict = ["1" : 1,  "2" : 2]

If we want it to be [String : Double], we can help the compiler with the second part of the type and still leave the first part for the compiler to infer:

    let dict: [_ : Double] = ["1" : 1, "2" : 2] // [String : Double]

Another interesting use case is making an inferred type optional. Just imagine how useful this could be in situations where you have to explicitly specify a very long type only to let the compiler know that it should be optional. Swift 5.6 lets you go with a shorter version:

    let int: _? = SomeVeryLongTypeName() // SomeVeryLongTypeName?

Unfortunately, placeholders don’t work with function parameters and return values. But they do produce useful hints in the latter case and suggest fixes:

    // Type placeholder may not appear in function return type
// Replace the placeholder with the inferred type 'Int' (Fix)
func returnInt() -> _ {
anInt
}

If you try to use a type placeholder with a function parameter, you’ll be shown another funny hint:

alt_text

Figure 1: Attempt to use a function parameter with a type placeholder

Standard Library Additions

CodingKeyRepresentable Protocol

Swift lets you encode dictionaries with String and Int keys into JSON objects of key-value pairs:

    import Foundation

let dict = ["key1" : "value1", "key2" : "value2"]
let data = try! JSONEncoder().encode(dict)

print(String(data: data, encoding: .utf8)!)
// {"key1":"value1","key2":"value2"}

But if you try to use any other type for keys, you’ll end up with an array of alternating keys and values instead of key-value pairs—not very convenient for sending to your backend:

    struct CustomKey: Hashable, Encodable {
let key: String
}

let dict = [CustomKey(key: "key1") : "value1",
CustomKey(key: "key2") : "value2"]
let data = try! JSONEncoder().encode(dict)

print(String(data: data, encoding: .utf8)!)
// [{"key":"key1"},"value1",{"key":"key2"},"value2"]

Now, in Swift 5.6, the CodingKeyRepresentable protocol fixes this issue. What it expects from you is to essentially implement a way to represent your custom key as a String and, optionally, an Int. Of course, this is just a wrapper for existing limitations, but the protocol at least provides a unified way of doing it instead of forcing you to “reinvent the wheel” with your own solution:

    struct CustomCodingKey: CodingKey {


let stringValue: String
let intValue: Int? = nil


init(stringValue: String) {
self.stringValue = stringValue
}
init?(intValue: Int) {
nil
}


}

struct CustomKey: Hashable, Codable, CodingKeyRepresentable {


let id: String
var codingKey: CodingKey { CustomCodingKey(stringValue: id) }


init(id: String) {
self.id = id
}
init?<Key: CodingKey>(codingKey: Key) {
self.init(id: codingKey.stringValue)
}


}

let dict = [CustomKey(id: "key1") : "value1", CustomKey(id: "key2") : "value2"]
let data = try! JSONEncoder().encode(dict)

print(String(data: data, encoding: .utf8)!)

This prints “["key1":"value1","key2":"value2"]”–much better for outside-Swift environments.

Compiler Additions

#unavailable Keyword

The #available keyword now has an inverted counterpart–#unavailable.

First of all, this is useful in situations when you would need to write something extra for older platforms. For example, starting from iOS 13, you might have moved a lot of application initialization stuff to UISceneDelegate and executed a lot of code in UIApplicationDelegate only conditionally, to ensure backward compatibility with previous iOS versions:

    if #available(iOS 13.0, *) {
// Do nothing. The case is covered in UISceneDelegate.
} else {
// ... (execute pre-iOS 13 code).
}

Swift 5.6 allows you to make such code look a little bit nicer:

    if #unavailable(iOS 13.0) {
// ... (execute pre-iOS 13 code).
}

In the #unavailable case, you of course don’t need a wildcard as the second argument–another small advantage to making your code a bit more concise.

Conclusion

Although Swift 5.6 doesn’t seem to bring us a pile of new exciting possibilities like Swift 5.5 did, it’s another important step towards Swift 6. After introducing a built-in concurrency with the previous language release, it’s not surprising that the authors continue building a path for us to slowly start using this feature in real projects.

Another important thing about this new release is the existential “any” keyword. If I had to bet, this keyword is going to be mandatory in one of the upcoming major releases. Whether or not this actually happens, Swift users should keep up with what’s going on in the field.

· 14 min read
Kustiawanto Halim

Introduction

In computer science, concurrency is the process of performing multiple tasks at the same time. The iOS framework has several APIs for concurrency, such as Grand Central Dispatch (GCD), NSOperationQueue, and NSThread. As you may be aware, multithreading is an execution paradigm in which numerous threads can run concurrently on a single CPU core. The operating system allocates tiny chunks of computation time to each thread and switches between them. If more CPU cores are available, multiple threads can run in parallel. Because of the power of multithreading, the overall time required by many operations can be greatly decreased.

In this post, we will discuss concurrency and multithreading in iOS. We’ll start with what it was like to work with completion handlers before Swift 5.5 supported async-await statements. We’ll also explore some of the challenges of async-await and how to solve them.

Completion Handlers

Before Swift had async-await, developers solved concurrency problems by using completion handlers. A completion handler is a callback function that sends back return values of a length running function, such as network calls or heavy computations.

To demonstrate how completion handlers function, you can check the following example. Assume you have a large amount of transaction data, and you want to know how many transactions are on average. First, you will use fetchTransactionHistory to return an array of Double representing all transaction amounts. The calculateAverageTransaction function takes the transaction amount given by fetchTransactionHistory and converts it to a Double that shows the average amount of all transaction data. Finally, uploadAverageTransaction will upload the average transaction amount to some destination and return a String "OK" indicating that the upload data was successful. Here is a mockup sample code:

import Foundation

func fetchTransactionHistory(completion: @escaping ([Double]) -> Void) {
// Complex networking code here; let say we send back random transaction
DispatchQueue.global().async {
let results = (1...100_000).map { _ in Double.random(in: 1...999) }
completion(results)
}
}

func calculateAverageTransaction(for records: [Double], completion: @escaping (Double) -> Void) {
// Calculate average of transaction history
DispatchQueue.global().async {
let total = records.reduce(0, +)
let average = total / Double(records.count)
completion(average)
}
}

func uploadAverageTransaction(result: Double, completion: @escaping (String) -> Void) {
// We need to send back average transaction result to the server and show "OK"
DispatchQueue.global().async {
completion("OK")
}
}

Figure 1: Sample code of asynchronous function using completion handlers

Let’s say that to upload the average transaction, you need to calculate the average transaction value from the transaction history. Hence, you need to chain the function (fetch the transaction history, calculate the average, and upload the result). This will result in “callback hell.”

Here’s what “callback hell” looks like:

// 1. This statement will be executed first
// Some function to setup UI

// 2. Our asynchronous function is executed
fetchTransactionHistory { records in
// 4. Records are returned, execute calculateAverageTransaction
calculateAverageTransaction(for: records) { average in
// 5. Average is returned, execute showAverageTransaction
uploadAverageTransaction(result: average) { response in
// 6. Lastly, print server response
print("Server response: \(response)")
}
}
}

// 3. Another statement is executed, we still wait for fetchTransactionHistory
// Some other function

Figure 2: Chaining function call of completion handlers resulting in “callback hell”

There are several problem that can occur with completion handlers:

  • The functions may call their completion handler more than once, or, even worse, will forget to call it at all.
  • The @escaping (xxx) -> Void syntax is not familiar to human language.
  • You need to use weak references to avoid retain cycles or memory leaks.
  • The more completion handlers you chain in a function, the greater the chance that you’ll end up with a "pyramid of doom" or “callback hell,” where the code will increasingly indent to accommodate each callback.
  • It was difficult to resolve back errors with completion handlers until Swift 5.0 introduced the Result type.

Async-Await

At WWDC 2021, Apple introduced async-await as part of Swift 5.5’s new structured concurrency. With this new async function and await statement, you can define asynchronous function calls clearly. Before we look at how async-await solved completion handler problems, let's discuss what they actually are.

Async

async is an asynchronous function attribute, indicating that the function does asynchronous tasks.

Here is an example of fetchTransactionHistory written using async:

func fetchTransactionHistory() async throws -> [Double] {
// Complex networking code here; let say we send back random transaction
DispatchQueue.global().async {
let results = (1...100_000).map { _ in Double.random(in: 1...999) }
return results
}

}

Figure 3: Sample code of asynchronous function using new async statement

The fetchTransactionHistory function is more natural to read than when it was written using completion handlers. It is now an async throwing method, which implies that it performs failable asynchronous works. If something goes wrong (when executing the function), it will throw an error, and it will return a list of transaction amounts (in Double) if the function is running well.

Await

To invoke an async function, use await statements. Put simply, the await statement is a statement used when awaiting the callback from the async function.

If you only want to call the fetchTransactionHistory, the code will look like this:

do {
let transactionList = try await fetchTransactionHistory()
print("Fetched \(transactionList.count) transactions.")
} catch {
print("Fetching transactions failed with error \(error)")
}

Figure 4: Implementation of await statement to call async function

The above code calls the asynchronous function fetchTransactionHistory. Using the await statement, you tell it to await for the result of length tasks performed by fetchTransactionHistory and only continue to the next step when the result is available. This result could be a list of transactions or errors, if something went wrong.

Structured Concurrency

Look back at Figure 2, which shows the chaining function you need to call an asynchronous function using completion handlers. There, the code is called unstructured concurrency. In that example, we called the fetchTransactionHistory function between another code that was continually running on the same thread (in this case, the main thread). You never know when your asynchronous function returns its value, but you handle it inside the callback. The problem with unstructured concurrency is that you don’t know when the asynchronous function gives its result back, and sometimes it doesn’t return anything.

async-await allows you to use structured concurrency to handle the code order of execution. With structured concurrency, an asynchronous function will execute linearly (step by step), without going back and forth to handle its callback.

This is how you rewrite the chaining function call using structured concurrency:

do {
// 1. Call the fetchTransactionHistory function first
let transactionList = try await fetchTransactionHistory()
// 2. fetchTransactionHistory function returns

// 3. Call the calculateAverageTransaction function
let avgTrx = try await calculateAverageTransaction(transactionList)
// 4. calculateAverageTransaction function returns

// 5. Call the uploadAverageTransaction function
let serverResponse = try await uploadAverageTransaction(avgTrx)
// 6. uploadAverageTransaction function returns

print("Server response: \(serverResponse)")
} catch {
print("Fetching transactions failed with error \(error)")
}
// 7. Resume execution of another statement here

Figure 5: Sample implementation of chaining asynchronous function using structured concurrency

Now, your code order of execution is linear, and it is easier to understand the flow of the code. By modifying your asynchronous code to use async-await and structured concurrency, it will be easier to read the code and debug complex business logic.

Async Let

While you can benefit from structured concurrency using async-await to linearly execute asynchronous functions, sometimes you need to call it in parallel. Let's say that to save time by using all available resources, you want to call uploadAverageTransaction several times parallely.

Here’s how to do this with async-await:

do {
let serverResponse1 = try await uploadAverageTransaction(avgTrx1)
let serverResponse2 = try await uploadAverageTransaction(avgTrx2)
let serverResponse3 = try await uploadAverageTransaction(avgTrx3)
} catch {
print("Fetching transactions failed with error \(error)")
}

Figure 6: Linear execution of async-await functions

This code will produced:

Finished upload average transaction 1 with response OK
Finished upload average transaction 2 with response OK
Finished upload average transaction 3 with response OK

Figure 7: Execution result of linear async-await functions

You can take advantage of async-let to call these functions parallely because the order of success uploading the transaction functions doesn't matter.

do {
async let serverResponse1 = uploadAverageTransaction(avgTrx1)
async let serverResponse2 = uploadAverageTransaction(avgTrx2)
async let serverResponse3 = uploadAverageTransaction(avgTrx3)
} catch {
print("Fetching transactions failed with error \(error)")
}

Figure 8: Parallel execution of functions using async-let

Now, the outcome of the code above will be the asynchronous function that returned faster, based on resource availability and execution time:

Finished upload average transaction 3 with response OK
Finished upload average transaction 1 with response OK
Finished upload average transaction 2 with response OK

Figure 9: Execution result of parallel functions call using async-let

Challenges with Concurrency

Concurrency/multithreading is a powerful technique that comes with many challenges, including race condition and deadlock. These two issues are related to accessing the same shared resources.

Race Condition

A race condition happens when a system attempts to perform two or more operations on the same resources at the same time. Critical race conditions frequently occur when tasks or threads rely on the same shared state.

To illustrate, take a look at TransactionManager class. We use this class to manage all transaction related function, such as update transaction status, and fetch transaction. TransactionManager will work in multi-thread environment, so we will use asyncronous function to it. Imagine you want to create a digital banking app that users can use to check their account balances and transfer money to other users. One of the app's main features is that users can install it on more than one device. The app must ensure that the user has sufficient funds before transferring money to another user. Otherwise, the app must bear the loss.

This is how TransactionManager code will look:

struct Transaction {
var id = 0
var status = "PENDING"
var amount = 0
}

class TransactionManager {
private var transactionList = [Int: Transaction]()
private let queue = DispatchQueue(label: "transaction.queue")

func updateTransaction(_ transaction: Transaction) {
queue.async {
self.transactionList[transaction.id] = transaction
}
}

func fetchTransaction(withID id: Int,
handler: @escaping (Transaction?) -> Void) {
queue.async {
handler(self.transactionList[id])
}
}
}

Figure 10: Sample of race condition code

The above implementation is working as expected, but when you try to update a transaction, and try to fetch it at the same time, data race condition may happen. Take a look at the following example:

let manager = TransactionManager()
let transaction = Transaction(id: 8, status: "PENDING", amount: 100)

func tryRaceCondition() {
let updatedTransaction = Transaction(id: 8, status: "FAILED", amount: 100)
manager.updateTransaction(updatedTransaction)
manager.fetchTransaction(withId: 8) { transaction in
print(transaction)
// This code might print Transaction(id: 8, status: "PENDING", amount: 100)
// but we already update the status?
}
}

The above example may produce data race conditions, where the printed transaction status is “PENDING”, while we have already updated it in the previous line. The asyncronous function do not promise us that the updateTransaction is successfuly running and data is updated when we call fetchTransaction function. In some cases, updating data require longer time, thus the transaction data returned in fetchTransaction is the data before being proccess with updated value.

To solve race condition, actor can be used to prevent data is accessed by more than one resources by ensuring synchronized access to data (serialized access for properties and method). You can use locks to achieve the same behavior, but with actor, the Swift standard library hides all functionalities related to synchronizing access as an implementation detail.

Here’s how to rewrite the code using actor:

actor TransactionManager {
private var transactionList = [Int: Transaction]()

func updateTransaction(_ transaction: Transaction) {
transactionList[transaction.id] = transaction
}

func fetchTransaction(withID id: Int) -> Transaction? {
transactionList[id]
}
}

Figure 11: Using actor to solve race condition

As you can see, we do not need to handle multi-threading and dispatch method because actor force the caller of this function to use await function. This allows the Swift compiler to handle the underlying lock mechanism and synchronization process, so you don’t need to do anything else related to shared data access. Now if we call tryRaceCondition() function, it will print the updated transaction with “FAILED” status.

let manager = TransactionManager()
let transaction = Transaction(id: 8, status: "PENDING", amount: 100)

func tryRaceCondition() async {
let updatedTransaction = Transaction(id: 8, status: "FAILED", amount: 100)
await manager.updateTransaction(updatedTransaction)
let transaction = await manager.fetchTransaction(withID: 8)
print(transaction)
// Transaction(id: 8, status: "FAILED", amount: 100)
}

Deadlock

A deadlock is when each member of a queue is waiting for another member, including itself, to be executed (sending a message or, more typically, releasing a lock). In simple terms, a deadlock occurs on a system when there is a waiting time for resources to become accessible; meanwhile, it is logically impossible for them to be available.

One example of producing deadlock is when you run a lot of tasks to a concurrent queue and it is blocked because of a synchronous function or because no resources are available.

This is a sample code that will produce deadlock:

let queue = DispatchQueue(label: "my-queue")

queue.sync {
print("print this")

queue.sync {
print("deadlocked")
}
}

Figure 12: Example of code producing deadlock

There are several thread safety mechanisms that can be used to solve deadlock problems, including Dispatch Barrier. You can use Dispatch Barrier to block serial queues (to create a bottleneck), so it will make sure no other tasks are being executed while running the barrier task. Once the barrier task is finished, Dispatch Barrier will release the queue of other serial tasks, making them available to be executed. This may seem to slow down the process. However, in some cases, you need to limit large amounts of asynchronous tasks to make sure resources are still available in order to avoid deadlock.

This is sample code for implementing Dispatch Barrier:

let queue = DispatchQueue(label: "my-queue")

queue.async(flags: .barrier) {
print("print this")

queue.async(flags: .barrier) {
print("no more deadlock")
}
}

Figure 13: Solving deadlock using Dispatch Barrier

Another thread-safety approach to solving deadlock issues is to use DispatchSemaphore or NSLock.

alt_text

Figure 14: Visualization of barrier task in Dispatch Barrier. (Source: https://basememara.com)

Conclusion

Because of its complexity, debugging code that uses concurrent programming is difficult. Modern IDE already provides us with a debugger. However, when it is related to concurrency or multithreading, it only gives us a collection of threads and some information about the thread’s memory state. If we understand the low-level machine code, this can be useful. But most of the time, we only care about the ability to trace back the steps of our code in different threads.

To help debugging concurrent code, you need a good logging mechanism. Sometimes it is hard to find which code is causing concurrency problem, especially when the application is running. You can deduct what is wrong with the code by logging status information at some point in our program and observing it. Shipbook helps with this by giving you the power to remotely gather, search, and analyze your user mobile-app logs—and even crashes in the cloud—on a per-user and session basis. This will allow you to easily analyze relevant data related to concurrent functions in your app and catch bugs that no one found in the testing phase.

· 15 min read
Kustiawanto Halim

Imagine you work for NASA and are building a rocket for space travel. You, as the main developer of the rocket launch program, are responsible for the precision of the rocket launch angle. Of course, the necessary calculations are numerous and complex. After calculating the launch angle, for example, you have to complete many other interrelated calculations. Let’s say that on the day of the rocket launch, the rocket tragically crashes because there was a shift in the launch angle. You then discover that the code for the launch angle changed because of another calculation code.

From the scenario above, we can understand that the logic of the code we create (in this case, the launch angle calculation) can change—without our knowledge—when another code is added. This can have a major impact, and can even be fatal. But of course, the rocket crash could have been prevented if you had added tests to the code.

Likewise, in software development, you need to do software testing to avoid programs that do not match your requirements. In this post, we’ll discuss software testing and its benefits, unit testing in iOS development using XCTest, and how to write a UI test. You will also learn how to show code coverage in your XCode project.

· 20 min read
Vandad Nahavandipoor
Elisha Sterngold

Vandad Nahavandipoor

Vandad has written a number of books published by O'Reilly such as iOS programming Cookbook, Swift Programming Cookbook and others, what’s more recently he has been publishing a ton of content, including videos with tips and tricks relating to Flutter on Youtube and Github. Vandaad currently has more then 2000 stars on Github for “Flutter Tips and Tricks”.

He is employed as the Lead iOS developer in Telia Smart Family. Telia being the leading communication service provider in Nordic Countries.