Introduction
RecyclerView and ListView are two popular options for displaying long lists of data within an Android application. Both are subclasses of the ViewGroup class and can be used to display scrollable lists. However, they have different features, capabilities and implementation.
The process of implementing both may seem pretty similar, for example,
- You get list of data
- You create an adapter
- Find the view to which you have to display the list
- Set the adapter to that list
ListView was one of the earliest components introduced in Android development for displaying a scrollable list of items. Although it provided basic functionality and ease of implementation, it had its limitations, especially when it came to handling large data sets and customizing the appearance and behavior of the list.
As Android applications evolved and the need for more sophisticated list management became apparent, RecyclerView was introduced as a more versatile and efficient solution for displaying lists. As a developer, it's essential to understand the key differences between ListView and RecyclerView to appreciate their respective advantages and disadvantages.
In this article, we'll explore the key differences between RecyclerView and ListView and give you a good understanding of when to use what and how and also appreciate why RecyclerView came into existence over ListView.
ListView
ListView was introduced in Android 1.0 and has been around since then. ListView was the go-to solution for displaying lists of data before RecyclerView was introduced.
One of the biggest advantages of using a ListView is that it's simpler to implement, easier to use. Here is an example of how simply ListViews can be implemented in Android.
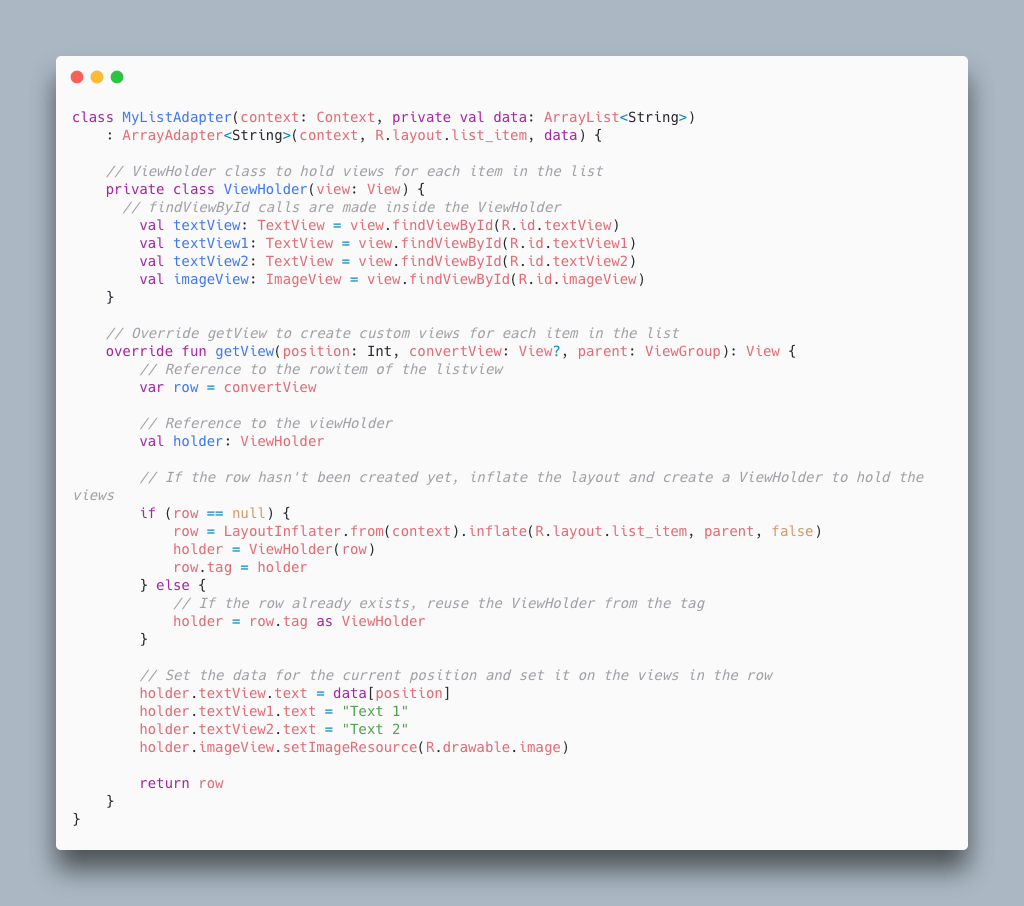
As you can see, the code is pretty simple and straight-forward compared to the RecyclerView implementation one has to do by implementing custom adapter and viewholder classes.
If you ask any Android Developer about the difference between the two they would say something like “ListView is still available and can be a good solution for displaying smaller lists of data. But, as the complexity of the app increases, the ListView might not be the best solution for managing and displaying large amounts of data.” Let’s try to understand why?
To implement anything a little more complex than just a simple list of Strings, it’s a good practice to write our own Adapter class whose responsibility is to map the data to the positioned view as we scroll through the list.
Let’s write our own adapter class instead of a simple ArrayAdapter for the above snippet.

The getView function on a high level does the following:
- Gets each view item from the listview
- Find references to its child views
- Sets the correct data to those views depending upon the position
- Returns the created view item.
For each row item in the 1000 item list, we don’t have to create 1000 different views, we can repopulate and reuse the same set of views with different data depending on the position in the list. This can be a major performance boost as we are saving tons of memory for a large list. This is called View-Recycling and is a major building block for RecyclerView which we will see in a while and here is a representation of how View Recycling works.
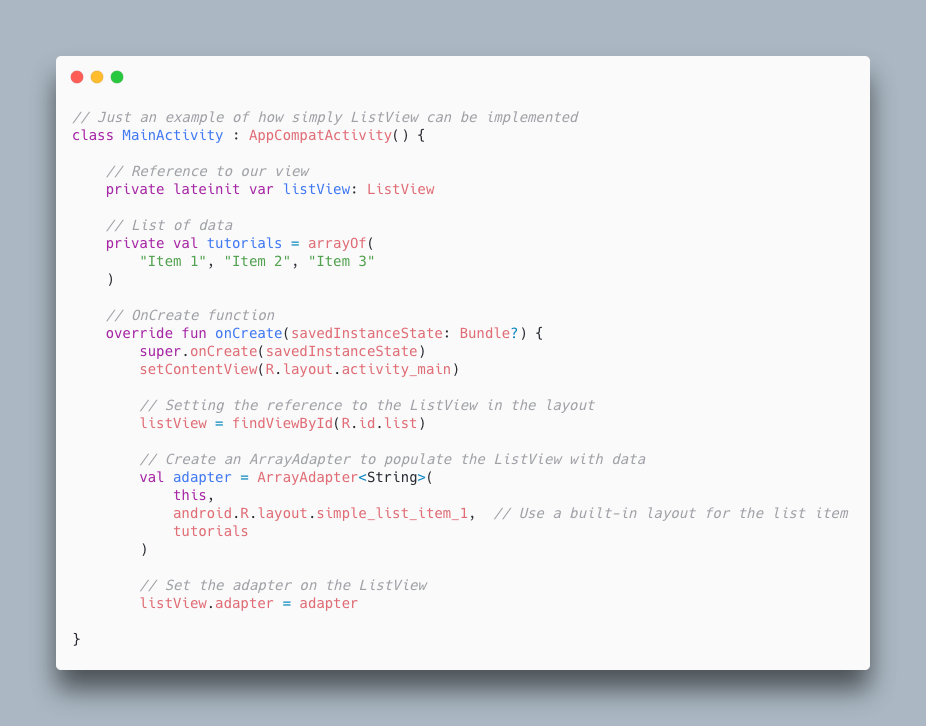
Now, we have recycled the views by a simple null check and saved memory but if we look inside the getView() function we can see that we are trying to find the references to the child views by doing findViewByID() calls.
Depending upon how many child views there are, in my example code there are 4 so** for each item in the list, we are** calling findViewByID() 4 times.
Hence for a 1000 item list, there will be 4000 findViewByID() calls even though we have optimized the way in which the rowItem views are initialized. To help fix this problem for large lists, the ViewHolder pattern comes into play.
ViewHolder Pattern in Android
The ViewHolder pattern was created in Android to improve the performance of ListViews (and other AdapterView subclasses) by reducing the number of calls to findViewById().
When a ListView is scrolled, new views are created as needed to display the list items that become visible. Each time a new view is created, the findViewById() method is called to find the views in the layout and create references to them. This process can be slow, especially for complex layouts with many views while also at the same time the instantiated views references are kept in memory for the whole list which can grow directly proportional to the size of the list you are rendering.
The ViewHolder pattern addresses this performance issue by caching references to the views in the layout. When a view is recycled (i.e., reused for a different list item), the ViewHolder can simply update the views with new data, rather than having to call findViewById() again.
Implementing ViewHolder Pattern in our ListView
Lets implement our ViewHolder class inside the MyListAdapter class.
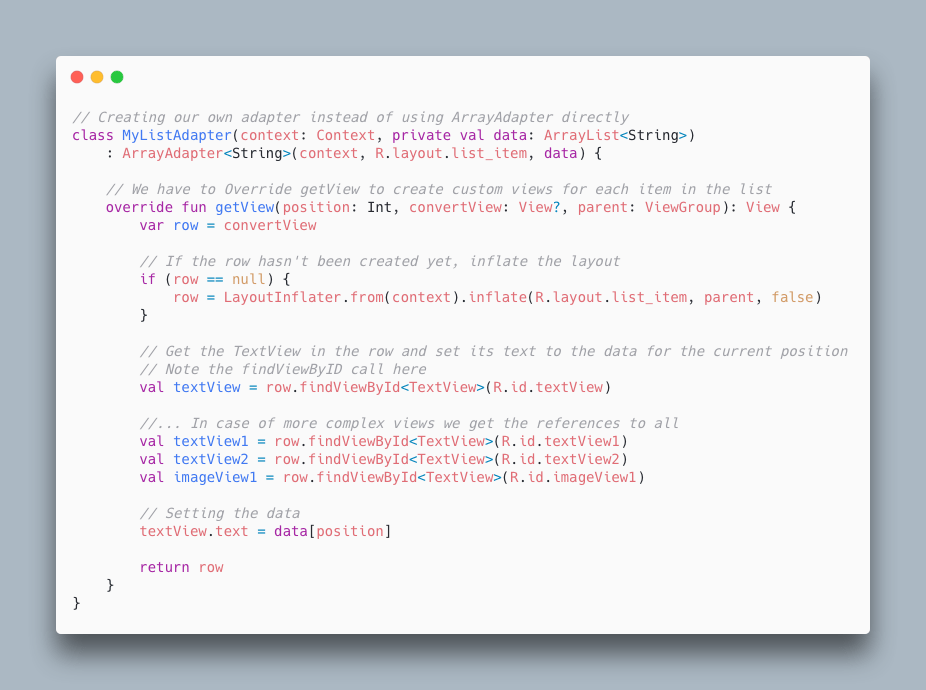
With the above mentioned changes, we have created a structure to:
- Reuse the View for each item in the list instead of creating new ones for each item in the list.
- Reduce the number of findViewByID() calls which in case of complex layouts and large number of items in the lists can take down the performance of the app significantly.
These are the two key things which are provided as a structure to the developers with RecyclerView apart from other features of customisations in RecyclerView.
Drawbacks of Using ListView
- Inefficient scrolling due to inefficient memory usage out of the box
- Lesser flexibility to customize how the list items should be positioned.
- Can only implement a vertically scrolling list.
- Implementing animations can be hard and complex out of the box
- Only offers notifyDataSetChanged() which is an inefficient way to handle updates.
RecyclerView
RecyclerView was introduced in Android 5.0 Lollipop as an upgrade over the ListView. It is designed to be more flexible and efficient, allowing developers to create complex layouts with minimal effort.
It uses "recycling" out of the box which we have seen above. It also has more flexible layout options, allowing you to create different types of lists with ease and also provides various methods to handle data set changes efficiently.
Let’s use RecyclerView instead of ListView in our above implementation.
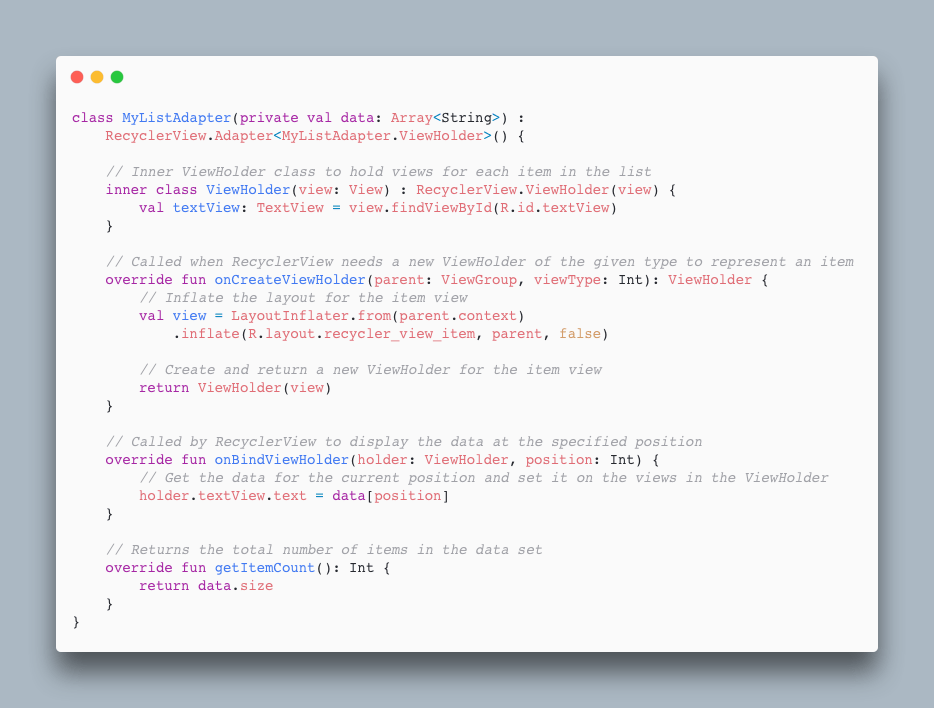
As you can see there are multiple functions to override instead of just one getView() function of ArrayAdapter which makes the implementation of RecyclerViews not as beginner friendly as compared to ListView. It can also feel like an overkill implementation for the simplest of the lists in Android.
Benefits of Using RecyclerView
-
The major advantage of RecyclerView is its performance. It uses a view holder pattern out of the box, which reuses views from the RecyclerView pool and prevents the need to constantly inflate or create new views. This reduces the memory consumption of displaying a long list compared to ListViews and hence improves performance.
-
With LayoutManager you can define how you want your list to be laid out, linearly, in a grid, horizontally, vertically rather than just vertically in a ListView.
-
RecyclerView also offers a lot of customisation features over listview that make it easier to work with. For example, It supports drag and drop functionality, rearrange items in the list, item swiping gestures features like deleting or archiving items in the list. Below is an attached example code on how easy it is to extend the functionality to add swiping gestures.
// Set up the RecyclerView with a LinearLayoutManager and an adapter
recyclerView.layoutManager = LinearLayoutManager(this)
adapter = ItemAdapter(createItemList())
recyclerView.adapter = adapter

// Add support for drag and drop
val itemTouchHelper = ItemTouchHelper(object : ItemTouchHelper.Callback() {
    override fun getMovementFlags(
        recyclerView: RecyclerView,
        viewHolder: RecyclerView.ViewHolder
    ): Int {
        // Set the movement flags for drag and drop and swipe-to-dismiss
        val dragFlags = ItemTouchHelper.UP or ItemTouchHelper.DOWN
        val swipeFlags = ItemTouchHelper.START or ItemTouchHelper.END
        return makeMovementFlags(dragFlags, swipeFlags)
    }

    override fun onMove(
        recyclerView: RecyclerView,
        viewHolder: RecyclerView.ViewHolder,
        target: RecyclerView.ViewHolder
    ): Boolean {
        // Swap the items in the adapter when dragged and dropped
        adapter.swapItems(viewHolder.adapterPosition, target.adapterPosition)
        return true
    }

    override fun onSwiped(viewHolder: RecyclerView.ViewHolder, direction: Int) {
        // Remove the item from the adapter when swiped to dismiss
        adapter.removeItem(viewHolder.adapterPosition)
    }
})

// Attach the ItemTouchHelper to the RecyclerView
itemTouchHelper.attachToRecyclerView(recyclerView)
- Implementing animations is pretty simple in RecyclerView and can be done by simply setting the
itemAnimatoras shown below:
val itemAnimator: RecyclerView.ItemAnimator = DefaultItemAnimator()
recyclerView.itemAnimator = itemAnimator
Best Practices to keep in mind with RecyclerView
To ensure the best results, developers should follow best practices when working with RecyclerView and ListView. For example:
-
Use item animations sparingly, as too many animations can lead to janky performance.
-
To update the UI with a RecyclerView, we can use the notifyItemInserted(), notifyItemRemoved() or even notifyItemChanged() methods, which tells the adapter that the data has changed and the list needs to be refreshed, but if not used responsibly can lead to redundant rebuilds of the list and introduce unwanted bugs.
Conclusion
In this article, we started off with implementing a simple list using ListView and made changes to it which don’t come out of the box with ListView to make it more memory efficient, like View Recycling and View Holder pattern, only to realize the limitations of customizations available in ListView.
Then we implemented the same list with RecyclerView which enforces developers to implement the features of View Recycling and ViewHolder pattern out of the box making them efficient, customizable and performant out of the box explaining their popularity as a solution in the Android Community.