
4 posts tagged with "swiftui"

View All Tags

· 6 min read
Nikita Lazarev-Zubov

Debugging SwiftUI Views Redraws

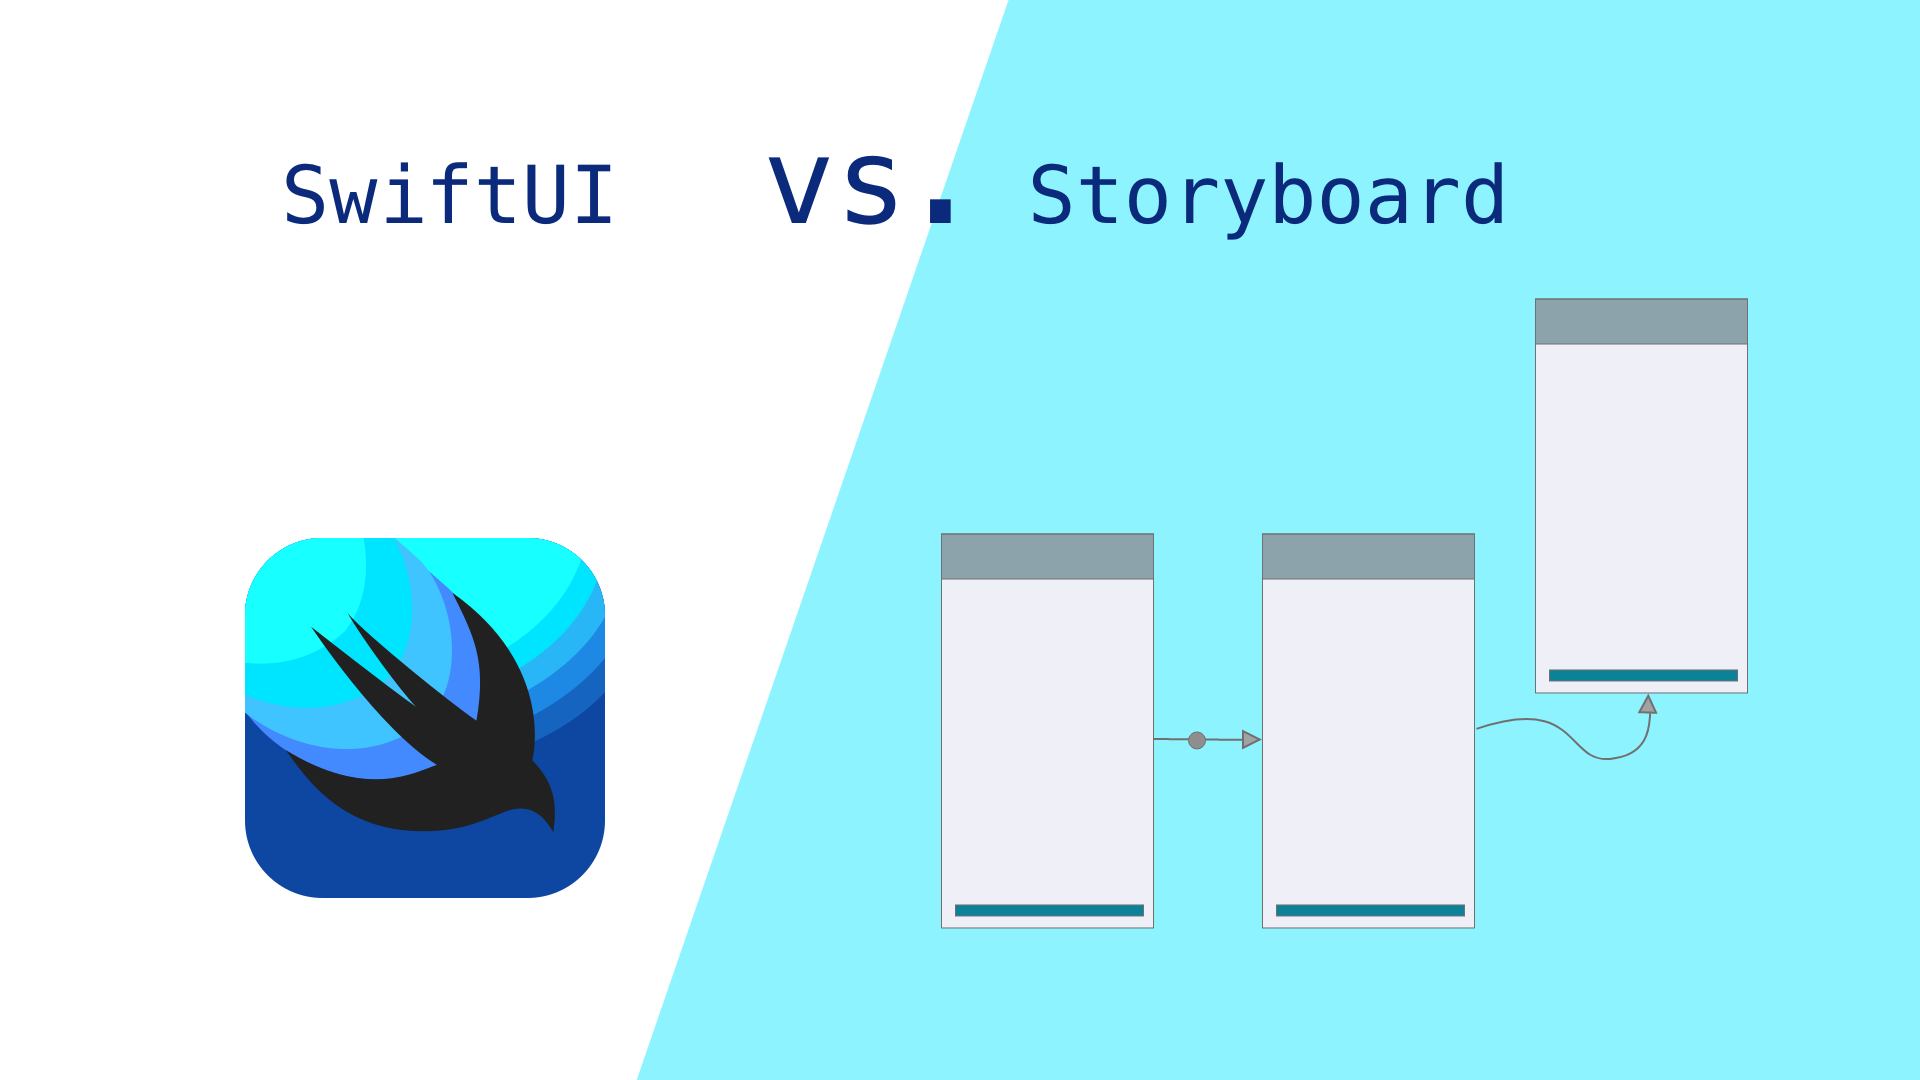
When SwiftUI was introduced by Apple as a substitution to the old-fashioned UIKit in 2019, it immediately became a hit. Developers love that SwiftUI requires far less code to implement a user interface than the hundreds of lines of code necessitated in UIKit. However, as often happens, this new technology presented programmers with a steep learning curve. An initial lack of unambiguous documentation added fuel to the fire, leading developers to exchange their sometimes-frustrating experiences in communities like Stack Overflow.

Challenges Posed by SwiftUI

The reason for the initial confusion of SwiftUI adopters is that SwiftUI doesn’t follow common imperative principles of UIKit. In UIKit, we need to manually implement all view events and handlers of those events, and describe how views are rendered. But in SwiftUI, views are built on declarative principles: Using a concise DSL, we describe what views look like. The how part is left to the system.

SwiftUI views are value types; they don’t store any state and don’t need the developer to implement transitions between states. Instead, they have an identity. Since views are implemented with structs, changing their identity means that the old value is destroyed and the new value is created as a substitution. At this point, the SwiftUI engine redraws the view.

Taking both performance and user interface smoothness into consideration, Apple implemented SwiftUI in such a way that it doesn’t redraw everything at once. The engine isolates only those views with changed identities, and redraws them according to the rules we describe (e.g., animation.) Now, keeping in mind that views are composable, and that every element inside a view is a view itself, view redrawing and animation might not work exactly as we would expect.

Troubleshooting SwiftUI is often a challenge. To understand what happens under the hood, we need debugging. But how does debugging work in a value-oriented environment, where no state is ever preserved? Let’s see how SwiftUI views can be debugged using an example.

Problematic View Example

Let’s start with a simple view with just a couple of text labels, one of which is animated:

struct ContentView: View {


var body: some View {
VStack(spacing: 10.0) {
Text("Your score is")
.scaleEffect(isTitleScaling ? 1.2 : 1.0)
.rotationEffect(
Angle(degrees: isTitleRotating
? .random(in: -10.0...0.0)
: .random(in: 0.0...10.0))
)
Text("\(score)")
}
.onAppear {
withAnimation(
.easeInOut(duration: 0.5).delay(0.1).repeatForever()
) { isTitleScaling.toggle() }
withAnimation(
.easeInOut(duration: 1.0).delay(0.2).repeatForever()
) { isTitleRotating.toggle() }
}
}
private let score: Int
@State private var isTitleRotating = true
@State private var isTitleScaling = true

init(score: Int) {
self.score = score
}

}

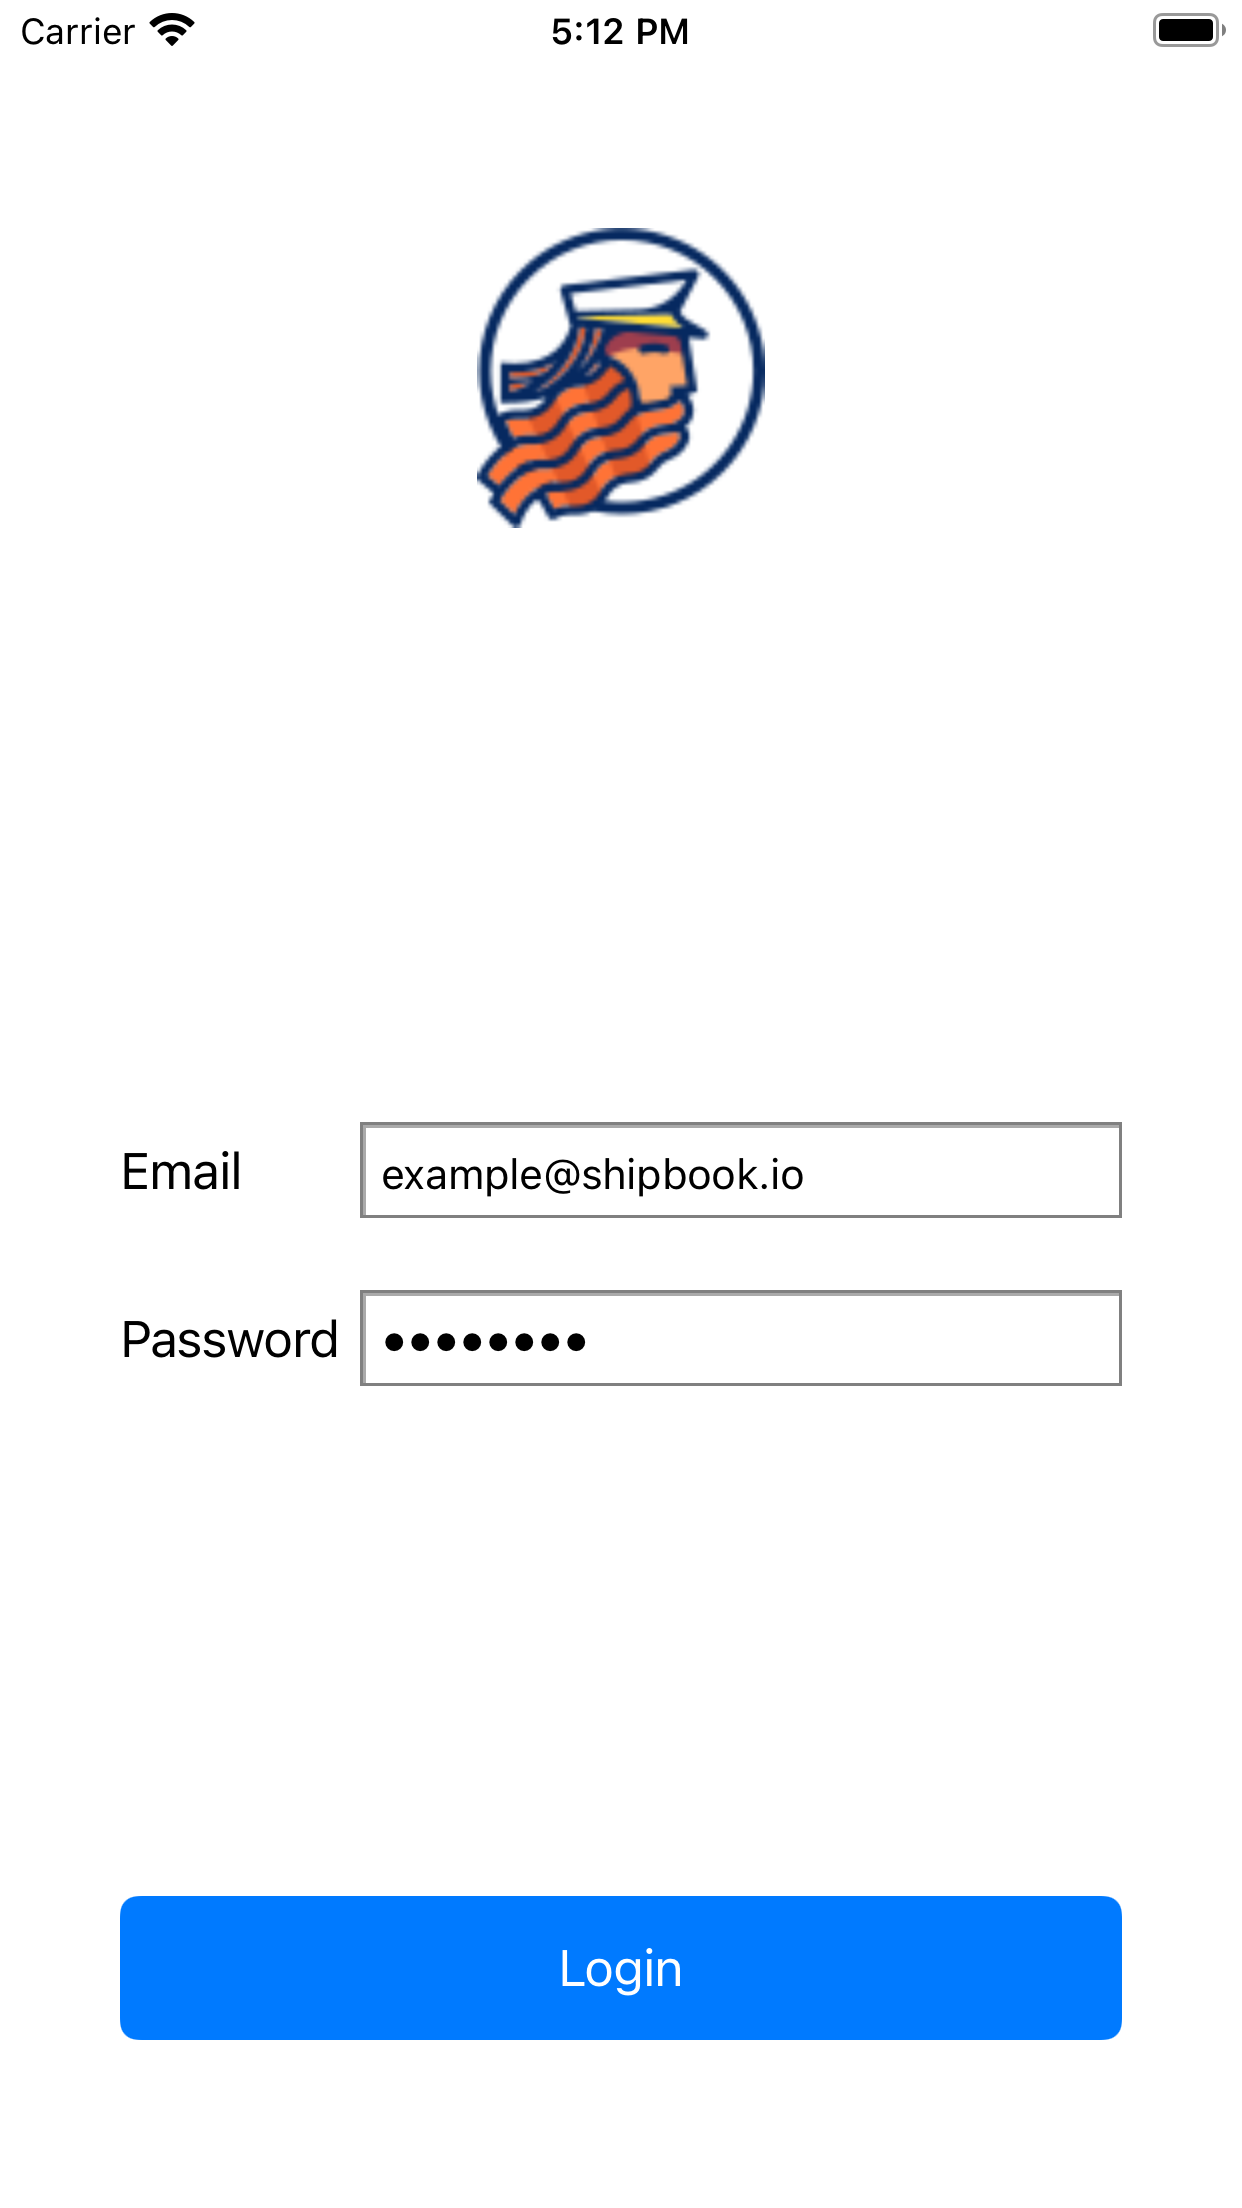
This is what it looks like:

A simple view with animation

Figure 1: A simple view with animation

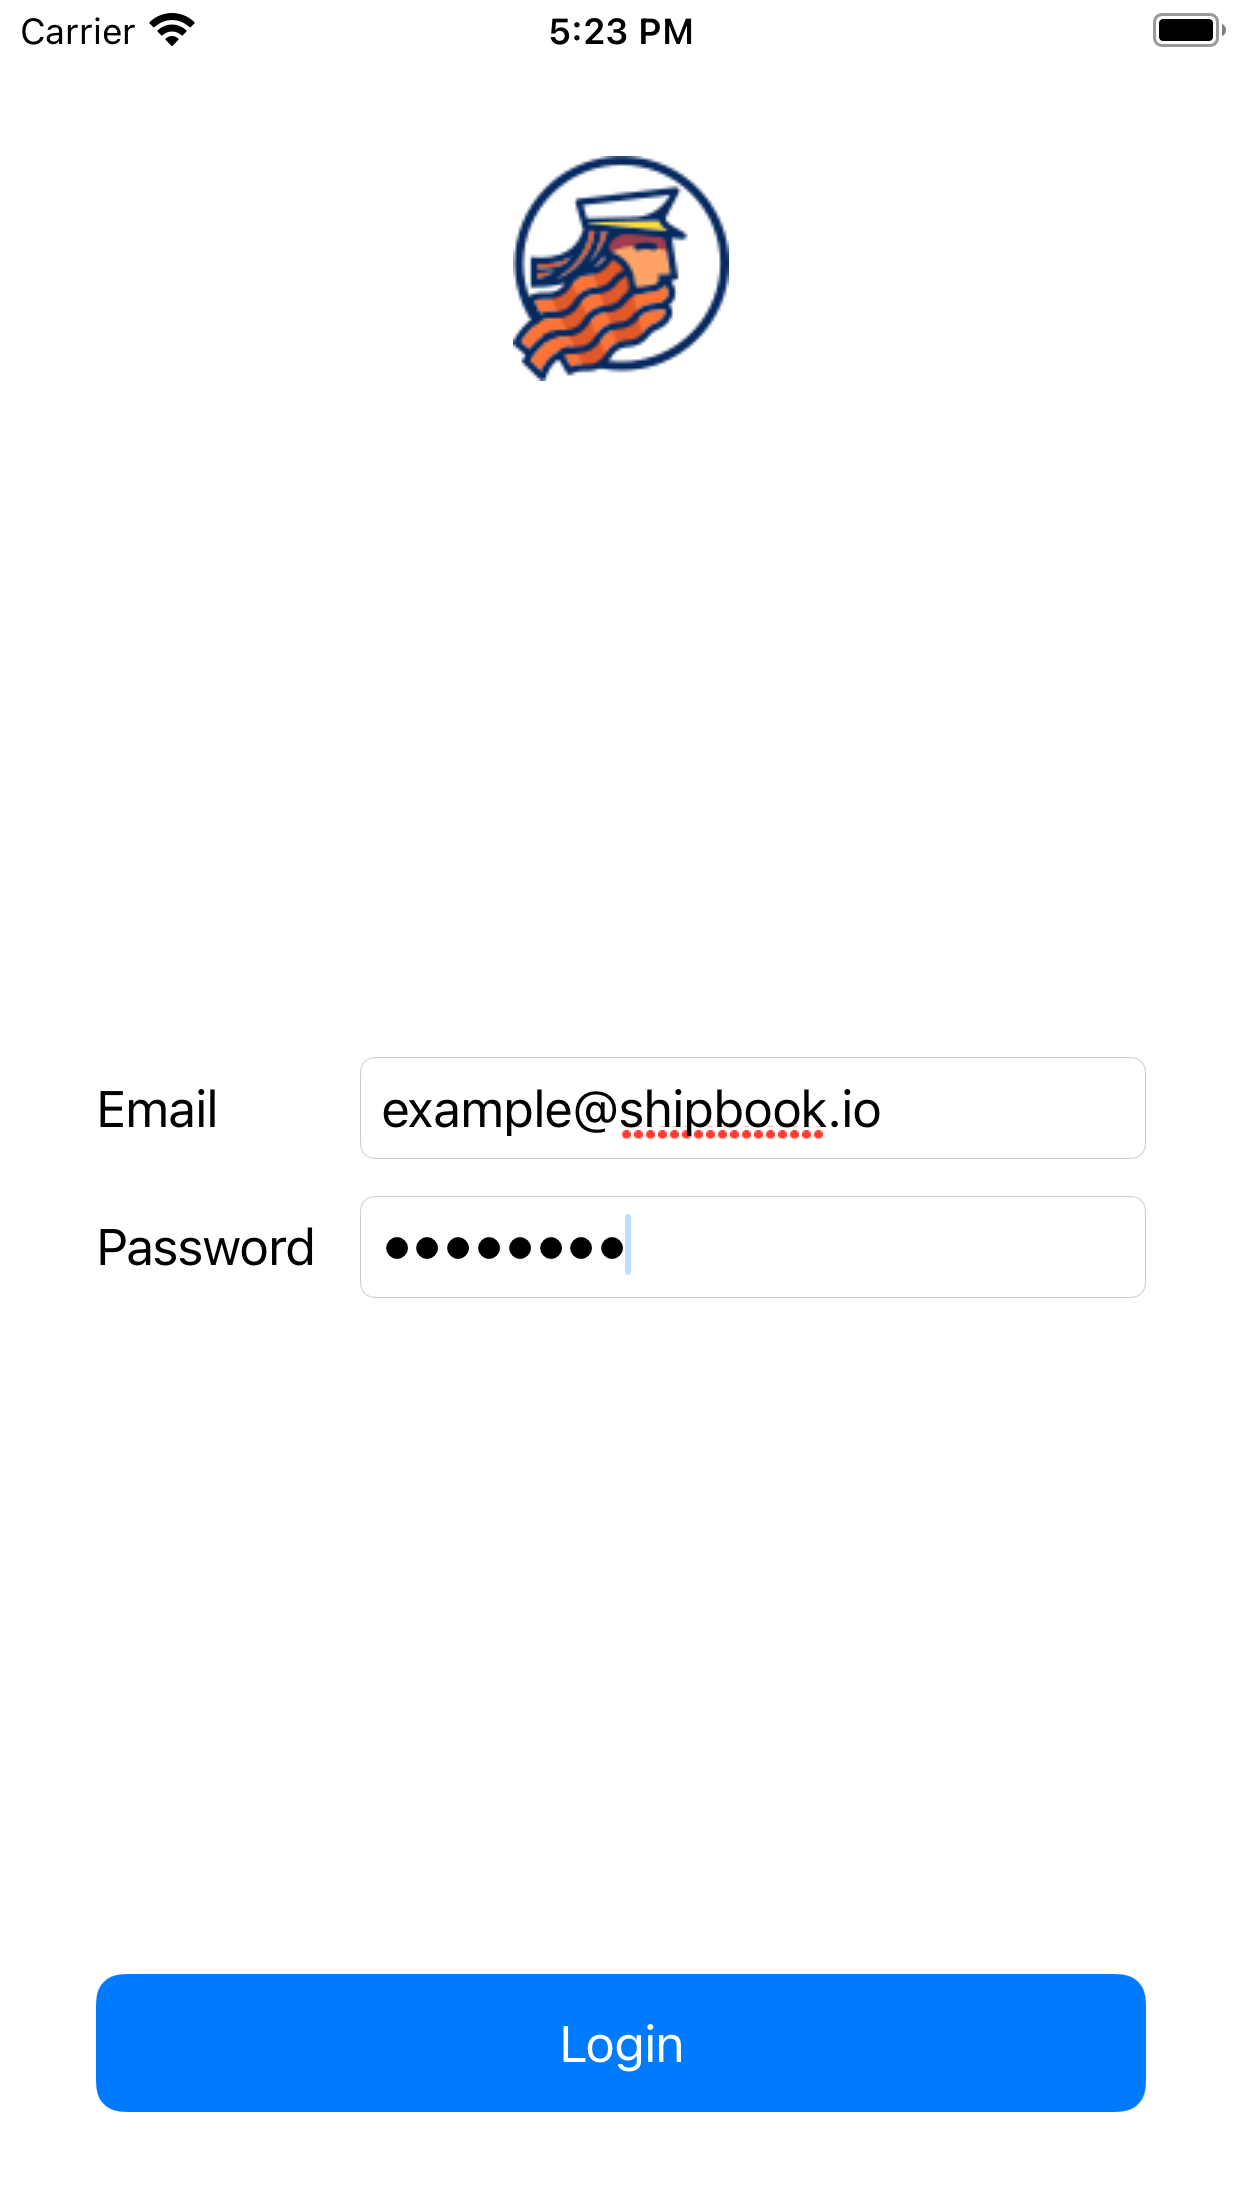
For now, it looks as expected. However, if we make it dynamic by updating score from an outside source, things immediately go south:

Broken animation in a dynamic view

Figure 2: Broken animation in a dynamic view

The animation becomes choppy and breaks when the score number is changed. Here’s the changed version of the view for comparison:

struct ContentView: View {
var body: some View {
VStack(spacing: 10.0) {
Text("Your score is")
.scaleEffect(isTitleScaling ? 1.2 : 1.0)
.rotationEffect(
Angle(degrees: isTitleRotating
? .random(in: -10.0...0.0)
: .random(in: 0.0...10.0))
)
Text("\(viewModel.score)")
}
.onAppear {
withAnimation(
.easeInOut(duration: 0.5).delay(0.1).repeatForever()
) { isTitleScaling.toggle() }
withAnimation(
.easeInOut(duration: 1.0).delay(0.2).repeatForever()
) { isTitleRotating.toggle() }
}
}
@State private var isTitleRotating = true
@State private var isTitleScaling = true
@StateObject private var viewModel = ContentViewModel()
}

The only changed thing is the source of the score text, which is now a @Published property of a view model:

final class ContentViewModel: ObservableObject {
@Published private(set) var score = 0
}

The initial source of the score value changes can be anything: a real time game update, a received response from a remote API, etc.

Let’s try to find the cause of the bug and fix it.

Debugging a View

One of the first things that come to mind when someone mentions debugging is breakpoints. We can go that route and simply put a breakpoint inside the body property. The next time that the ContentView’s identity is changed (i.e., any of its properties receives a new value, and the view is re-created), a redraw is invoked and the breakpoint is triggered. But what good is that?

Apple let slip information about a private static method _printChanges() that prints the reason for the last redraw. To use it, while on the breakpoint, type po Self._printChanges() (mind the Self part, since it’s a static method) in the LLDB console, and it will print out something like “ContentView: _score changed.” Voilà, now we know the reason that the view was redrawn!

Apparently, the timer—being a part of the entire view—triggers a redraw of the entire view, not just the text with the score count. To fix that, we can extract the animated text into a separate view, leaving the score count and its timer on their own:

struct ContentView: View {

var body: some View {
VStack(spacing: 10.0) {
ScoreTitle()
Text("\(viewModel.score)")
}
}
@StateObject private var viewModel = ContentViewModel()

private struct ScoreTitle: View {

var body: some View {
Text("Your score is")
.scaleEffect(isTitleScaling ? 1.2 : 1.0)
.rotationEffect(
Angle(degrees: isTitleRotating
? .random(in: -10.0...0.0)
: .random(in: 0.0...10.0))
)
.onAppear {
withAnimation(
.easeInOut(duration: 0.5).delay(0.1).repeatForever()
) { isTitleScaling.toggle() }
withAnimation(
.easeInOut(duration: 1.0).delay(0.2).repeatForever()
) { isTitleRotating.toggle() }
}
}
@State private var isTitleRotating = true
@State private var isTitleScaling = true

}

}

The fix works just fine:

Fixed animation together with a dynamic view

Figure 3: Fixed animation together with a dynamic view

Logging Redraw Triggers

Unfortunately, if we need to log changes of properties of a dynamic view, the debugger can’t help us. However, SwiftUI provides us with a view modifier onChange(of:perform:) that can be added to a view to track changes of any SwiftUI view property. Here’s an example that uses the Shipbook syntax:

.onChange(of: score) {
Log.d("New score is \($0)")
}

Conclusion

SwiftUI introduced a brand new mindset to building UI on Apple platforms, and learning it is not always easy. While implementing complex views, even an experienced developer might stumble and encounter confusing problems. To avoid unexpected behavior in as many cases as possible, always try to make your views small. This will enable you to reuse them more easily, and will help avoid bugs and failures.

When dealing with dynamic views, it’s even more vital to avoid introducing unwanted view redraws. Properties that trigger updates should affect only the views they change. When implementing animations, it’s always safer to make an animated view a separate SwiftUI View.

While troubleshooting unexpected behavior, the _printChanges method might prove useful. However, for logging purposes, SwiftUI’s view modifier onChanged is the best choice. It’s the perfect place to track changes of observable properties and log them remotely using Shipbook.

· 7 min read
Nikita Lazarev-Zubov

State Restoration in SwiftUI

Many mobile applications base their work on quick user actions: Open the app, do something quickly, close it, and forget about it for a while. Others apps, though, have a more ambitious goal: to become a handy companion to the user. The user stores valuable information in that app, and comes back to it on a regular basis.

When dealing with the applications in the second category, you would usually expect a better-than-average user experience. Specifically, you want the app’s state to be preserved across its launches. But unfortunately, that’s not a default behavior in iOS. Apple’s mobile operating system pursues principles of effective utilization of device resources, and when an application is closed by the user, the system might terminate it any moment in order to free up memory for another application that is currently in use. When it happens, all data that wasn’t explicitly saved on disk is gone.

Let’s look at how we as developers can walk an extra mile in order to provide our users with a better experience by retaining app data.

Traditional Methods

The UI of an app can be determined by flags or stored values that indicate one state or another. In the case of basic types—for instance, user preferences—you can use UserDefaults. This is a lightweight, key-value database provided by iOS to every application on a given device. It’s simple to use:

    UserDefaults.standard.set("Yellow", forKey: "Background")

For a larger quantity of data, you can save the data directly in a file in one of the standard folders at the app’s disposal: the documents directory, the temporary directory, or similar. The syntax is more complicated in this case, because you need to manually decode values into data, and write the latter to a file on disk. For example:

    let folderURL = FileManager
.default
.urls(for: .documentDirectory, in: .userDomainMask)[0]
let fileURL = folderURL.appendingPathComponent("Data")

let string = "I want to store this string"
try string.write(to: fileURL,
atomically: true,
encoding: .utf8)

State Preservation in UIKit

For UIKit’s view controllers, Apple gave us an app state preservation and restoration API, which includes several steps:

  1. The functionality must be enabled in the AppDelegate:

    func application(
    _ application: UIApplication,
    shouldSaveSecureApplicationState coder: NSCoder
    ) -> Bool {
    return true
    }
    func application(
    _ application: UIApplication,
    shouldRestoreSecureApplicationState coder: NSCoder
    ) -> Bool {
    return true
    }
  2. Every restorable view controller must be assigned a restoration ID in Storyboard or in code.

  3. Encoding and decoding of necessary data must be implemented in restorable view controllers:

    override func encodeRestorableState(with coder: NSCoder) {
    super.encodeRestorableState(with: coder)
    // Save data.
    }
    override func decodeRestorableState(with coder: NSCoder) {
    super.decodeRestorableState(with: coder)
    // Restore data.
    }

This is, of course, a simplified overview. In real-world applications, using this API requires significantly more code, which is in line with the overall imperative style of UIKit programming.

The SwiftUI Method

Let’s see whether the modern SwiftUI interface offers something friendlier.

AppStorage

Everything said about UserDefaults and file storage above is, of course, true for SwiftUI apps, too. To simplify the usage of the former, SwiftUI has a dedicated property wrapper: @AppStorage. This wrapper can be added to any property, and it will automatically reflect a value from UserDefaults. In the example below, background always returns the value stored in UserDefaults by the “Background” key, or the default value—“Yellow,” if there’s no key with such name:

    @AppStorage("Background")
var background = "Yellow"

As you may have guessed, assigning a new value to the property also stores it as a new value for the “Background” key. As the icing on the cake, changing the backing stored value invalidates the view, so @AppStorage properties—similar to in the case of @State—are observable.

SceneStorage

As mentioned earlier, UI state preservation is a good practice in achieving a better user experience, however, it’s not critical to the app’s functionality. SwiftUI’s solution, the @SceneStorage property wrapper, is effective but lightweight, and thus is not supposed to be 100% reliable. We’ll come back to the limitations later, but first, let’s look at how it can be used.

@SceneStorage works similarly to @AppStorage with one important difference: The values it stores are only available to the current scene, and thus, the former is more suitable for storing data related directly to the UI of the application. Therefore, this is exactly what we need to implement state preservation in SwiftUI.

Its syntax and usage are straightforward: Just add the wrapper to any view property that needs preservation:

    @SceneStorage("Background")
var background = "Yellow"

In the example above, after view initialization, the value of the background property will be equal to its last value before the application was closed last time. This means that the system preserves the last value across app launches.

Limitations of SceneStorage

Storage keys ("Background," in the example above,) however, require attention. To avoid unexpected bugs, they must be unique across the app scene. Additionally, if you reuse your views, keys should be also unique to each view instance, otherwise the instances will share the same stored value.

This solution’s power is not limitless. It only supports a short list of types, namely Bool, Int, Double, String, URL, and Data. If you need to save any custom type, you should use some other storage technique.

You can, of course, encode anything to Data and still use @SceneStorage, but Apple explicitly warns us against doing that, and against storing anything large in general. The reason is that storing and restoring happens inside a view, and large values may result in a poor performance of the view.

From that limitation, another caveat follows: If you need to preserve something more complicated than a number or string—for example, a navigation path to open a specific screen—you must implement your own logic on how to encode and decode such values. This bears an unfortunate similarity to the “old” ways.

And finally, as the property wrapper’s name suggests, stored values are only accessible within a single scene. There are a couple of implications to this:

  1. If your application supports multiple scenes, each of them has its own dedicated storage which is not shared with other scenes. To share or pass data between scenes, something else would need to be implemented, for example, NSUserActivity.
  2. If the corresponding scene is destroyed (when, for example, the user removed it from the switcher snapshot on iPad, where the app may have multiple scenes,) the data is gone too. Thus, no sensitive or unrecoverable data should rely on the @SceneStorage property wrapper.

Evidently, this @SceneStorage method has a number of restrictions, but it still may come in handy in simple situations.

Conclusion

Old methods of preserving data to restore the state of an iOS application, although not particularly complicated, all rely on you to implement their particular logic and handle corner cases. Modern, SwiftUI-based APIs aim to achieve similar results, and they indeed appear simpler and more concise. However, they have similar limitations to the old methods, and require extra work in more complicated cases. I personally think that the current methods of state preservation in SwiftUI are just a start, and something even better awaits us in a future release of the iOS SDK.

Logging

In some cases you might want to log changes of preserved values to later analyze the state of the UI or to gather additional information necessary to nail a nasty bug. Unfortunately, neither the old method of UI state preservation nor the new one offer a means of doing that automatically. You need to track the change manually, e.g., within the onChange(of:perform:) SwiftUI view modifier, and pass it further to your log system. For example, Shipbook offers a simple in use yet powerful platform to gather your app logs remotely.

· 11 min read
Nikita Lazarev-Zubov

SwiftUI Navigation

Another WWDC has come and gone, leaving in its wake a glut of new features and enhancements. Now that the initial excitement has passed, software developers across the world are thinking about how they can update their apps to benefit from these exciting new offerings. Improvements and evolution come at a cost, with API modernization accompanied by deprecations. SwiftUI is no exception in both regards, its updates offering both benefits and challenges to developers.

One of the most notable updates for SwiftUI is its navigation system. Navigation in SwiftUI has been a pain point for its users, especially with regard to bigger code bases, and Apple’s attention to navigation in this update will put a smile on the faces of many developers. But with this overhaul come new warnings and deprecations. Let’s take a look at SwiftUI’s navigation updates in practice and explore how to implement its features.

Putting SwiftUI Navigation to the Test

Apple’s examples for new updates are usually on the topic of food, but I’m more of a reader than a chef. We’ll build an application called Book Worm using SwiftUI’s new navigation features starring a collection of my favorite programming books.

We can understand what’s new in the field of SwiftUI navigation by building a simple app. The starting point of the app is a simple scrollable list. Tapping on a list item reveals the corresponding book details. From there, a third layer of the UI offers more in-depth information on that specific book.

Without further ado, let’s dive into coding.

Step One: Book List

As a warm-up, let’s create BookListCellView that will represent a single element of the book list. We don’t need anything complicated here, just a couple of text labels:

Stack(alignment: .leading) {
Text(viewModel.authorsString)
Text(viewModel.titleString)
.font(.headline)
}
.padding([.leading, .trailing])

I prefer to have separate view models for my views. Some people argue that it’s not a good idea, but I try to keep as much business and presentation logic out of the view layer as possible, because it helps unit testing and abstracting out layers.

In Book Worm all view models are pretty straightforward, but let’s also look at an underlying Book model that is at the heart of the data service of the app. You can now see what information the app shows to the end user:

struct Book: Decodable {
let authors: [Author]
let brief: String
let id: String
let title: String
let year: String
}
struct Author: Decodable {
let id: String
let name: String
let brief: String?
}

And here’s the body of the list view, BookListView, itself:

List(0..<viewModel.booksCount, id: \.self) {
BookListCellView(
viewModel: viewModel.cellViewModel(forIndex: $0)
)
}

The MainView of the app only has the list for now:

var body: some View {
BookListView(viewModel: viewModel.bookListViewModel)
}

This is how it looks on iOS:

The book list on iOS

Figure 1: The book list on iOS

Not bad. Now let’s implement something more interesting.

Step Two: Book Details

The next step is to add a view for book details. Here’s the body of BookDetailsView:

VStack {
Image(viewModel.imageName)
.resizable()
.scaledToFit()
.frame(width: 200.0)
.padding([.top], 8.0)
.padding([.bottom], 40.0)
Text(viewModel.title)
.font(.title2)
.multilineTextAlignment(.center)
Text(viewModel.authors)
.multilineTextAlignment(.center)
.padding([.bottom], 8.0)
Text(viewModel.year)
.padding([.bottom], 8.0)
}
.padding()
.frame(maxWidth: 400.0)

There’s nothing too complicated here, but we’ve reached the point where we have to start implementing elements of navigation. In the list view, we need a NavigationLink instead of a plain cell view:

List(0..<viewModel.booksCount, id: \.self) { index in
NavigationLink {
BookDetailsView(
viewModel: viewModel.detailsViewModel(forIndex: index)
)
} label: {
BookListCellView(
viewModel: viewModel.cellViewModel(forIndex: index)
)
}
}

NavigationLink allows us to present another view on top of the navigation stack, but we need a stack to get started with that. Prior to iOS 16, there was only one way to put everything into a stack, which was by wrapping the root view by a NavigationView:

NavigationView {
BookListView(viewModel: viewModel.bookListViewModel)
}

This resulted in a traditional “push” behavior on iPhone in portrait orientation, and a two-column view on iPad, macOS, and iPhone in landscape orientation.

This method is now deprecated, but the only thing we need to change is to use NavigationStack instead of NavigationView. The former works well, but in more complicated cases, the new NavigationPath type offers important benefits. It can be stored outside the view layer, allowing us to implement proper routers or coordinators. It’s a huge step toward cleaner SwiftUI apps.

To understand this concept, let’s focus on the book details presentation from the list of books. First, we’ll need an ObservableObject that will store the NavigationPath of the app. The latter represents a data structure that stores the list of all currently presented views. The path can be manipulated as a regular array; you can add or remove view identifiers, and the navigation stack will be modified accordingly. Removing all elements from the path will pop all presented views and reveal the root view.

final class Router: ObservableObject {
@Published var path = NavigationPath()
}

Let’s add a book details destination ID to the router:

final class Router: ObservableObject {
enum Destination: Hashable {
case details(book: Book)
}
func openDetails(of book: Book) {
path.append(Destination.details(book: book))
}
// The rest of the code.
}

Since we’ve been using view models, it’s logical to put references to the router there, but this is where things can start to get messy. In order to initialize the navigation stack in the view, we need to expose the path to it. This introduces the problem of multiple sources of truth: Both the router (or whatever holds the path) and the navigation stack can modify the path. Here’s an extract from BookListView, where the stack is configured:

NavigationStack(path: $viewModel.path) {
List(0..<viewModel.booksCount, id: \.self) {
// ...
}
}

In order to make that possible, we need to “republish” the path in the view model:

final class BookListDefaultViewModel: BookListViewModel {

@Published var path = NavigationPath()
private var cancellables: Set<AnyCancellable> = []

init(/* ... */) {
// ...
router
.$path
.assign(to: \.path, on: self)
.store(in: &cancellables)
}

// The rest of the code.

}

Then the view model can handle taps for the view:

func handleTap(on index: Int) {
router.openDetails(of: bookService.books[index])
}

This method can be trivially called from the view:

List(0..<viewModel.booksCount, id: \.self) { index in
Button {
viewModel.handleTap(on: index)
} label: {
// Style the button.
}
}

In BookListView, we need to provide a way for NavigationStack to know exactly which view it should present when an element is added to the current path. Although the view creation can be delegated, the view still knows about the destination type IDs, which makes things yet messier. Here’s the full body of the view:

NavigationStack(path: $viewModel.path) {
List(0..<viewModel.booksCount, id: \.self) { index in
Button {
viewModel.handleTap(on: index)
} label: {
viewModel.cell(for: index)
}
.buttonStyle(.plain)
}
.navigationTitle("Books")
.navigationDestination(for: Router.Destination.self) {
viewModel.view(for: $0)
}
}

Step Three: Details Placeholder

If you’re like me, you probably don’t like the empty space in the second column. This is an easy fix: We can add a placeholder to the navigation view, and it will be displayed by default. Once you use a navigation link from the left column, it will show the link’s destination view in the second column, replacing the placeholder view.

In iOS 15 it could be achieved by adding a second view into the NavigationView:

NavigationView {
BookListView(viewModel: viewModel.bookListViewModel)
EmptyDetailsView()
}

This is where one of the ugly sides of the NavigationView API reared its head: Nothing stopped us from adding a third view, which would result in the three-column navigation, or a fourth one, a fifth… On macOS, all of them would be nicely rendered as separate columns, but on mobile platforms things went south quickly and we ended up with a lot of undefined behavior. In the best case scenario, excessive columns would simply be invisible, but in the worst case, we had UI glitches and non-working navigation.

In iOS 16 a new NavigationSplitView was introduced to handle multi-column navigation:

NavigationSplitView {
BookListView(viewModel: viewModel.bookListViewModel)
.frame(minWidth: 200.0)
} detail: {
EmptyDetailsView()
.frame(minWidth: 300.0)
}

Here’s what we should have by now:

The book list with details on iPadOS

Figure 2: The book list with details on iPadOS

Step Four: Book Description

Let’s add another view to the app where we can show detailed information about the book. We’ll call it BookDescriptionView:

ScrollView {
Text(viewModel.description)
}
.padding()

We want to open the new view from BookDetailsView, using another navigation link. In iOS 15 the link could be activated with a boolean flag:

var body: some View {
VStack {
// The rest of the contents stay unchanged.
NavigationLink(destination: BookDescriptionView(
viewModel: viewModel.bookDescriptionViewModel
),
isActive: $detailsShown) {
Text("Read more")
}
.padding([.bottom], 8.0)
}
.padding()
.frame(maxWidth: 400.0)
}

This NavigationLink API was another reason the model of navigation in SwiftUI was criticized—it needed a boolean flag to indicate whether the link should present its destination view:

@State private var detailsShown = false

On one hand, the flag makes sense, because SwiftUI views describe the state—the idea that is called the “declarative approach,” as opposed to the imperative one. On the other hand, boolean flags are usually considered as code smell and can become messy if they are too numerous.

In iOS 16 flag-based navigation links are also deprecated in favor of the navigation path. Fortunately, in our simple case, we can get by on an automatic navigation link:

NavigationLink {
BookDescriptionView(
viewModel: viewModel.bookDescriptionViewModel
)
} label: {
Text("Read more")
}

All this works nicely for iOS and iPadOS, but if you run the app on macOS, the “Read more” button will be inactive. One way to overcome this is to wrap BookDetailsView with another NavigationView. On macOS this results in a three-column navigation view, but on iOS devices, you’ll see a lot of UI glitches.

Another option is to use a sheet-styled presentation, but this comes with its own problems. Firstly, it doesn’t fit the app’s visual concept. Secondly, it doesn’t work out of the box for macOS, so we would need to implement additional means for closing the sheet. Thirdly, determining size for the sheet would be tricky and would probably require us to use UIKit APIs like UIScreen. And fourthly, sheet presentations on SwiftUI require another boolean flag: isPresented.

In other words, this isn’t something you could write once and run anywhere.

Instead, let’s return to Book Worm and add a third column to our navigation model using new iOS 16 NavigationSplitView:

NavigationSplitView {
BookListView(viewModel: viewModel.bookListViewModel)
.frame(minWidth: 200.0)
} content: {
EmptyDetailsView()
.frame(minWidth: 300.0)
} detail: {
EmptyView()
}

Explicitly named parameters content and detail remove the uncertainty of the indefinite set of views inside NavigationView’s content. If you want a two-column navigation, you just need to remove the content parameter.

Optionally, we could specify a columnVisibility argument for the NavigationSplitView initializer. It takes a Binding to a NavigationSplitViewVisibility variable. This new argument solves another problem with multi-column presentation in SwiftUI prior to iOS 16, namely the need to use UIKit and UISplitViewController to define the visibility of columns. This is how it looks if we want to keep all three columns constantly visible:

NavigationSplitView(columnVisibility: .constant(.all)) {
// ...
}

This is how the three-column navigation view looks on macOS:

The book list with details and description in a separate view on macOS

Figure 3: The book list with details and description in a separate view on macOS

Here you can download the final version of the app to play with.

Conclusion

With the iOS 16 release, SwiftUI continues to evolve. Along with various new classes, methods, and techniques, we are also starting to see deprecations. This suggests that SwiftUI is no longer a novelty, but rather a serious way to build your applications.

Since SwiftUI was first released, developers have been struggling with creating clean and maintainable navigation in their big code bases. Apple has responded to this problem, and the new SwiftUI navigation types are a major step toward an easier build and maintain experience for developers. The system still has room for improvement, but knowing Apple, we won’t have to wait long for an even sleeker navigation experience for users and developers alike.

· 11 min read
Kustiawanto Halim

Swiftui vs Storyboard

Introduction

In 2019, Apple introduced SwiftUI as a brand-new user interface foundation for iOS, tvOS, macOS, and watchOS. Since then, it has rapidly evolved into a new paradigm that is altering how developers view UI development for iOS apps. SwiftUI enables iOS developers to create a user interface with a single set of tools and APIs using declarative languages. Say goodbye to cumbersome UIKit code.

In contrast, storyboards, which were introduced w ith iOS 5, save you time when you’re developing iOS applications by allowing you to create and design user interfaces in one Interface Builder, while simultaneously defining business logic. You can use storyboards to prototype and design numerous ViewController views in one file, as well as to create transitions between them.

In this article, we will compare SwiftUI and storyboards. Hint: SwiftUI is more powerful.

Imperative UI vs. Declarative UI

To understand the differences between SwiftUI and storyboards, you first need some background on the imperative and declarative programming paradigms.

Imperative UI

Prior to SwiftUI, developers had to use different frameworks to create a platform-specific application: UIKit for iOS and tvOS apps, AppKit for macOS apps, and WatchKit for watchOS apps. These three event-driven UI frameworks used the imperative programming paradigm, which involves prototyping or modeling the UI application design. In imperative programming, you define the actions that modify the state of the machine, focusing on the “how,” rather than the “what.”

For example, if you want to create a login form screen using a storyboard, your storyboard source code will look like this:

alt_text

Figure 1: XML file of login form with a storyboard

The XML file of the storyboard is quite messy, so you need Interface Builder to “translate” the XML file to be more readable for the developers. Here is a screenshot of the storyboard’s Interface Builder for the login form screen:

Interface Builder for the login form

Figure 2: Interface Builder for the login form

After finishing the UI of the application in the storyboard, you also need to define the business logic in the ViewController file. This is how it looks:

import UIKit

class ViewController: UIViewController {

@IBOutlet weak var email: UITextField!
@IBOutlet weak var password: UITextField!
@IBOutlet weak var loginButton: UIButton!

override func viewDidLoad() {
super.viewDidLoad()

loginButton.isEnabled = false

email.addTarget(self,
action: #selector(onTextFieldChanged),
for: .editingChanged)

password.addTarget(self,
action: #selector(onTextFieldChanged),
for: .editingChanged)
}

@objc func onTextFieldChanged(_ sender: UITextField) {
sender.text = sender.text?.trimmingCharacters(in: .whitespaces)

guard email.hasText, password.hasText else {
loginButton.isEnabled = false
return
}

loginButton.isEnabled = true
}

@IBAction func loginPressed(_ sender: Any) {
// do some login action here
}

}

Declarative UI

SwiftUI implements the declarative programming paradigm. Unlike imperative programming, declarative programming allows you to define your programs (what they should do and look like in different states), then let them manage shifting between those states. Declarative programming focuses on the “what,” rather than “how” a code is running.

Using SwiftUI, you only need to define what your application looks like inside the ContentView file:

import SwiftUI

struct ContentView: View {
@State var email: String = ""
@State var password: String = ""

var body: some View {

VStack {
Spacer().frame(height: 32)

Image("shipbook-logo-circle")

Spacer()

HStack {
Text("Email")
.frame(width: 80, alignment: .leading)

TextField("[email protected]", text: $email)
.keyboardType(.emailAddress)
.textFieldStyle(.roundedBorder)
}

HStack {
Text("Password")
.frame(width: 80, alignment: .leading)

SecureField("password", text: $password)
.textFieldStyle(.roundedBorder)
}

Spacer()

Button {
// do some login action here
} label: {
Text("Login")
.frame(maxWidth: .infinity)
}
.disabled(email.isEmpty || password.isEmpty)
.buttonStyle(.borderedProminent)
.frame(height: 48)
.padding(.bottom, 32)
}
.padding(.horizontal, 32)
}
}

struct ContentView_Previews: PreviewProvider {
static var previews: some View {
ContentView()
}
}
StoryboardSwiftUI

Figure 3: Comparing the UI of a storyboard (left) and SwiftUI (right)

Framework Support

Here is a summary of what each framework supports:

UIKit (Storyboard)SwiftUI
Platform SupportiOS and tvOS onlyiOS, tvOS, macOS, and watchOS (all platforms)
Minimal Version SupportiOS 5.0iOS 13.0 and Xcode 11
ParadigmImperativeDeclarative
View HierarchyAllowed to be examinedNot allowed to be examined
Live PreviewNot provided; only canvas in Interface BuilderProvided with hot reload

No More Interface Builder in SwiftUI

Prior to SwiftUI, when developers only used Storyboard, they would create a user interface in Interface Builder and produce .storyboard and .xib files in XML format. Interface Builder uses drag-and-drop gestures to add objects into the canvas. After you move objects and position them in the canvas, you also need to connect it to your code, which is written in another file using @IBOutlet and @IBAction. Finding the correct button to create the interface can be confusing because there are so many options.

alt_text

Figure 4: Interface Builder (Source: https://developer.apple.com/)

Design Tools and Live Preview

One of SwiftUI’s most helpful design tools is Live Preview. This is a progressive method of designing, building, and testing the outcome of the application interface in real time, without even running the app. With the Dynamic Replacement feature, every change made in the code will automatically recompile and update the preview screens. Xcode design tools also provide a drag-and-drop design control to arrange objects in the design canvas.

alt_text

Figure 5: SwiftUI design tools and previews (Source: https://developer.apple.com/)

SwiftUI replaces storyboards with code, making it simple to construct reusable views and minimize conflicts caused by the development team's concurrent use of one project.

The Cons of SwiftUI

Since there aren’t many, let's start with SwiftUI's disadvantages:

  • It is only compatible with iOS 13 and Xcode 11. By upgrading the minimum iOS version, some users will not be able to update the application.
  • SwiftUI’s technical community is still not mature, so you can’t obtain much help with complex situations.
  • Debugging user interfaces with SwiftUI is very hard. You cannot explore the view hierarchy in Xcode Previews because SwiftUI renders its view differently than UIKit.

The Pros of SwiftUI

Now let’s discuss SwiftUI's many positive features:

State Management and Binding

SwiftUI differs from Apple's prior UI frameworks, not just in how views and other UI components are built, but also how view-level state is handled throughout a program that utilizes it. SwiftUI provides a built-in state management function. This means that instead of delegates, data sources, or other state management patterns seen in imperative frameworks like UIKit and AppKit (i.e., a third-party framework such as RxSwift or ReSwift), SwiftUI ships with a number of property wrappers that allow you to describe exactly how your data is observed, rendered, and changed by your views.

Here are several state management functions for handling data flow in SwiftUI:

  • @Environment
    This is a property wrapper that can be used to read the value of the view's environment given by its parent. Read more.
  • @State
    You can use this property wrapper type to read and write a value without needing to worry about its management. Read more.
  • @Binding
    This property wrapper type can read and write a value owned by a source of truth defined in other places (using @Published property wrapper). Read more.
  • ObservableObject
    A type of object has a publisher. You can listen to the publisher changes using the objectWillChange function. Read more.

Mixable with UIKit

Apple added support for backward compatibility so that you can add SwiftUI to existing UIKit projects or vice versa. To be able to import SwiftUI view into UIKit, you can use UIHostingController, which will hold all of the subviews of ViewController in order to become a single SwiftUI view.

It is essential to understand that SwiftUI does not replace UIKit. Instead, SwiftUI is constructed on top of UIKIt, and gives you an extra layer of abstractions. To be able to import UIKit view inside SwiftUI, you can use UIViewRepresentable.

There are three functions you need to override in order to use this protocol:

  • makeUIView(:) to create and configure the initial state of object view
  • updateUIView(:context:) to update the state of object view when needed by SwiftUl
  • makeCoordinator() to create a Coordinator to communicate the changes of object view with other SwiftUI elements

Cross-Platform User Interface

Creating a user interface will never be easier than when using SwiftUI, since it combines and automatically translates your view into a visual interface element that is suitable for each specific platform (macOS, iOS, watchOS, tvOS, etc.).

alt_text

Figure 6: View rendered for different platforms (Source: https://www.clariontech.com)

For example, as shown above, the Toggle view will look different on different platforms. SwiftUI may also change the colors, padding, and spacing, depending on the platform, container size, control status, and current screen. This ability to cross-platform build for the many operating systems inside the Apple ecosystem means there’s no need to master three distinct frameworks if you want to create an app that works on Apple Watch, Apple TV, MacBook Pro, and iPhone.

Easy-to-Add Animation

When adopting SwiftUI, you can independently animate changes to views or the state of a view, regardless of where the effects occur. SwiftUI takes care of the complexities of the animation logic (combinations, layers, and interruptible animations). You just need to call a single function, .animation(), to a view that you want to animate, add the animation logic inside of it, and, voilà, the animation is applied.

struct ContentView: View {
// …

@GestureState private var isDetectingPress = false

var body: some View {

VStack {
Spacer().frame(height: 32)

Image("shipbook-logo-circle")
.scaleEffect(isDetectingPress ? 2 : 1)
.animation(.easeInOut(duration: 4), value: isDetectingPress)
.gesture(
LongPressGesture(minimumDuration: 0.1)
.sequenced(before:DragGesture(minimumDistance: 0))
.updating($isDetectingPress) { value, state, _ in
switch value {
case .second(true, nil):
state = true
default:
break
}
})

Spacer()

// …
}
}

In the example above, you can add a long-press gesture on the Shipbook image to add scaling animation on it. You can then store the gesture state in isDetectingPress and use it as a value of the scaling effect and animation to be triggered.

When to Use Storyboards—and When Not To

So, if SwiftUI is the way of the future, why should you still use storyboards? There are a few explanations that come to mind:

  • You already have a codebase written in storyboards and XIB. This likely required a lot of effort.
  • You are a novice. Storyboards are a simple way to get started with iOS coding.
  • Storyboards need less coding and are more aesthetically appealing. However, if your user interface grows to be very complex, storyboards can rapidly become difficult to use.

Despite these use cases, there are several disadvantages to using storyboards in iOS projects:

  • Storyboards and the Interface Builder are difficult to grasp. The Interface Builder has so many tabs and buttons that it's like studying Photoshop.
  • The interaction between the code and the storyboard is complicated. A string match will be used numerous times to connect your code to the storyboard.
  • If you misspell or use the incorrect string, your application will crash at runtime! This is not a good experience for users or developers.
  • Modifications to storyboards are hard to trace. Because storyboards aren't written in human-readable code, resolving merge conflicts is extremely difficult. In particular, this happens if you have a huge team of developers all working on the same storyboard.

Conclusion

It’s important to consider the pros and cons of the UI development framework and features that are suitable for your application. If you are creating a new application and don't care about supporting the old version of iOS, SwiftUI is the obvious choice. It’s also possible to migrate your legacy code to SwiftUI because SwiftUI can be combined with UIKit and storyboards.


Shipbook gives you the power to remotely gather, search and analyze your user logs and exceptions in the cloud, on a per-user & session basis.