
Introduction to Kotlin Multiplatform Mobile
Understanding Kotlin Multiplatform Mobile
What is KMM?
Kotlin Multiplatform Mobile is an extension of the Kotlin programming language that enables the sharing of code between different platforms, including Android and iOS. Unlike traditional cross-platform frameworks that rely on a common runtime, KMM allows developers to write platform-specific code while sharing business logic and other non-UI code.
Key Advantages of KMM
- Code Reusability: With KMM, you can write and maintain a single codebase for your business logic, reducing duplication and ensuring consistency across platforms.
- Native Performance: KMM leverages the native capabilities of each platform, providing performance comparable to writing platform-specific code. All your KMM code is built to platform-specific code before running on any device following all the latest best practices eventually providing users peak native capabilities.
- Interoperability: KMM seamlessly integrates with existing codebases and libraries, allowing developers to leverage platform-specific features when needed.
- Incremental Adoption: You can introduce KMM gradually into your projects, starting with shared modules and gradually expanding as needed.
KMM vs. Flutter
While KMM and Flutter do have a lot in common in terms of functionality and end result, they have very different approaches to reaching it:
- Programming language - KMM uses Kotlin, a language known for its conciseness, safety features and strong null-safety. Flutter on the other hand uses Dart, developed by Google and specifically targeted at building UIs through a reactive programming model
- Architecture - KMM focuses on sharing business logic between platforms and encourages a modular architecture by mixing sharing of core business logic modules with platform specific UI implementations. Flutter embraces a reactive and declarative UI framework with a widget-based architecture. The entire UI in Flutter is expressed as a hierarchy of widgets and doesn’t have a clear separation between business logic and UI.
- UI Framework - KMM doesn’t have a UI framework of its own, but rather leverages native UI frameworks like Jetpack Compose for Android and SwiftUI for iOS. Flutter proposes a custom UI framework that is equipped with a rich set of customisable widgets. The UI is rendered via the Skia graphics engine which is aimed at delivering a consistent look and feel across all supported platforms.
- Community and ecosystem - KMM is actively developed by JetBrains and has been gaining a lot of traction since inception by drawing many benefits from the Kotlin community. Flutter is maintained by Google and has a large and active community. It’s constantly growing its ecosystem of packages and plugins.
- Integration with native code - KMM seamlessly integrates with native codebases making its adoption effortless. Flutter relies on a platform channel mechanism to communicate with native code. It can invoke platform-specific functionality, but requires additional setup.
- Performance - Kotlin compiles to native code, providing near-native performance. Flutter uses a custom rendering engine (Skia) and introduces an additional layer between the app and the platform, potentially affecting performance in graphic-intensive applications.
- Platform support - KMM currently supports Android and iOS devices with planned support for other platforms in the future. Flutter has a broader range of supported platforms including Android, iOS, web, desktop (yet in experimental stage) and embedded devices.
The choice between KMM and Flutter still remains mostly subjective and is still dependent on language and architecture preferences, specific project requirements and of course - personal choice.
Creating a New KMM Project
Creating a new KMM project is a straightforward process:
- Open Android Studio:
- Select "Create New Project."
- Choose the "Kotlin Multiplatform App" template.
- Configure Project Settings:
- Provide a project name, package name, and choose a location for your project.
- Configure Platforms:
- Choose names for the platform-specific and shared modules (Android, iOS and shared).
- Configure the Kotlin version for each platform module.
- Finish:
- Click "Finish" to let Android Studio set up your KMM project.
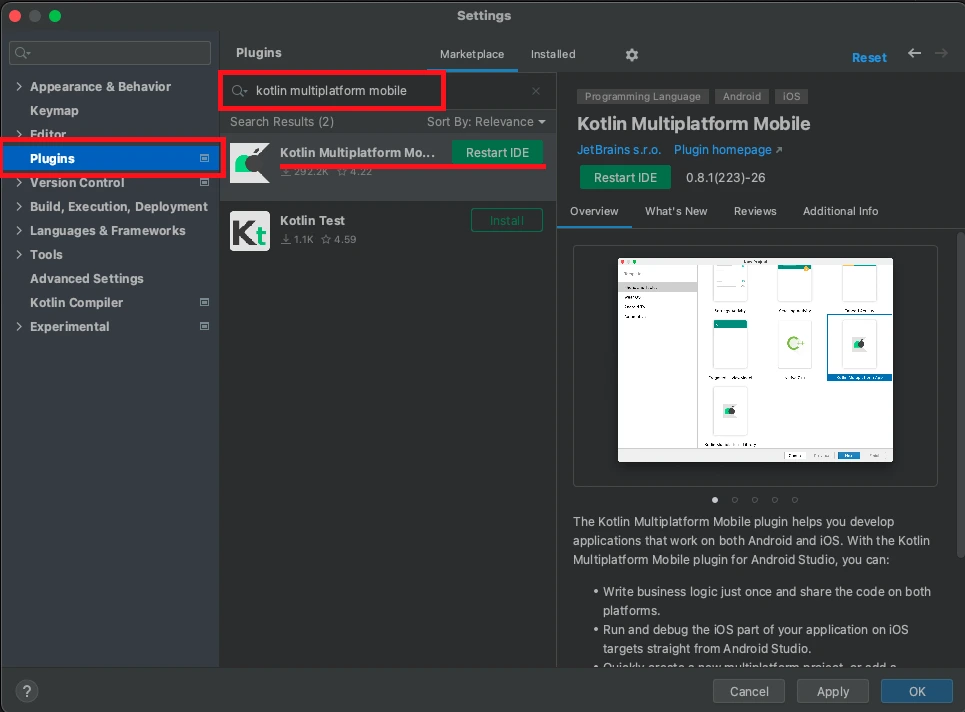
If you don’t see the “Kotlin Multiplatform App” template then open Settings > Plugins, type “Kotlin Multiplatform Mobile”, install the plugin and restart your IDE.
Project Structure and Organization
Understanding the structure of a KMM project is crucial for efficient development:
MyKMMApp
|-- shared
|   |-- src
|       |-- commonMain
|       |-- androidMain
|       |-- iosMain
|-- androidApp
|-- iosApp
- shared: Contains code shared between Android and iOS.
- commonMain: Shared code that can be used on both platforms.
- androidMain: Platform-specific code for Android.
- iosMain: Platform-specific code for iOS.
- androidApp: Android-specific module containing code and resources specific to the Android platform.
- iosApp: iOS-specific module containing code and resources specific to the iOS platform.
Shared Code Basics: Writing Platform-Agnostic Logic
Now that you have your Kotlin Multiplatform Mobile (KMM) project set up, it's time to dive into the heart of KMM development—writing shared code. In this chapter, we'll explore the fundamentals of creating platform-agnostic logic that can be used seamlessly across Android and iOS.
Identifying Common Code Components
The essence of KMM lies in identifying and isolating the components of your code that can be shared between platforms. Common code components typically include:
- Business Logic: The core functionality of your application that is independent of the user interface or platform.
- Data Models: Definitions for your application's data structures that remain consistent across platforms.
- Utilities: Helper functions and utilities that don't rely on platform-specific APIs.
Identifying these shared components sets the foundation for maximizing code reuse and maintaining a consistent behavior across different platforms.
Writing Business Logic in Shared Modules
In your KMM project, the commonMain module is where you'll write the majority of your shared code. Here's a simple example illustrating a shared class with business logic:
// shared/src/commonMain/kotlin/com.example.mykmmapp/Calculator.kt

package com.example.mykmmapp

class Calculator {
    fun add(a: Int, b: Int): Int {
        return a + b
    }

    fun multiply(a: Int, b: Int): Int {
        return a * b
    }
}
In this example, the Calculator class provides basic mathematical operations and can be used across both Android and iOS platforms.
Ensuring Platform Independence
While writing shared code, it's crucial to avoid dependencies on platform-specific APIs. Instead, use Kotlin's expect/actual mechanism to provide platform-specific implementations where necessary.
Here's an example illustrating the use of expect/actual for platform-specific logging. In order to stay consistent while writing your code it’s recommended to use the same service provider on both platforms, for example Shipbook’s logger providing all required dependencies for both platforms. For the sake of simplicity, the example given below is using the native loggers of each platform.
Code in shared module:
// shared/src/commonMain/kotlin/com.example.mykmmapp/Logger.kt

package com.example.mykmmapp

expect class Logger() {
    fun log(message: String)
}
Code in Android’s module:
// shared/src/androidMain/kotlin/com.example.mykmmapp/AndroidLogger.kt

package com.example.mykmmapp

actual class Logger actual constructor() {
    actual fun log(message: String) {
        android.util.Log.d("MyKMMApp", message)
    }
}
Code in iOS’s module:
// shared/src/iosMain/kotlin/com.example.mykmmapp/IOSLogger.kt

package com.example.mykmmapp

import platform.Foundation.NSLog

actual class Logger actual constructor() {
    actual fun log(message: String) {
        NSLog("MyKMMApp: %@", message)
    }
}
By employing expect/actual declarations, you ensure that the shared code can utilize platform-specific features without compromising the platform independence of the core logic.
Platform-Specific Code: Adapting for Android
Now that you've laid the groundwork with shared code, it's time to explore the intricacies of adapting your Kotlin Multiplatform Mobile (KMM) project for the Android platform.
Leveraging Platform-Specific APIs
One of the advantages of KMM is the ability to seamlessly integrate with platform-specific APIs. In Android development, you can use the Android-specific APIs in the androidMain module. Here's an example of using the Android Toast API:
// shared/src/androidMain/kotlin/com.example.mykmmapp/Toaster.kt

package com.example.mykmmapp

import android.content.Context
import android.widget.Toast

actual class Toaster(private val context: Context) {
    actual fun showToast(message: String) {
        Toast.makeText(context, message, Toast.LENGTH_SHORT).show()
    }
}
In this example, the Toaster class is designed to display Toast messages on Android. The class takes an Android Context as a parameter, allowing it to interact with Android-specific features.
Managing Platform-Specific Dependencies
When working with platform-specific code, it's common to have dependencies that are specific to each platform. KMM provides a mechanism to manage platform-specific dependencies using the expect and actual declarations. For example, if you need a platform-specific library for Android, you can declare the expected behavior in the shared module and provide the actual implementation in the Android module.
Here is a shared class and function intended to fetch data from an online source making a HTTP request:
// shared/src/commonMain/kotlin/com.example.mykmmapp/NetworkClient.kt

package com.example.mykmmapp

expect class NetworkClient() {
    suspend fun fetchData(): String
}
Android-specific implementation:
//shared/src/androidMain/kotlin/com.example.mykmmapp/AndroidNetworkClient.kt

package com.example.mykmmapp

import okhttp3.OkHttpClient
import okhttp3.Request

actual class NetworkClient actual constructor() {
    private val client = OkHttpClient()

    actual suspend fun fetchData(): String {
        val request = Request.Builder()
            .url("https://api.example.com/data")
            .build()

        val response = client.newCall(request).execute()
        return response.body?.string() ?: "Error fetching data"
    }
}
In this example, the NetworkClient interface is declared in the shared module, and the Android-specific implementation is provided in the androidMain module using the OkHttp library.
Building UI with Kotlin Multiplatform
User interfaces play a pivotal role in mobile applications, and with Kotlin Multiplatform Mobile (KMM), you can create shared UI components that work seamlessly across Android and iOS. In this chapter, we'll explore the basics of building UI with KMM, creating shared UI components, and handling platform-specific UI differences.
Overview of KMM UI Capabilities
KMM provides a unified approach to UI development, allowing you to share code for common UI elements while accommodating platform-specific nuances. The shared UI code resides in the “commonMain” module, and platform-specific adaptations are made in the “androidMain” and “iosMain” modules. A more convenient, but advanced approach to designing shared components would be to use a multiplatform composer tool, like the one provided by JetBrains named Compose Multiplatform. While still young in its development, it already provides powerful approach to writing UI logic reusable in many platforms like:
- Android (including Jetpack Compose, hence the name “Compose Multiplatform)
- iOS (currently in Alpha, but unfortunately without support for SwiftUI)
- Desktop (Windows, Mac and Linux)
- Web (but still in Experimental stage)
Creating Shared UI Components
Let's consider a simple example of creating a shared button component:
// shared/src/commonMain/kotlin/com.example.mykmmapp/Button.kt

package com.example.mykmmapp

expect class Button {
    fun render(): Any
}
In this example, the Button interface is declared in the shared module, and the actual rendering implementation is provided in the platform-specific modules.
Android Implementation
// shared/src/androidMain/kotlin/com.example.mykmmapp/AndroidButton.kt

package com.example.mykmmapp

import android.widget.Button

actual class Button actual constructor(private val text: String) {
    actual fun render(): Button {
        val button = Button(AndroidContext.appContext)
        button.text = text
        return button
    }
}
iOS Implementation
// shared/src/iosMain/kotlin/com.example.mykmmapp/IOSButton.kt

package com.example.mykmmapp

import platform.UIKit.UIButton
import platform.UIKit.UIControlStateNormal

actual class Button actual constructor(private val text: String) {
    actual fun render(): UIButton {
        val button = UIButton()
        button.setTitle(text, UIControlStateNormal)
        return button
    }
}
In these platform-specific implementations, we use Android's “Button” and iOS's “UIButton” to render the button with the specified text.
Storing Platform-Specific Resources
To manage platform-specific resources such as layouts or styles, you can utilize the “androidMain/res” and “iosMain/resources” directories. This allows you to tailor the UI experience for each platform without duplicating code.
Interoperability: Bridging the Gap Between Kotlin and Native Code
Kotlin Multiplatform Mobile (KMM) doesn't exist in isolation; it seamlessly integrates with native code on each platform, allowing you to leverage platform-specific libraries and functionalities. In this chapter, we'll explore the intricacies of interoperability, incorporating platform-specific libraries, communicating between shared and platform-specific code, and addressing data serialization/deserialization challenges.
Incorporating Platform-Specific Libraries
One of the strengths of KMM is its ability to integrate with existing platform-specific libraries. This allows you to leverage the rich ecosystems of Android and iOS while maintaining a shared codebase. Let's consider an example where we integrate an Android-specific library for image loading.
Shared Code Interface
// shared/src/commonMain/kotlin/com.example.mykmmapp/ImageLoader.kt

package com.example.mykmmapp

expect class ImageLoader {
    fun loadImage(url: String): Any
}
Android Implementation
// shared/src/androidMain/kotlin/com.example.mykmmapp/AndroidImageLoader.kt

package com.example.mykmmapp

import android.widget.ImageView
import com.bumptech.glide.Glide

actual class ImageLoader actual constructor() {
    actual fun loadImage(url: String): ImageView {
        val imageView = ImageView(AndroidContext.appContext)
        Glide.with(AndroidContext.appContext).load(url).into(imageView)
        return imageView
    }
}
In this example, we've integrated the popular Glide library for Android to load images. The ImageLoader interface is declared in the shared module, and the actual implementation utilizes Glide in the Android-specific module.
Communicating Between Shared and Platform-Specific Code
Effective communication between shared and platform-specific code is crucial for building cohesive applications. KMM provides mechanisms for achieving this, including the use of interfaces, callbacks, and delegation.
Callbacks and Delegation
// shared/src/commonMain/kotlin/com.example.mykmmapp/CallbackListener.kt

package com.example.mykmmapp

interface CallbackListener {
    fun onResult(data: String)
}
Usage in Android-specific module
//shared/src/androidMain/kotlin/com.example.mykmmapp/AndroidCallbackHandler.kt

package com.example.mykmmapp

actual class AndroidCallbackHandler {
    private var callback: CallbackListener? = null

    fun setCallback(callback: CallbackListener) {
        this.callback = callback
    }

    fun performCallback(data: String) {
        callback?.onResult(data)
    }
}
In this example, the “AndroidCallbackHandler” class in the Android-specific module utilizes the shared callback interface and acts as an intermediary for callback communication between shared code and Android-specific code.
Handling Data Serialization/Deserialization
When dealing with shared data models, KMM provides tools for efficient data serialization and deserialization. The “kotlinx.serialization” library simplifies the process of converting objects to and from JSON, facilitating seamless communication between shared and platform-specific code.
Add Serialization Dependency
Ensure that your shared module has the kotlinx.serialization dependency added to its “build.gradle.kts” or “build.gradle” file:
commonMain {
    dependencies {
        implementation "org.jetbrains.kotlinx:kotlinx-serialization-json:1.3.0"
    }
}
Define Serializable Data Class:
Create a data class that represents the structure of your serialized data. Annotate it with “@Serializable”:
// shared/src/commonMain/kotlin/com.example.mykmmapp/User.kt

package com.example.mykmmapp

import kotlinx.serialization.Serializable

@Serializable
data class User(val id: Int, val name: String, val email: String)
Serialize Data to JSON:
Use the “Json.encodeToString” function to serialize an object to JSON:
// shared/src/commonMain/kotlin/com.example.mykmmapp/UserService.kt

package com.example.mykmmapp

import kotlinx.serialization.encodeToString
import kotlinx.serialization.json.Json

class UserService {
    fun getUserJson(user: User): String {
        return Json.encodeToString(user)
    }
}
Deserialize JSON to Object:
Use the “Json.decodeFromString” function to deserialize JSON to an object:
// shared/src/commonMain/kotlin/com.example.mykmmapp/UserService.kt

package com.example.mykmmapp

import kotlinx.serialization.decodeFromString
import kotlinx.serialization.json.Json

class UserService {
    fun getUserFromJson(json: String): User {
        return Json.decodeFromString(json)
    }
}
Debugging and Testing in a Kotlin Multiplatform Project
Debugging and testing are critical aspects of the software development lifecycle, ensuring the reliability and quality of your Kotlin Multiplatform Mobile (KMM) project. In this chapter, we'll explore strategies for debugging shared code, writing tests for shared and platform-specific code, and running tests on Android.
Writing Tests for Shared Code
Testing shared code is crucial for ensuring its correctness and reliability. KMM supports writing tests that can be executed on both Android and iOS platforms. The “kotlin.test” framework is commonly used for writing tests in the shared module.
Sample Test in the Shared Module
// shared/src/commonTest/kotlin/com.example.mykmmapp/CalculatorTest.kt

package com.example.mykmmapp

import kotlin.test.Test
import kotlin.test.assertEquals

class CalculatorTest {
    @Test
    fun testAddition() {
        val calculator = Calculator()
        val result = calculator.add(3, 4)
        assertEquals(7, result)
    }

    @Test
    fun testMultiplication() {
        val calculator = Calculator()
        val result = calculator.multiply(2, 5)
        assertEquals(10, result)
    }
}
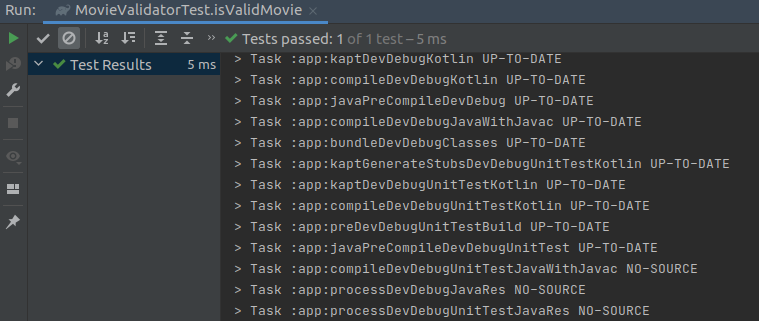
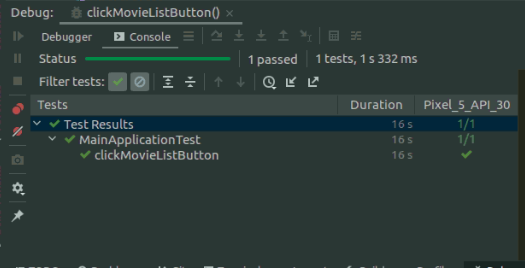
Running Tests on Android
Running tests on Android and iOS involves using Android Studio's and xCode’s testing tools. Ensure that your Android and iOS test configurations are set up correctly, and then execute your tests as you would with standard Android and iOS tests.
Testing Platform-Specific Code
While shared code tests focus on business logic, platform-specific code tests ensure the correct behavior of platform-specific implementations. Write tests for Android and iOS code using their respective testing frameworks.
Android Unit Test Example
// shared/src/androidTest/kotlin/com.example.mykmmapp/AndroidImageLoaderTest.kt

package com.example.mykmmapp

import androidx.test.ext.junit.runners.AndroidJUnit4
import org.junit.Test
import org.junit.runner.RunWith
import kotlin.test.assertTrue

@RunWith(AndroidJUnit4::class)
class AndroidImageLoaderTest {
    @Test
    fun testImageLoading() {
        val imageLoader = ImageLoader()
        val imageView = imageLoader.loadImage("https://example.com/image.jpg")
        assertTrue(imageView is android.widget.ImageView)
    }
}
iOS Unit Test Example
// shared/src/iosTest/kotlin/com.example.mykmmapp/IosImageLoaderTest.kt

import XCTest
import MyKmmApp // Assuming this is your Kotlin Multiplatform module name

class IosImageLoaderTest: XCTestCase {

    func testImageLoading() {
        let imageLoader = ImageLoader()
        let imageView = imageLoader.loadImage("https://example.com/image.jpg")
        XCTAssertTrue(imageView is UIImageView)
    }
}
integrating Kotlin Multiplatform Mobile with Existing Android Projects
Integrating Kotlin Multiplatform Mobile (KMM) with existing Android projects allows you to gradually adopt cross-platform development while leveraging your current codebase. In this chapter, we'll explore the process of adding KMM modules to existing projects, sharing code between new and existing modules, and managing dependencies.
Adding KMM Modules to Existing Projects
-
Add KMM Module
- Navigate to "File" > "New" > "New Module..."
- Choose "Kotlin Multiplatform Shared Module"
- Follow the prompts to configure the module settings.
-
Configure Dependencies
Ensure that your Android module and KMM module are appropriately configured to share code and dependencies. Update the settings.gradle and build.gradle files as needed.
// settings.gradle

include ':app', ':shared', ':kmmModule'
// app/build.gradle
dependencies {
implementation project(":shared")
implementation project(":kmmModule")
} -
Sharing Code
You can now share code between the Android module and the KMM module. Place common code in the “commonMain” source set of the KMM module.
// shared/src/commonMain/kotlin/com.example.mykmmapp/CommonCode.kt

package com.example.mykmmapp

fun commonFunction() {
    println("This function is shared between Android and KMM.")
} -
Run and Test
Run your Android project, ensuring that the shared code functions correctly on both platforms.
Managing Dependencies
Shared Dependencies
Ensure that dependencies required by shared code are included in the KMM module's “build.gradle.kts” file.
// shared/build.gradle.kts

kotlin {
    android()
    ios()
    sourceSets {
        val commonMain by getting {
            dependencies {
                implementation("org.jetbrains.kotlinx:kotlinx-coroutines-core:1.5.0")
                // Add other shared dependencies
            }
        }
    }
}
Platform-Specific Dependencies
For platform-specific dependencies, declare them in the respective source sets.
// shared/build.gradle.kts

kotlin {
    android()
    ios()
    sourceSets {
        val androidMain by getting {
            dependencies {
                implementation("com.squareup.okhttp3:okhttp:4.9.0")
                // Add other Android-specific dependencies
            }
        }
        val iosMain by getting {
            dependencies {
                // Add iOS-specific dependencies
            }
        }
    }
}
Conclusion
As we conclude our exploration of Kotlin Multiplatform Mobile (KMM), it's evident that this technology has emerged as a powerful solution for cross-platform mobile app development. By seamlessly bridging the gap between Android and iOS, KMM empowers developers to build robust applications with efficiency and code reusability at its core.
Kotlin Multiplatform Mobile stands as a testament to the evolving landscape of mobile app development. By embracing the principles of code reusability, adaptability, and continuous improvement, you are well-equipped to navigate the complexities of cross-platform development.